When shade dapples your landscape, don’t resent it–– embrace it. You may think a beautiful garden requires full sunlight, but there exist plenty of shade-loving plants that can turn your landscape into a showstopper. From elegant ferns to variegated hostas, we’ll show you how to create a shade garden that’s beautiful, practical, and sustainable.
While some gardeners see shade as a limitation, others see it as an opportunity for a calm, cooling garden. With the right plants and garden decor, a shade garden is the perfect resting spot for those hot summer days.
Here’s what we’ll cover in the guide below:
What is a Shade Garden?

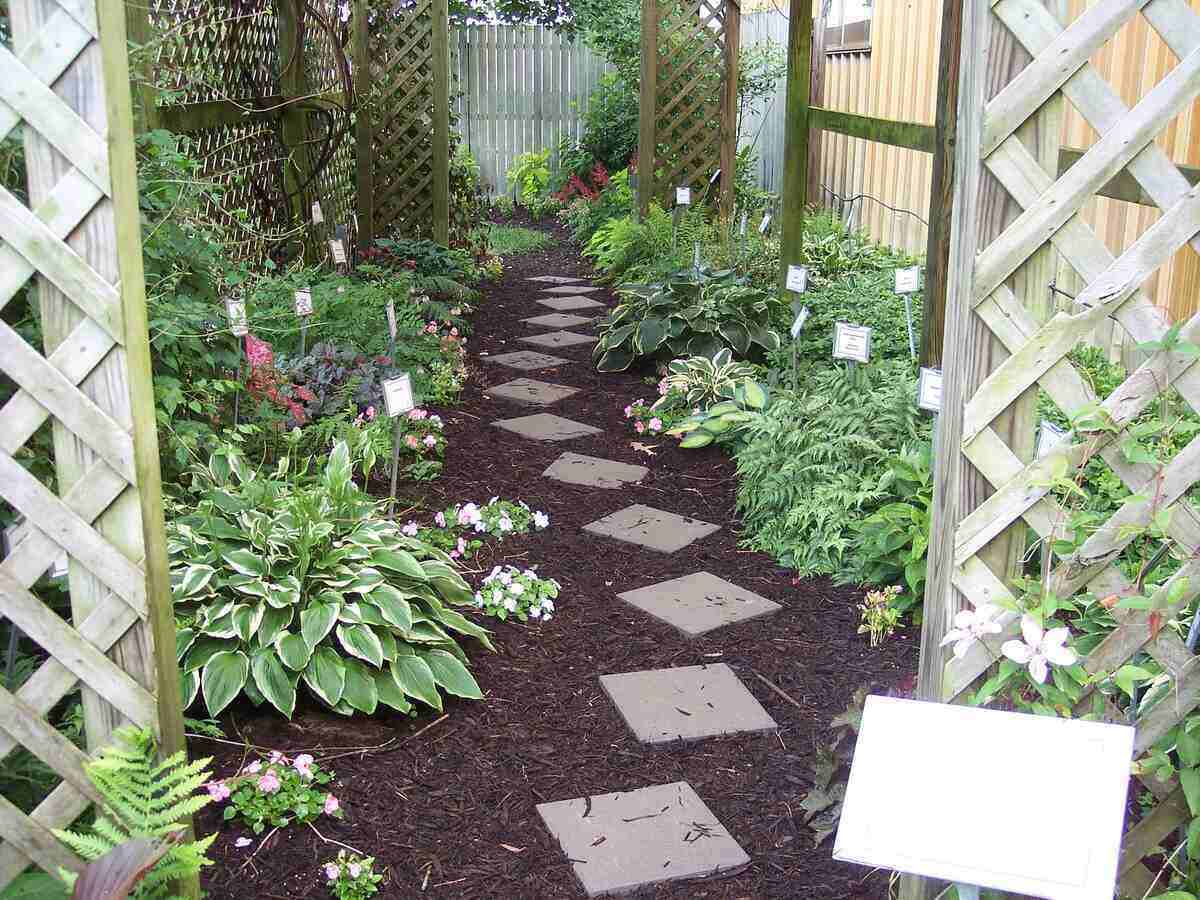
A shade garden is any garden, big or small, that thrives in the shade. Whether the garden grows under a single tree, behind a building, or beneath a forest canopy, it can make a gorgeous addition to the landscape.
Shade gardens feature shade-loving plants, but they can also boast charming walkways, water fountains, pergolas, and other garden decors.
What You’ll Need For Your Shade Garden
Building a garden in your backyard is no easy task, so starting unprepared will make the job more difficult. Here’s what you’ll need to prepare your shade garden for success:
- Shovel or garden spade
- Gardening gloves
- Watering can or garden hose to supply water
- Rope
- Tape measure
- Standard ruler or triangular square (aka set square)
- Compost
- Pencil
- Tracing paper or regular paper
- Design plan
- Shade-loving plants
- Wheelbarrow (to transport soil, compost, and plants)
- Three-prong cultivator
- Garden rake (aka bow rake)
- Newspaper (optional)
- Sod cutter (optional)
- Mulch
- Hand trowel
- Garden decor of your choice
How to Build a Shade Garden
Step 1: Find a Location
Before you rush to the garden store with your list of plants, you need to know where you want to build your shade garden. Will your plants grow under a forest canopy or a single shade tree? Location determines many factors, including which plants you buy and how many.
Remember to measure the area to know the amount of space you’re working with.
Step 2: Measure the Space
Tape measure in hand, measure the location’s dimensions. Calculating the square footage and perimeter will allow you to create the garden’s design in step seven.
Step 3: Determine Shade Level
Next, determine how much shade the location receives each day. Why? Because some shade-tolerant plants grow best in full shade while others prefer partial shade. Let’s take a closer look at what the different types of shade mean:
- Dense shade (or deep shade): The location receives little to no sunlight all day. Dense tree canopies usually surround the area, and there is no reflected light.
- Full shade: The shady area receives little to no sunlight all day but is slightly brighter than dense shade, thanks to reflected light from the surrounding area.
- Partial shade (or part shade): Area receives two to four hours of sunlight per day.
- Partial sun: Area receives four to six hours of sunlight per day.
- Dappled shade (or light shade): Receives a changing pattern of sunlight and shade as the light filters through the tree canopies.
- Full sun: Area receives six or more hours of direct sunlight per day.
Remember, shade changes in autumn and winter when deciduous trees lose their leaves, affecting your choice of plants.
Step 4: Test the Soil
If you want a healthy shade garden, you’ll need to grow plants that tolerate the garden’s soil. Some plants prefer clay soils, while others prefer sandy soils. If the soil is too alkaline or acidic, some plants may struggle.
By performing a soil test in the chosen area, you can determine the soil type and what amendments to add. For example, if the soil is too alkaline, a soil test may recommend a sulfur application to help lower the soil pH level.
Pro Tip: Send a soil sample to your local Cooperative Extension or university for professional laboratory testing. DIY at-home soil test kits are available, but they don’t provide as detailed results as laboratory soil tests.
Step 5: Test for Soil Drainage
How well does water drain in the garden’s chosen location? Most plants require good drainage, but some prefer poor drainage. How well the site drains water will help you determine which plants are best suited for your shade garden.
Ready to test the site’s soil drainage? The Iowa State University Extension and Outreach recommends performing the following steps:
- When the soil is dry, dig a hole at least 12 inches deep and 4 to 12 inches wide. Performing the test on wet soil may affect the results.
- Fill the hole with water and allow the water to drain (this may take a while).
- Immediately after the water drains, refill the hole with water and measure the depth of the water in inches.
- After 15 minutes, measure the drop in water in inches.
- Multiply the inches of drained water (the number from above) by 4. The result is how much water drains in an hour.
Evaluating the results:
- Poor drainage: Soil drains less than one inch of water per hour.
- Good drainage: Soil drains 1 to 3 inches of water per hour. Most plants prefer good drainage.
- Very well-drained: Soil is considered very well-drained if it drains more than 4 inches per hour.
Example:
If the soil drains one-half inch of water in 15 minutes, that means it drains 2 inches of water per hour and has good drainage.
Pro Tip: If your clay soil drains too slowly or your sandy soil drains too fast, adding organic matter (like compost) can help improve drainage. Add the soil amendment in step 11, if necessary.
Step 6: Decide on Plants
Now that you know the shade levels, soil conditions, and size of the shade garden’s location, you can prepare a list of plants. Research the plants to determine whether they can tolerate the shade levels, drainage conditions, the local climate, and your hardiness zone.
When choosing shade-loving plants, here are a few tips that can help narrow your options:
- Grow native plants: Plants native to your area can thrive with little to no help from fertilizers and pesticides. They’re low-maintenance and typically require less water than non-native plants, making them a great sustainable option.
- Save time with perennials: Perennial plants grow year after year, whereas annual plants do not return the following season.
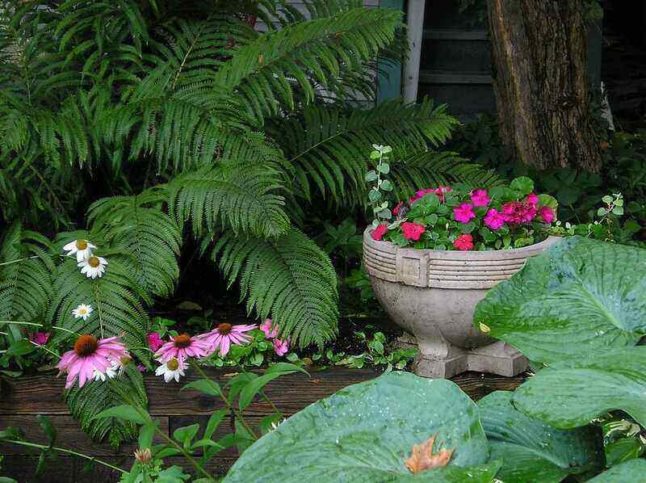
- Experiment with texture: Give your eyes a treat by choosing various textures for the garden, from smooth, leathery leaves to frilly ferns.
- Play with color: Not all shade plants are brightly colored flowering plants, so it’s good to be creative with color options. For instance, variegated leaves can have a marble-like pattern of greens, whites, yellows, and pinks.
- Think big and small: Create eye-catching layers in your shade garden by growing tall shrubs and short ground covers.
- Plant for each season: If you only grow plants that bloom in spring, you won’t get to enjoy the garden’s beauty for long. Enjoy your shade garden all year by growing plants for each season, such as spring and summer blooms, autumn foliage colors, and winter evergreens.
- Choose a design style: How will these new plants match the surrounding landscape? You can take your shade garden’s style in almost any direction, including tropical, Mediterranean, or cottage styles.
Step 6: Sketch Your Design
It’s time to put on your artist cap. Grab the pencil, tracing paper, ruler, and set square to begin drawing your shade garden’s design. Remember the measurements you took in step two? Those will help you scale your design.
Keep these tips in mind when designing your shade garden:
- Think about the goals of your design. Do you want space for a seating area? Do you want the shade garden to be a relaxing oasis with water features?
- Consider your house’s architecture. What materials, shapes, and textures would harmonize your home and garden?
- Get creative with shape. You know the location’s size–– now consider how you want the shade garden to fit inside that space. Will the garden bed have curves or straight lines? Draw the garden bed’s shape and measurements on your tracing paper.
- Go from big to small, starting with the largest objects, such as trees, pergolas, walkways, or fountains. Remember to keep everything to scale when putting ideas to paper.
- Include the plant layers. Draw the smaller plants near the front and the taller plants in the back. Keep in mind how tall the plants will grow when they mature.
- Bring your favorite plants to the forefront— you don’t want them hiding out of sight.
- Group same-colored plants together to create pops of color (pollinators will also have an easier time finding the plants).
And remember, if art or architecture leaves you scratching your head, hire a landscape designer to bring your vision to life.
Step 7: Rope Off the Area
Now that you have your design plan, let’s start preparing the garden bed. Gather your rope and place it on the ground to outline your garden bed. The rope acts as a guideline as you remove turfgrass.
Step 8: Remove Turfgrass (If Necessary)
If the shady spot where you want to grow your garden has turfgrass, you’ll need to remove the sod. There are several ways you can do this:
Remove Grass With a Shovel
First, cut the shovel (or garden spade) a few inches into the ground along the entire rope guideline. Once you’ve sliced into the soil along the entire guideline, move the shovel 10 to 12 inches forward and cut along the rope guideline again.
After shoveling along the rope twice, slice into the ground as if you were cutting rectangular pieces of cake, about two feet long. Put on your garden gloves, roll the sliced sod off the ground, and place it in the wheelbarrow.
Repeat this whole process throughout the entire area.
Need help visualizing this technique? Check out how Laura from Garden Answer removes grass with a garden spade:
Remove Grass With Newspaper
Don’t want to perform the laborious task of removing grass with a shovel? Smothering the grass with newspaper (aka sheet mulching) will save you sweat, but it requires patience.
Spread a 10-sheet thick layer of newspaper over the garden bed area. Remember to overlap the stacks of newspaper so that no grass or weeds grow through the gaps. To ensure the newspaper doesn’t blow away in the wind, sprinkle handfuls of mulch over the newspaper as you work.
Once you’ve spread all the newspaper, cover it with a layer of organic mulch and water the area. Wait several months for the newspaper and turfgrass to decompose in the soil. The best time to perform this task is in the fall so that the material can decompose over the winter before spring planting.
Remove Grass With a Sod Cutter
If you need to prepare a large garden bed, a sod cutter might be the way to go. Head to your local home improvement store to learn about hourly, daily, and weekly sod cutter rentals.
Step 9: Till the Soil
After removing the turfgrass from the garden area, prepare the soil for planting. With the help of your shovel, till the area by turning over the soil 4 to 6 inches deep. Tilling helps to aerate the soil so that plant roots can better absorb nutrients and water.
As you turn over the soil, you may notice weed roots and rocks rising to the surface. Pick them from the soil and toss the debris in a wheelbarrow or bucket.
The best time to till the soil is a few days after rainfall when the soil is slightly moist. Tilling the soil when it’s too dry is challenging, and tilling it when it’s too wet will destroy the soil structure.
Consider renting a rototiller if you’re tilling a large area.
Caution: If you’re growing your shade garden underneath a tree canopy, be careful not to harm the tree’s roots. Tilling too deep can severely damage a tree, especially with shallow roots.
Step 10: Break Up the Clumps
If the soil is clumpy, help loosen the compact clumps with a three-prong cultivator. Hold the cultivator like a rake and break down the soil with the prongs.
Step 11: Add Soil Amendments
With your soil nicely aerated and loose, it’s ready for soil amendments. Refer to your soil test results and drainage test to determine which amendments to add.
For example, if the soil test results reveal the soil is too alkaline, adding a sulfur amendment can help lower the ph. If your clay soil has poor drainage, a compost amendment can help improve it. Sprinkle 2 to 4 inches of compost over the garden space and work it into the top 6 to 12 inches with your shovel.
Step 12: Level the Garden Bed
By now, some sections of the garden may have large soil hills while others dip below ground level. Grab your garden rake and level out the garden bed, creating an even surface. Remember to snap up any weeds or rocks peeking through the soil.
Step 13: Add Your Plants
You can finally add those beautiful plants to the garden bed. Refer to your design to remind yourself which plants go where. Matching the design, place the plants around your garden to get one last final look. If you don’t like how some plants look next to each other, move them around. Remember to leave space in between plants that haven’t matured yet.
With every plant in place, grab your garden trowel and dig holes for each plant, one at a time. Gently remove the plant from its nursery pot, tease the roots to help loosen them up, then place the root ball in the hole. Carefully pat down the soil to secure the plant in place.
Step 14: Add Mulch (Optional)
Spreading a 2- to 3-inch layer of mulch along the soil surface is a great way to protect your garden from erosion, help the soil retain moisture, and add textured beauty to the garden. If you use an organic mulch, the mulch will decompose and add healthy nutrients to the soil.
Step 15: Install Garden Decor
If you had your heart set on installing a water fountain or walkway in your garden, go right ahead! Depending on the decor you’re installing, you may find it’s easier to add the decor before the plants. It’s always good to have your design nearby, but planning its execution is also helpful.
How to Care For Your Shade Garden
You’ve set your shade garden up for success, and now it’s time to maintain that success. From nurturing the garden’s soil to preventing plant diseases, here are some maintenance tips for your shade garden:
Encourage Air Circulation
As your plants grow and expand, there’s less room for a refreshing breeze. Without air movement, the plants may struggle to dry in the shade, making them vulnerable to moisture-loving diseases. Increase air circulation by pruning and trimming overgrown plants.
Install a Drip Irrigation System
Without full sunlight, water in a shade garden is slow to evaporate, which can lead to fungal diseases. A drip irrigation system manages those moisture problems by avoiding leaf wetness and delivering water directly to the root zone. This method of irrigation also helps minimize water loss.
Test the Soil
If weakening plants in the garden don’t respond to water, the soil may have an issue. Sending a soil sample to a local laboratory for testing is the best way to understand the garden’s soil health and how you can improve it. The healthier the soil, the healthier your garden.
If you’re growing native plants, chances are you won’t need to fertilize your shade garden. On the other hand, if you’re growing non-native plants and a soil test calls for fertilizer, opt for a slow-release fertilizer.
Replenish Organic Mulches
Organic mulches, such as shredded bark and wood chips, eventually decompose and add nutrients to the soil. If you notice your shade garden’s mulch layer beginning to thin, it may need a new application.
Rake Out the Leaves
Most shade gardens are nestled underneath large trees. When autumn comes, expect to see leaves falling in your shade gardens. Grab the garden rake and gather the fallen leaves to prevent them from matting together. Matted leaves can block water from penetrating the soil, create moisture problems, and invite diseases.
Switch Out Dying Plants
You may discover that some of your new plants aren’t taking well to the shade levels. You may need to swap some plants around or replace dying plants with new plants. Monitor your plants as the seasons progress, as shade levels will change from season to season.
FAQ About Shade Gardens
Need some decor ideas for your shade garden? A stone walkway or swaying wind chimes may be the charm your garden needs. There are several hardscapes and decor items you can add to your shade garden:
• Birdbath
• Bird feeders
• Containers
• Firepit
• Garden pond
• Gazebo
• Hammock
• Outdoor lighting
• Patio
• Pavilion
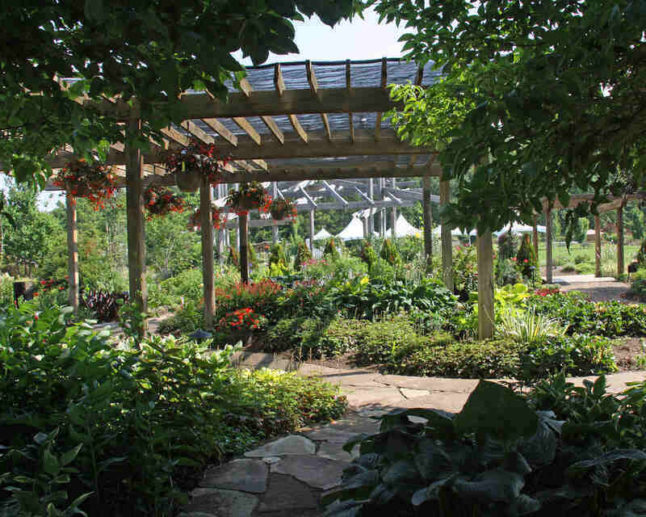
• Pergola
• Privacy fence
• Raised garden beds
• Retaining walls
• Sculptures
• Seating area
• Trellis
• Walkways
• Water fountains
• Wind chimes
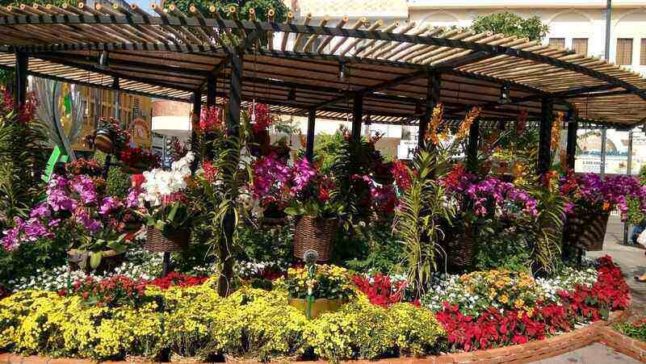
You probably envision a mass of variegated hostas when you think of a shade garden. But your shade garden design can take shape in several ways. From a cozy cottage garden to a dry xeriscape, here are some design ideas for your shade garden:
• Container garden
• Cottage garden
• Forest garden
• Mediterranean garden
• Pollinator garden
• Rain garden
• Rock garden
• Tropical garden
• Water garden
• Xeriscape
Shade needn’t stop your landscaping dreams. A plethora of plants thrive in shady landscapes–– you just need to choose carefully. Remember, different plants tolerate different levels of shade, so you’ll need to monitor the garden area throughout the day and choose plants accordingly. Common shade garden plants include:
• Astilbe
• Azaleas
• Begonias
• Clematis
• Coral bells
• Dogwoods
• Ferns
• Hostas
• Hydrangea
• Impatiens
• Japanese maples
• Rhododendrons
Keep it Simple — Hire a Pro
After spending hours prepping the garden bed, transferring the garden plants, and installing a gravel pathway, the last thing you want is for your shade garden to fall below your expectations. Maybe you didn’t prepare the soil right or didn’t catch the drainage problem. Or maybe your design idea looked better on paper.
Give your shade garden the best chance for success by hiring a local professional landscaper. Leave the digging and planting to the pros while you imagine the relaxing afternoons you’ll spend in your shade garden.
Main Image Credit: University of Delaware Carvel REC / Flickr / CC BY 2.0