Like the famed yellow brick road, pathways beckon others to follow them as they journey to a specific destination. Forge your own welcoming trail and improve your curb appeal with these 10 walkway ideas for your yard and garden.
- First: What Can You Use to Make a New Walkway?
- 10 Walkway Ideas for Your Yard and Garden
- 1. Step onto a Stepping Stone Pathway
- 2. Add Lights Along Your Pathway
- 3. Use Pallets to Create a Bridge
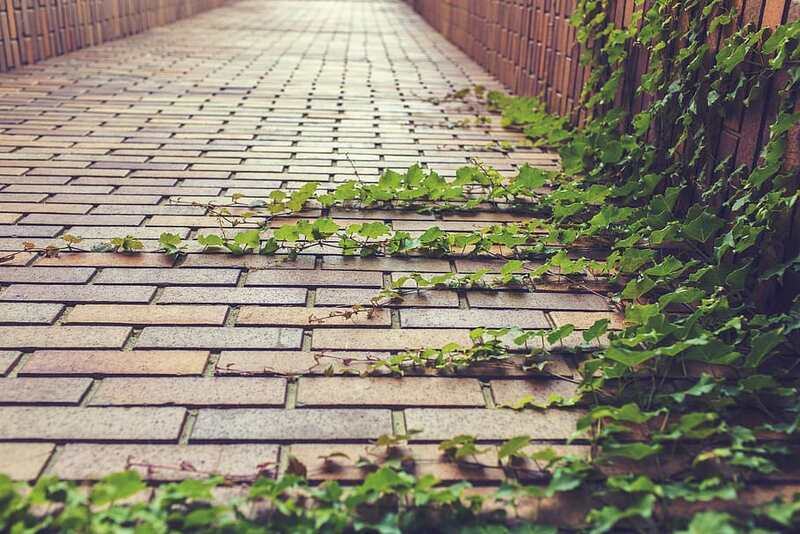
- 4. Pave the Way with a Paver Pathway
- 5. Build Your Own Stairway
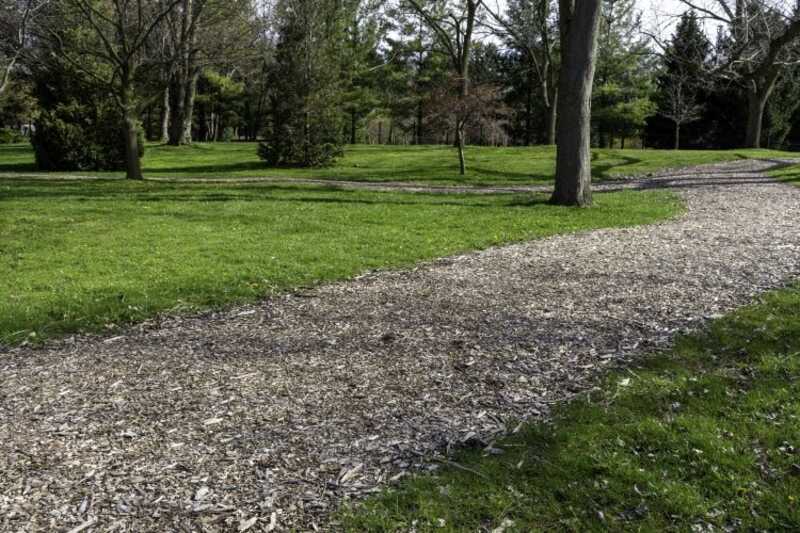
- 6. Go with Gravel for Your Walkway
- 7. Add History and Texture with Cobblestone Walkways
- 8. Try Bark Mulch for an Informal Path
- 9. Stroll Under a Canopy
- 10. Add Permanence with a Poured Concrete Pathway
- FAQ
First: What Can You Use to Make a New Walkway?
There’s a whole host of walkway materials to choose. When selecting one for your new path, keep in mind your current aesthetics, and pick a finish that will flow seamlessly into your landscaping.
Here are a few popular walkway materials to consider:
- Pavers
- Natural stone
- Wooden pallets
- Brick pavers
- Pea gravel
- Landscape timbers
- River rock
- Lighting
- Railroad timbers
- Bark mulch
- Cobblestones
10 Walkway Ideas for Your Yard and Garden
1. Step onto a Stepping Stone Pathway
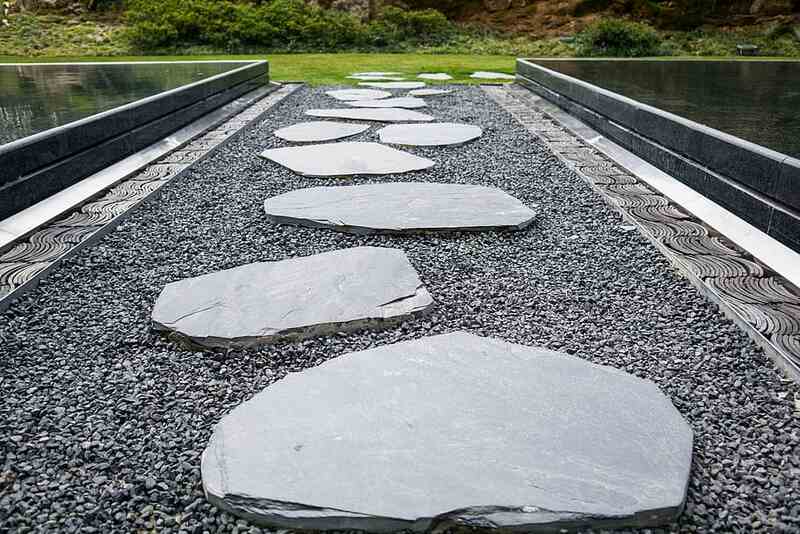
One of the easiest ways to DIY walkway construction is to use pre-cut stepping stones. After choosing an area for your new stone walkway, say leading up to your front door, lay the preliminary course by arranging the stones in the way you like.
Stepping stones and other landscaping rocks come in an array of materials, styles, colors, and shapes. Just a few examples follow:
- Concrete, flagstone, or bluestone
- Patterned or solid surfaces
- Tan, blue, or blended colors
- Square, round, or irregularly shaped pavers
Effort: One DIYer recommends using a base cloth or a gravel base if inserting a thin flagstone walkway (3 inches thick or less) and says you can skip this if opting for thicker ones. After arranging the stones, use a trowel to edge out each area. Or, for an easier method, spray paint around the base of the stone and dig up the turf later.
Once the turf has been removed, level and pat down the dirt, so that the stones fit well. Leave at least 4 inches of space between stones to encourage grass to grow in between. Individual stones may be heavy, so get help from a friend if needed.
Time: A short path can take just a day to build. If attempting a longer walkway, plan to spend a weekend finishing the project.
Cost: Depending on size, style, and material, you can purchase individual stones ranging in price from $2 to $10, but you can certainly spend more. Or buy a stepping stone kit for under $100. If you’d like to know the prices for other common landscaping tasks, check out our guide on How Much Landscaping Costs.
2. Add Lights Along Your Pathway
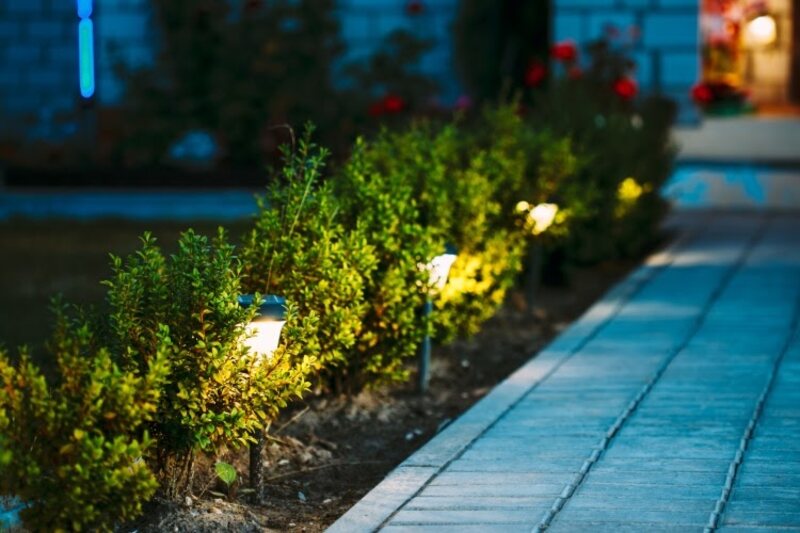
Friends and family don’t limit their visits to daytime hours. Ensure their safety after dark with solar stake lights, faux rock lights, or other pathway lighting styles. Not only will lighting help prevent injury, but it can also:
- Showcase curb appeal no matter the time of day
- Allow you to enjoy nighttime outdoor activities
- Increase security
Effort: Solar stake lighting options are super easy to set up, but before installation, place them in a sunny area of your yard for a couple of days so that their batteries can charge. Then pick a location that receives full sun. Before inserting the stakes, you may need to wet the soil and break it up a bit.
Time: The installation of stake lights shouldn’t take more than an hour or so.
Cost: DIY solar light prices range from around $20 to more than $100, depending on walkway length, style, number, and color of lights. Professionally installed lighting costs range from approximately $2,000 to $4,500 on average, depending on installation area and labor costs, as well as the type of light and the power source chosen.
3. Use Pallets to Create a Bridge
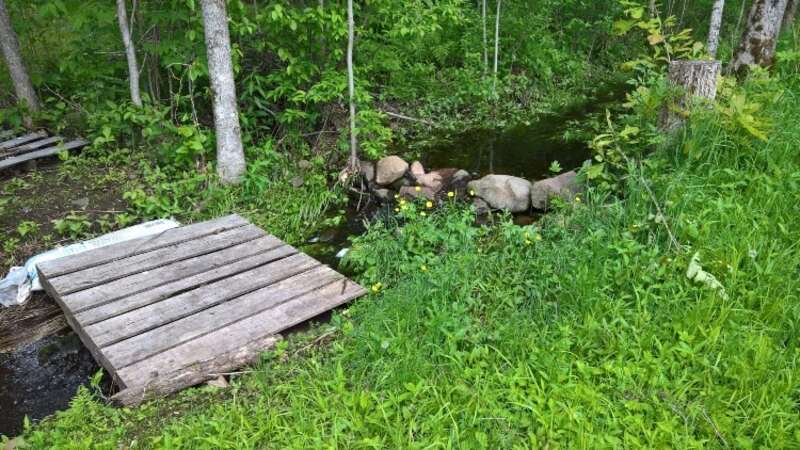
If repurposing is your jam, consider adding to your landscaping with a garden path made out of old pallets. They’re usually free to obtain, and they mesh well with any sort of rustic or country design.
Effort: Clear and level the spot where you want your pallet path to go, pack the soil, and set whole pallets in place. Stabilize them by surrounding them with more dirt, as needed.
Or, cut the pallets and use the individual boards to lay a boardwalk; this, of course, will take a little more effort and tools. For even more support, opt to nail your pallet boards in the ground. You can also take additional time and make a design (little squares, for example) with your pallet wood or paint each pallet board a different color.
Time: It will take only a few minutes if using whole pallets and one afternoon if dismantling the pallets for the wooden boards.
Cost: You can collect wooden pallets for free at local stores.
4. Pave the Way with a Paver Pathway
Depending on how much of a challenge you want, you can go fully artistic, or not, with patio pavers. Pavers come in a variety of materials, so you can build a stone, concrete, or brick walkway. You could use several types of paver patterns:
- Jack-on-jack method: The easiest method is jack-on-jack (laying pavers in perfectly aligned rows). You fit the interlocking pavers together in a standard way—no intricate patterns and not much, if any, cutting.
- Running bond pattern: Another easy pattern is running bond (placing one brick paver over two below). There’s some cutting involved here once you reach the end of a row, but it’s straightforward (cutting the brick in half, for example).
- Other pattern options: For more of an artsy look, choose a pinwheel, majestic random, whorled, or herringbone pattern. These designs may take more planning and time.
Effort: Laying more involved patterns, such as herringbone, will be more of a feat than the simpler jack-on-jack arrangement. Regardless of the style you choose, though, you’ll need to adhere to the following layering steps:
- Layer 1: Gravel paver base
- Layer 2: Sand
- Layer 3: Pavers
- Polymeric sand in joints to finish
Time: You can complete this DIY project over the course of a full day or two.
Cost: Expect to pay $8.69 to $22.18 per square foot, which is the same cost as a professionally installed paver patio. Unless you already own most of the tools and have an advanced DIY skill level, you may not save on labor costs if you want to tackle a complicated DIY brick pathway on your own.
5. Build Your Own Stairway
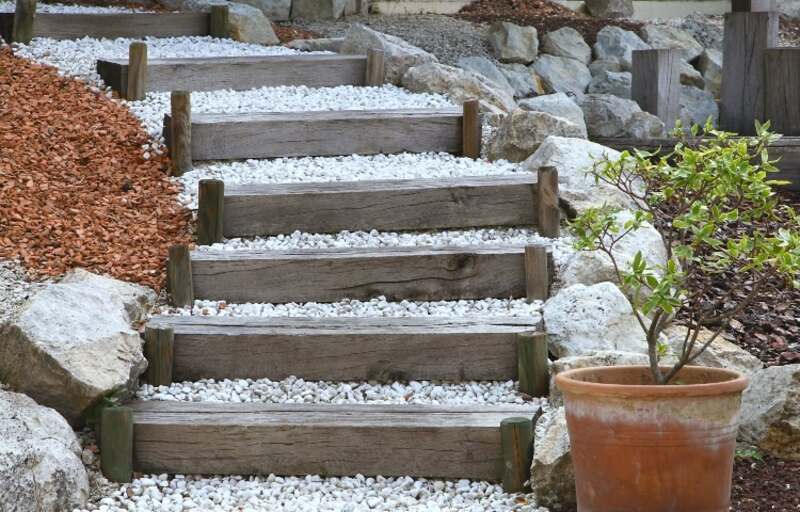
Another type of path, a stairway, can be built on a hill or slope using landscape timbers and gravel. Perfect as a lead from your front yard into your garden, this DIY job requires pressure-treated wood posts, pea gravel, and rebar, as well as landscape fabric.
Effort: This is a project for more experienced DIYers. You’ll need to know how to excavate, grade the land area, cut timber to size, and build step frames to complete this project.
Time: You’ll spend about half a day building your stairs, depending on the number of steps involved.
Cost: Based on the amount of landscape timber and pea gravel you need, as well as other materials and tools, your cost can fall between $50 and more than $200.
6. Go with Gravel for Your Walkway
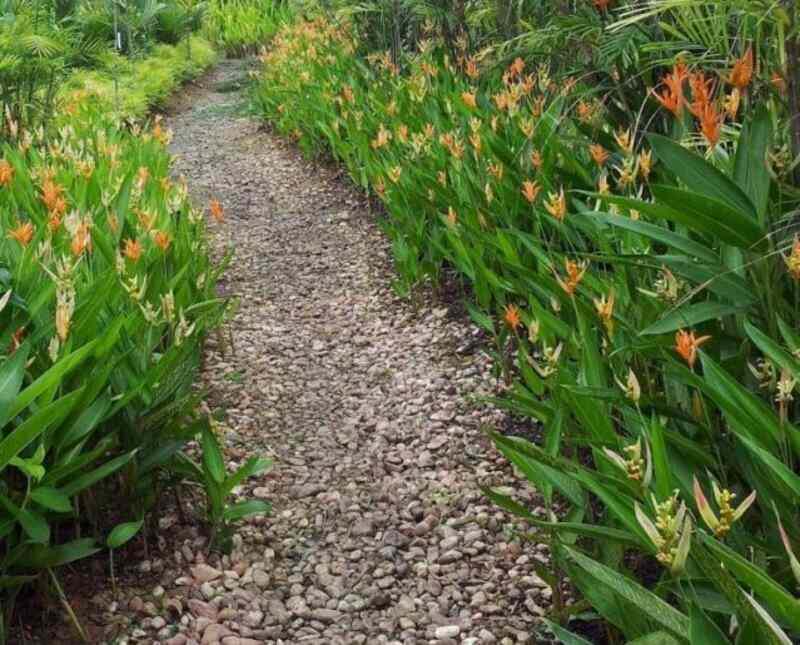
Easy enough for any DIY newbie to tackle, building a gravel walkway won’t break the bank either. Besides its economical cost and simple installation, gravel paths can also add a distinctive textural look to your garden walkway design — its neutral palette setting off splashes of green, pink, red, purple, and other colors from surrounding plants.
Effort: Lay out your planned path using a hose or rope, line it with plastic edging (or not, depending on how rustic you want it to look), and choose the type of gravel you’d like to use, such as pea gravel, white gravel, or polished and gray, beige, or brown river rock.
The most difficult parts of building this low-maintenance walkway? Digging up the sod and hauling the gravel. Dig up 4 inches of turf inside your defined area and tamp down the ground to level it. Then place your pea gravel down, spreading it out evenly.
Time: You can complete this project over the course of an afternoon or two.
Cost: Bags of pea gravel cost $4 to $7 each.
7. Add History and Texture with Cobblestone Walkways
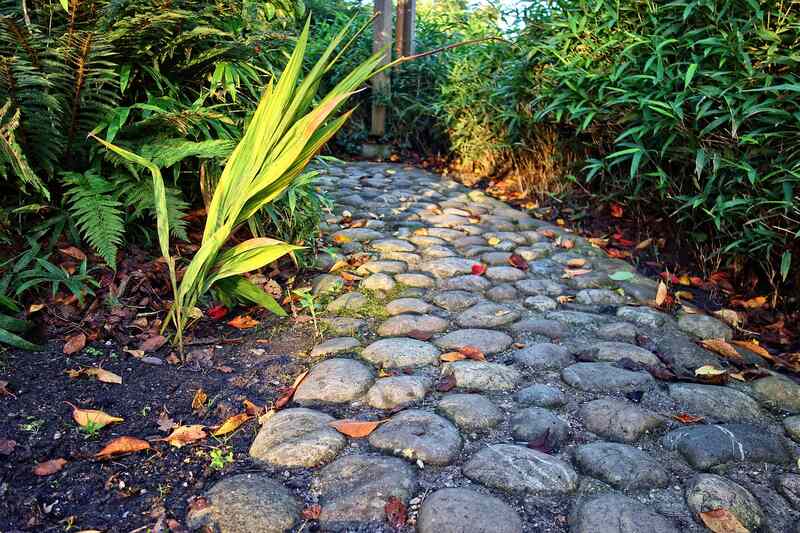
Perfect for homes in historic neighborhoods or for those with a Mediterranean vibe, cobblestone brings a touch of elegance to your front walkway or garden path. Available in gray, red, tan, brown, and other colors, cobblestones can be laid straight or in mosaic patterns.
Effort: Because cobblestones aren’t the most even materials to use, this tutorial suggests first sorting your cobblestones by similar size.
Once you’ve shaped your path with a rope or hose, dig up the turf and fill it with a base layer of gravel, followed by a layer of weed cloth and sand. Last, lay the cobblestones of similar size and tamp them down with a mallet.
Time: It will take you about one to two days to make a cobblestone path.
Cost: Cobblestone blocks can run you about $3 to $10 each. And don’t forget that, if this type of pathway is too much for you, you can always have a professional do the work.
8. Try Bark Mulch for an Informal Path
Another cost-effective, easy DIY walkway material is bark mulch. Ideal for an informal path leading from your backyard to a treehouse, shed, or outdoor space, this low-maintenance option can complement nearby garden beds.
Effort: As with other paths, lay out your design with a rope or hose and line the sides with plastic edging to keep the mulch from moving from its set location. Then add the mulch. All you’ll have to do to keep this walkway looking neat is to replace the mulch every few years because it decomposes over time.
Time: You can complete this in a weekend or less.
Cost: Mulch costs around $2 to $5.50 per bag, and for a standard 40-foot by 3-foot walkway, you’ll need approximately 20 bags. Of course, if you’re resourceful, you could also look around for free mulch.
9. Stroll Under a Canopy
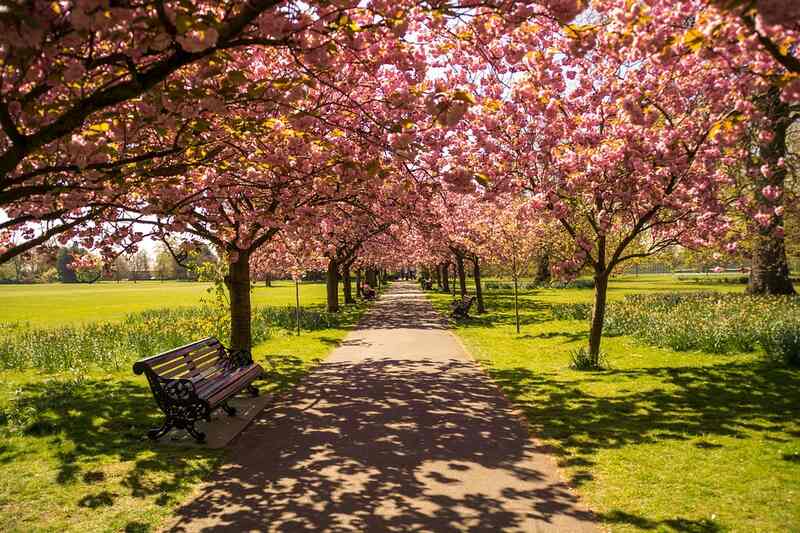
By far, one of the most enchanting walkway ideas is to create a Secret Garden-esque entrance tunnel. Plan your path to run underneath a canopy of shade trees, or you can choose to build a pretty pergola adorned with flowering vines.
Effort: Just about any type of walkway material will work for a shady area. The choice you make (such as pavers, stepping stones, gravel, or bark mulch) will determine the level of difficulty.
Time: If you opt for an easy-to-make walkway, such as gravel, bark mulch, or even concrete pavers, it shouldn’t take more than a weekend to complete. If you want to build a pergola, you will spend a couple more long days on the project.
Cost: Depending on the material, length, and style of the walkway you choose, prices can range anywhere from about $50 to $300.
You can craft your own DIY pergola or use a kit purchased from a home-improvement store. Kits cost between $300 and $2,000. If you’re not handy with a hammer, you can always hire a pro and expect to pay between $2,100 and $6,000.
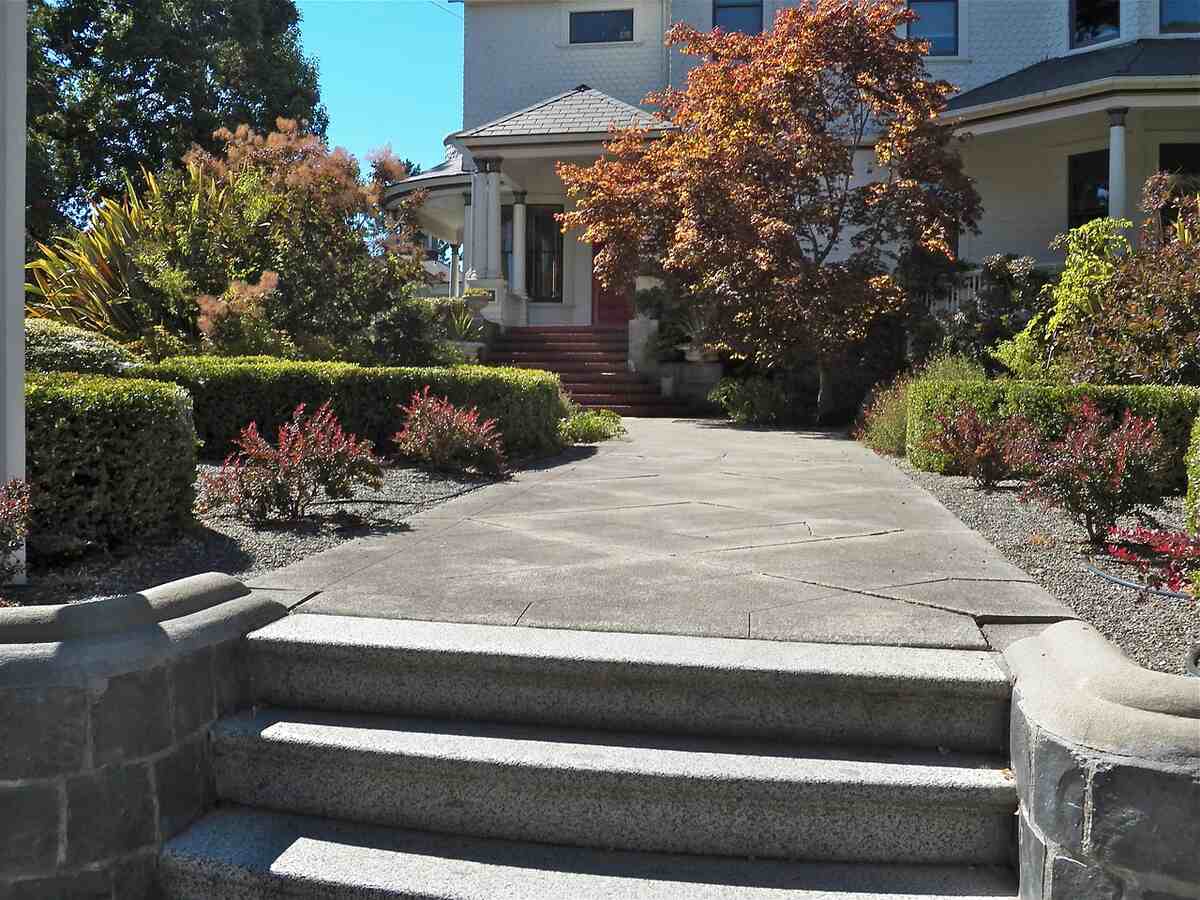
10. Add Permanence with a Poured Concrete Pathway
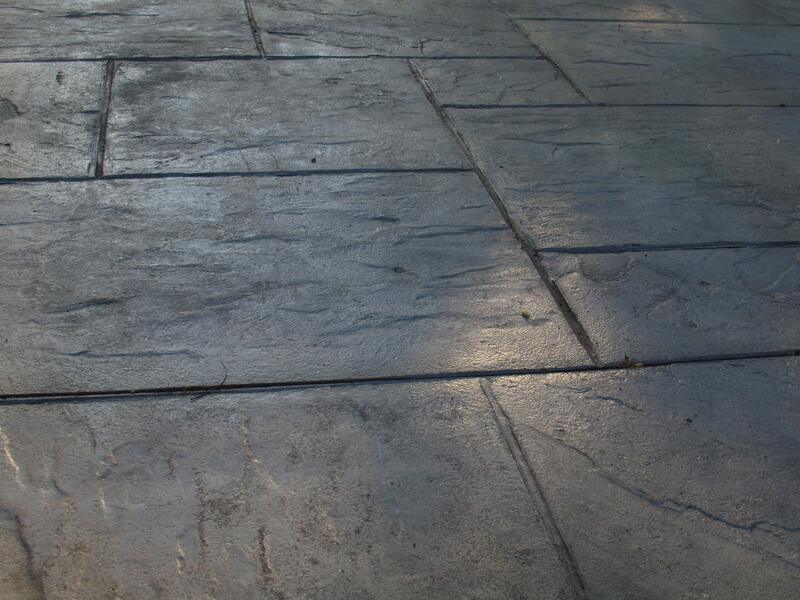
A way to level up your backyard design, poured concrete allows you to build a walkway that’s higher up than if you opted for pavers. This comes in handy if you’d prefer to keep your new path flush with a raised patio or porch.
Effort: After designating a location for your concrete walkway and lining it with stakes, string, and wooden forms, dig up the turf. Once the soil has been removed, you can pour the concrete into the preformed shape, flattening it with a 2×4 and smoothing the surface with a trowel and broom. Then you can put your stamp on your design.
Time: A day or two should provide you with the perfect concrete pathway. Of course, it will take a couple more days for it to dry.
Cost: Most homeowners can expect to spend as little as $9 per square foot on a simple stamped concrete design, whereas a complex design can cost over $25.25 per square foot. Or you can have a professional build a plain concrete sidewalk at a reasonable price of between $5.89 and $12 per square foot.
FAQ
The least expensive, easiest way to build a walkway is to repurpose wooden pallets — they’re free and don’t require any building. Other than that, mulch and gravel can also be economical walkway materials. Mulch can run around $110, whereas gravel can cost approximately $150, depending on the length of your path.
To finish off the design, line your walkway with outdoor lighting, wildflowers, ornamental grasses, other greenery, or even succulents, if you live in a year-round warm climate. In dry areas, try xeriscaping along your walkway (or your whole yard). You can also set a bench along your walkway or a trellis with, say, climbing roses for visual interest.
You must think about the types of disabilities (vision impairment, wheelchair user) and beware of the things that can impact travel along your walkway.
For example, stone or bark mulch may be difficult to traverse for those using wheelchairs.
Decorations such as flower pots inside the path may become obstacles for those with vision impairments.
Installing an outdoor stair lift is another excellent way to enhance the accessibility of an outdoor walkway.
The U.S. Department of Transportation, Federal Highway Administration, has published an informative guide that can help you make your walkway accessible for all. This booklet includes information on grading, curb ramps, and materials for making your garden pathway.
When to Call the Landscaping Pros
The more involved a project is, the better it is to consider bringing in a local landscape professional for help. Although you may be able to handle creating a walkway made of bark mulch, gravel, or wooden pallets, pouring and stamping concrete or laying intricate patterns with bricks or stones may be out of the scope of your wheelhouse.
Turn over your landscape design ideas to the experts and let them lead you on a path toward a more beautiful yard or garden.
Main Photo Credit: Needpix