Welcome to the wonderful world of gardening! Starting your first vegetable garden can be an exciting and rewarding experience. It’s a great way to connect with nature, learn about plants, and enjoy the satisfaction of growing your own food. Let’s dive into the step-by-step process of how to start a vegetable garden – plus how to maintain it for a fruitful (or veggie-ful) harvest.
- Step 1: Manage Your Expectations
- Step 2: Decide On The Type of Planting Method
- Step 3: The ABCD of a Perfect Garden Spot
- Step 4: Pick a Suitable Garden Size
- Step 5: Choose the Veggies
- Step 6: Plan Your Vegetable Garden Layout
- Step 7: Gather Your Tools and Materials
- Step 8: Prepare the Garden Bed
- Step 9: Install Transplants and Spread Seeds
- Step 10: Cover The Ground With Mulch
- Step 11: Maintain Your Vegetable Garden
- FAQ
Step 1: Manage Your Expectations
If this is your first gardening project, set comfortable expectations. Start with a small space and a few favorite veggies.
For this first year, the goal is to get your garden through an entire growing season. To learn the work, the soil, the plants, friendly and enemy insects, and diseases to watch for. You’ll see firsthand how much time is needed for watering, weeding, pruning, and harvesting.
Remember to enjoy the experience of growing your own vegetables. Celebrate the joy of young plants sprouting from the ground. Relish in cutting the first homegrown lettuce and radishes into a delicious salad. Savor those ripened tomatoes – juicy, sweet, and full of flavor. Gardening is a complete experience for the body and soul. Take it all in!
Step 2: Decide On The Type of Planting Method
There’s more than one way to grow vegetables at home. Here are the main options to weigh and decide when planning your garden.
Traditional Gardening
This method requires you to dig the soil before amending and planting. Digging damages and removes the weeds and aerates the ground. It also disturbs soil structure and microbiomes, making plants more reliant on fertilizers, herbicides, and pesticides. This being said, it is still the most popular method.
No-Dig Gardening
This is a gardening style that doesn’t involve digging or tilling. To kill the weeds, you cover the entire area with cardboard. Covered weeds don’t receive sunlight and die. Add a layer of garden or bed soil 6 to 8 inches thick on top of the cardboard. When making holes for planting, dig right through the moist cardboard.
No-dig preserves the soil texture and microbiome. For example, it protects earthworm tunnels used by water and air as natural passageways to plant roots.
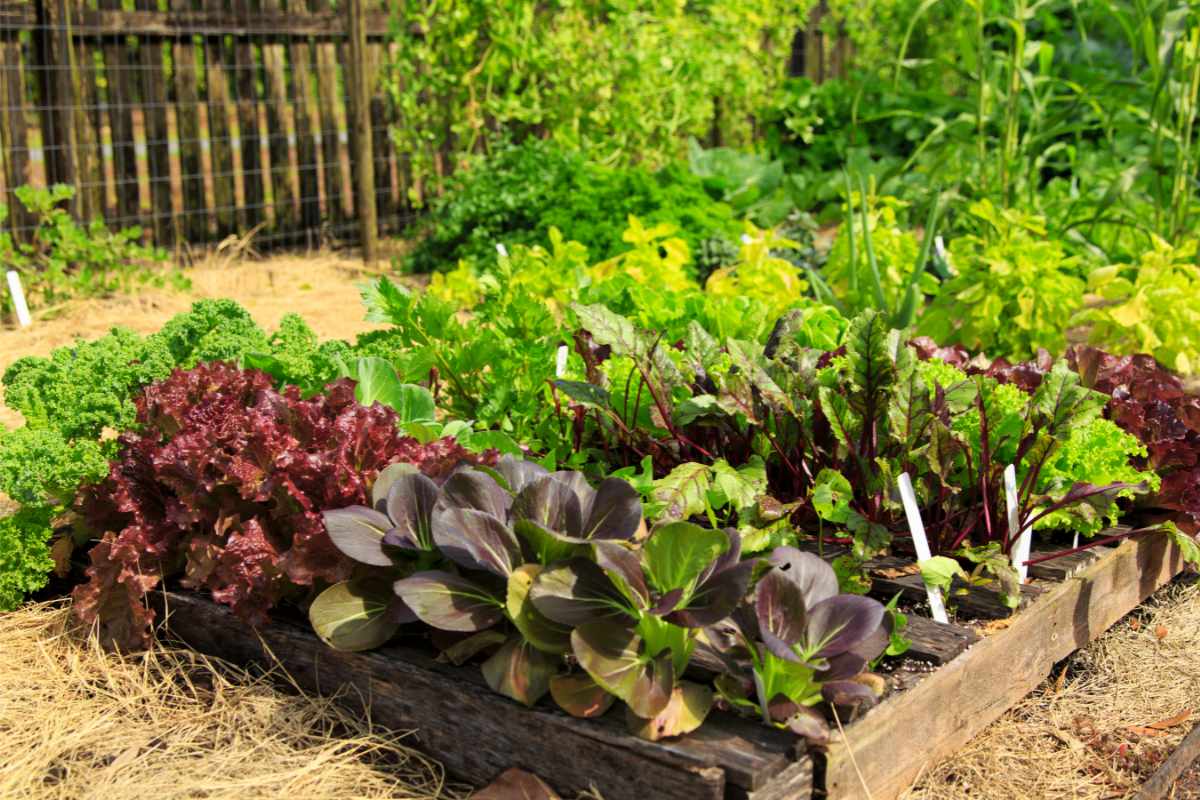
Raised Garden Beds
You can build raised beds using either the traditional or the no-dig method. Bordered with wood or stone, raised beds make a garden look neat and spacious.
The lowest garden bed models are 6 to 8 inches tall, but you can raise them to 1 or 2 feet tall. Build them higher if the garden soil is poor quality, and roots will develop mainly within the bed height. Also, build them higher if you have back problems and want to stay upright for planting, weeding, and harvesting.
Raised beds cost a bit more because of their edging and added soil. They also offer better drainage in rainy areas and are great for growing expansive plants like mint and sweet potatoes.
Container Gardening
Container gardens are a good option for porches, balconies, and small yards where you can use them to create extra space for your veggies and herbs. Ensure you choose the right size for each plant so roots have enough room to grow healthy.
The ground in containers dries out faster and requires more water. Since it’s also a poor, isolated microecosystem, you must regularly fertilize the soil to ensure good crops.
These are four practical options for starting a veggie garden. Moving on, we’ll see how you create a garden with traditional planting in soil-level beds.
Step 3: The ABCD of a Perfect Garden Spot
Growing rich crops is a matter of balancing sunlight, air, water, and fertile soil. Give yourself a good start by choosing the best location for your garden. Just remember the ABCD of choosing the perfect spot:
A. Good Sunlight Exposure
Most vegetable plants need 6 to 8 hours of full sun daily. They use it for photosynthesis to turn water and nutrients into the energy they need to grow and bear fruit. Some need more light than others:
- Tomatoes, peppers, cucumbers, eggplants, squash, and melons require 6 to 8 hours or more of direct sun exposure.
- Varieties with smaller fruits can thrive with less sun but still need at least 6 hours of direct sunlight.
- Leafy veggies like spinach, kale, cabbage, and lettuce need less sunlight. Around 4 hours is enough.
How to Find a Place With Good Sun Exposure
Observe your yard at different times during the day and notice where the light falls for the longest time. Do this in early spring for this season, or wait until summer if preparing for the following year. If trees don’t have their full canopy, keep in mind that future foliage will add extra shade.
You can also use an app to identify the sunny areas during the growing season. A few good options are:
Make a Sun Map
A sun map shows how much light falls in every area of your yard. It helps you better understand the space’s potential and where to put your veggie farm. How to make one? Draw a rough sketch of your yard and color in the different areas using the following shades:
- Yellow for zones with 6 to 8 hours of sun daily or more.
- Orange for those with 4 to 6 hours of sun.
- Blue for places that receive less than 4 hours of sunlight.
Your veggie garden should typically be in a yellow or a mixed yellow and orange zone.
Too Much Light and Heat
With summers getting hotter and hotter and scorching sunlight in July, is it still a good idea to place a garden in a sunkissed area? Yes, and here’s why: it is easier to create partial shade for a small garden standing in full sun than to add extra light for a shaded one.
When hot sunlight risks burning the leaves and stems, use some shade fabric to filter the sun falling on the veggie beds. Use stakes to install the shade cloth above the planted area or on the southern and western sides.
Vegetables To Grow In Shade
Does your yard have more shade than full sun? Don’t worry. You can still grow veggies and herbs. Salad greens, like arugula, lettuce, and spinach, can thrive with 3-4 hours of light a day. Kale, Swiss chard, mustard greens, and collards can also be grown with less light and harvested as baby greens.
Some root veggies like radishes, carrots, turnips, rutabaga, and even potatoes can be planted in areas with 4 to 5 hours of sun exposure. They grow slower but also stay tender and sweet for a longer time. With 4 to 5 hours of full sun, you can grow peas, beans, and herbs such as mint, chives, parsley, oregano, and coriander.
B. Fertile Soil With Good Drainage
Good soil is rich in organic matter and nutrients, absorbs water well, and has good drainage capabilities. If you’re lucky, your yard has loamy soil, which is the closest to perfection. Most of us enjoy a variety of sandy or clay soils that typically require some amendments before planting.
To identify the type of soil in your plot, collect a sample and send it to your local Extension Office for a soil test. Once you know your soil type, see the best veggies to grow in each type below.
Sandy Soil
Sandy soil has large, coarse particles and a gritty texture at the touch. If you squeeze some moist dirt in your hand, it will break off right away. Its loose structure ensures good drainage and aeration and makes digging easy. On the downside, sandy soil is poor in nutrients, dries out fast, and is often more acidic than plants need.
What can you grow in sandy soil? It has a good texture for tap-root veggies and herbs that need less water. You can plant radishes, carrots, potatoes, lettuce, collard greens, zucchini, corn, tomatoes, cucumbers, beans, thyme, rosemary, and oregano.
Clay Soil
This soil type has fine particles and a soft feel on your fingers, similar to flour or talc. When moist, you can shape it into a ball. It becomes heavy and sticky and will keep its form. The dense clay texture keeps nutrients and water well, making it a rich soil.
On the other hand, this also means poor drainage, a rock-hard texture if dry, and a tough time digging it.
Clay soil works better for vegetables with shallow roots and high requirements for nutrients and water. Cabbage, broccoli, Brussels sprouts, kale, cauliflower, peas, beans, potatoes, and some radishes are good examples.
Silt Soil
Present around bodies of water, silt soil has medium-sized particles and a slippery, soap-like texture when moist. It’s rich in minerals, easy to cultivate, and has a good water-holding and drainage balance. On the other hand, it compacts easily and is prone to erosion. You can grow a variety of vegetables on this type of soil.
Loamy Soil
Loam is the perfect soil type for gardening. If you don’t have it, aim for it. Loamy soil is a mix of sand, silt, and clay and has a crumbly, moist texture. It does an excellent job absorbing, holding, and draining water, holds nutrients for a long time, and has a loose texture that allows good aeration. It’s easy to work and cultivate.
How do you get from sandy or clay to loamy soil? Truth be told, it’s not easy to change the natural structure of the soil. But, you can use amendments to improve the top 4 to 8 inches where plant roots grow.
The best amendment for sandy and clay soils is organic matter, present in high concentrations in compost and rotted manure. Adding organic matter corrects pH and improves fertility and structure. Healthy topsoil should have ⅓ compost or manure. When amending, spread 2 to 4 inches of compost or manure and till it into the topsoil.
C. A Water Source Nearby
It’s essential to have a good source of clean water nearby to ensure proper irrigation from seed to harvest. You need to water the garden a few times a week after seeding and putting in transplants until the new, young plants establish proper roots.
During the growing season, the watering routine for a vegetable garden varies with the type of soil, the veggies you’re growing, and the climate you live in. Typically, a once-a-week watering schedule does the trick. Irrigate deeply and less often to promote deep, extensive roots and more resilient plants.
Install an automatic watering system to save time and simplify garden care. Drip irrigation and soaker hoses are the best options. They reduce water loss through evaporation and allow moisture to seep into the soil.
If you’re using sprinklers, only water in the morning to give the leaves time to dry out. Leaves that stay wet for long periods are a recipe for fungal diseases.
D. Shelter From Strong Wind
Some wind is good because air currents prevent fungal diseases and strengthen stems. However, persistent, strong wind forces plants to close their leaf pores, which limits breathing. It also dries the soil, can knock down young plants, breaks leaves and stems, and prevents pollinators from doing their job.
Consider installing windshields like protection nets if your garden is exposed to heavy winds. Here are two popular products used by gardeners:
Bonus: Place it Close to Home
On a large property, avoid placing the vegetable garden far from home. The closer it is, the easier it will be to take care of it and pay attention to your plants. You’ll save time and energy.
Step 4: Pick a Suitable Garden Size
Can you start a vegetable garden if you don’t have a large yard? Yes, you can. You don’t need much space to grow veggies for your family.
A suitable size for a first home garden is anywhere between a 4×4-foot bed to a 12×24-foot area. A 10×10-foot planted area allows you to grow 9 to 25 plants depending on their size and growth habit.
Step 5: Choose the Veggies
Most beginners enter the garden center or go online and buy tens of seed packets or plugs. It’s easy and normal to get excited. But, if you plant more than you can care for, plants will start getting sick and die, and you’ll get discouraged. Set yourself up for success by keeping this project simple and enjoyable. Here’s how.
Start With 9 to 25 Plants
When building a new garden, it’s best to begin with 3 to 5 types of plants and grow 3 to 5 of each. Choose:
- Favorite veggies and herbs you and your family like to eat and cook with.
- Easy to grow crops. The best vegetables for beginners are lettuce, radishes, spinach, green beans, peas, and beets.
- Suitable vegetable plants and herbs for your location, climate, and soil. Ask your neighbors what grows better in their gardens. Find your USDA hardiness zone and search for plants that grow well in your area.
- Productive varieties with good yield per season.
- Produce that’s less available fresh from the grocery store or that’s more expensive to buy, like aromatic herbs.
- Easy-to-can vegetables you can preserve for winter. Some of the best vegetables for canning include asparagus, cucumbers, beets, carrots, green beans, peppers, and tomatoes.
Choose by Growing Season
Cool-season crops love low to moderate temperatures, from 30 to 80°F, and have two growing seasons: spring and fall. You’ll typically seed them directly outside 2 to 4 weeks before the last frost of the spring and 6 to 8 weeks before the first frost of the fall. During summer, they leave the soil free to host warm-season crops.
The most commonly cultivated cool-season crops are peas, leafy greens (lettuce, spinach, chard), root vegetables (radishes, carrots, beets, and turnips), the cabbage family (broccoli, cauliflower, kale), and herbs (parsley, cilantro, fennel).
Warm-season veggies need the summer heat to thrive. You plant them after the last spring frost, typically around May. The most popular are tomatoes, peppers, eggplants, melons, squash, cucumbers, and sweet potatoes for backyard vegetable gardens.
Make a gardening calendar to track what and when you’re planting in your vegetable garden. Choose the crops according to your family’s schedule. If every year you all leave for a few weeks during summer, and there’s no neighbor to care for your plants, stick to the cool-season crops.
Pro tip: If you’re out of town a lot, grow a Three Sisters Garden with squash, beans, and corn. These crops work together to take care of themselves, so you can leave them alone for a week or more in summer, and they’ll still be healthy when you come back!
Seeds or Transplants
There are three ways to go when planting veggies outside: seeds, plugs, and potted vegetable plants. Some veggies are better seeded directly outside since they germinate fast and easily and don’t tolerate transplanting well. These are mainly leafy greens and root vegetables like radishes, peas, kale, spinach, arugula, carrots, and turnips.
Others are better planted outside as grown seedlings, either plugs or potted plants. This category mostly includes warm-season vegetables like tomatoes, peppers, cucumbers, and zucchini.
Here are the main pros and cons of the three options to help you decide:
| Method | Pros | Cons |
| Seeding directly outside | – Cheapest option. – Best for one-harvest veggies like radishes and carrots, allowing successive planting. – A good choice for early planting. | – Unreliable results since germination rates vary. – It takes a long time from seeding to harvest. |
| Planting plugs (small seedlings grown in seed trays bought from local nurseries) | – Good price. – Good survival rate. – Save time and effort. – Smart choice for beginners. | – It’s more costly than seeds. – Less resilient than potted plants. |
| Planting potted plants (young plants grown in nurseries in pots) | – Closest to the harvest stage. – It’s the best idea for late planting and areas with a short summer. – More resilient to pests and diseases. | – It’s the most costly option. |
What about growing plugs in a tray seed indoors? That’s a good option, too, but we think it’s best to leave it for the next year since it’s a separate gardening project.
Pro tip: Starting a garden from vegetable scraps is another method and quite ingenious. Read all about it in our scrap gardening guide.
Step 6: Plan Your Vegetable Garden Layout
What is a good layout for a backyard vegetable garden? Your garden’s design depends on the available space, shape, orientation, and what you want to grow. Here are a few guiding points to consider.
Plant Height and Shape
Plants grow in three basic shapes:
- Tall and spiky (peppers, tomatoes, eggplants)
- Round and full (cabbage, broccoli, kale, basil, lettuce)
- Cascading (squash, cucumber)
Place cascading plants along the edges of the bed, tall and spiky in the back or center, round and full in between the two. Check the mature size for each plant and ensure the taller ones will not shade the rest of your veggies when fully grown.
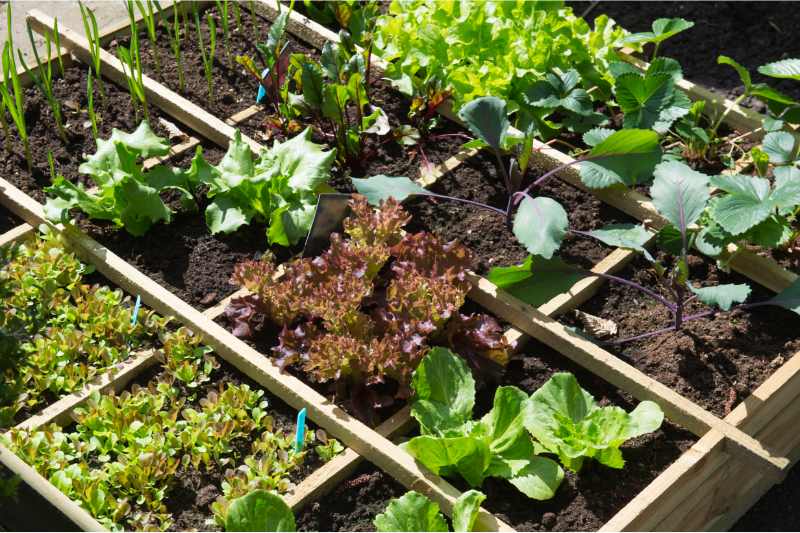
How Many Plants Per Square Foot
Check the recommended distance between plants on the transplant label or seed packet. Or use the square-foot gardening strategy. In a 1 by-1-foot area, you can plant the following:
- 9 to 16 small plants like radishes, onions, carrots, or lettuce.
- 4 to 8 medium-sized plants like basil or sage.
- 1 large plant like bell peppers, broccoli, or kale.
Large fruiting plants like tomatoes and cucumbers need 1.5 to 2 square feet of space.
When reaching maturity, plants should barely touch each other’s leaves. This ensures good air circulation and makes fungal diseases travel slower between plants.
How to Plant More Crops In a Small Space
Vertical gardening is a smart way to optimize space. Use trellises or cages for climbing veggies like peas, beans, and cucumbers to save space. Cages are also great for keeping tomatoes and pepper plants from leaning toward the soil if you plant lettuce or radishes around them.
You can even install suspended planting containers if your vegetable bed is near a wall or garden fence. While small for large plants like tomatoes or peppers, they are excellent for growing annual herbs and leafy greens.
Here are some practical models of trellises, cages, and vertical pots to extend your garden vertically:
- A-Frame Metal Garden Trellis Set for Raised Bed (Amazon)
- Tomato Cages Square (HomeDepot)
- Wall Mountable Garden Planter (Walmart)
Space to Walk and Work
Remember, you need space to walk around when tending your plants. Leave a 2 to 3-foot-wide space between vegetable beds. Cover walkways with mulch or plant a suitable ground cover. It’s more pleasant to walk on a covered surface after heavy rain.
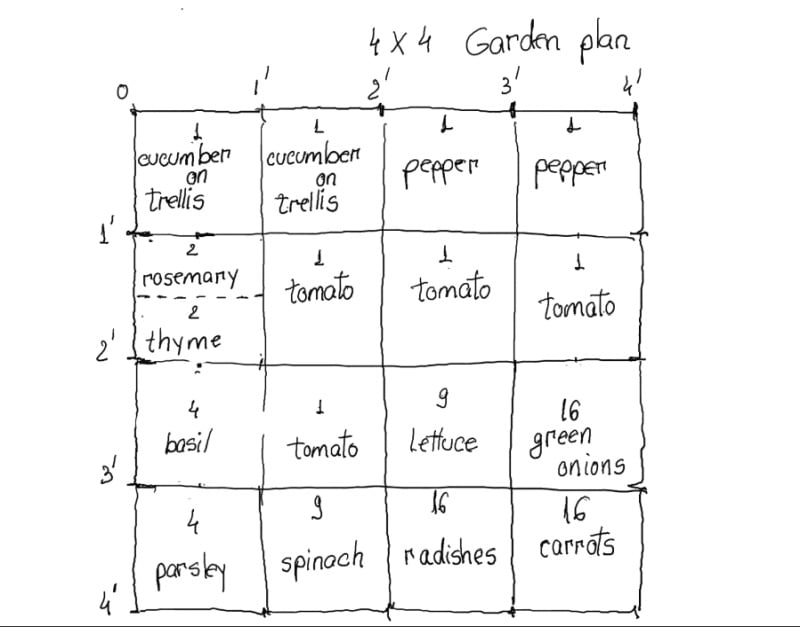
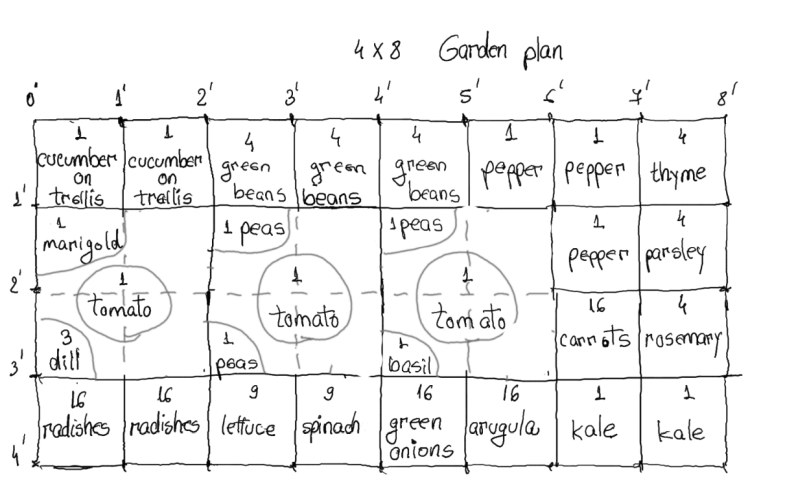
Vegetable Garden Plan Examples
Start working on your garden layout as early as possible. Winter is often a good time to think about what and where to plant. Put your ideas into a sketch. Make it in pencil or a digital format so you can change elements if you change your mind. Divide your garden space into one-square-foot sections to make orientation simpler.
Here are some examples of small garden designs with easy-to-grow vegetables and herbs suited for beginners.
4×4-foot garden plan
4×8-foot garden plan
Now that you’ve seen how to plan a kitchen garden on paper, it’s time to make your own sketch. Find a pencil, a ruler, and some paper, and get to work!
Planting Calendar
With a full life and a demanding job, it’s easy to skip the best time for planting your veggies and herbs. Make a planting schedule on paper and put it on your fridge or a board in your office. Include veggies and herbs, the best time for seeding or planting, and the harvesting period. Here’s a model to guide you.
Remember, planting time varies with your location. Here’s a classic gardening calendar with the most common starter vegetables.
| Plant Type | Best Time for Seeding or Planting Outside | Harvesting Period |
| Radishes | April – May August | May – June September – October |
| Cucumbers | May – June | July – September |
| Spinach | April – May | May – June |
| Tomatoes | May – June | August – September |
| Carrots | April August | May – June September – October |
| Kale | April – May July – August | June September – October |
Step 7: Gather Your Tools and Materials
Starting a traditional garden is simple and requires just a few good tools. Here’s what you need:
- Stakes or wood posts to mark the plant bed corners.
- Rope.
- Weed wacker or cardboard for weeds.
- Digging shovel to till the soil.
- A few bags of garden soil to amend the beds.
- A garden rake.
- Garden trowel to dig holes for seeds and transplants.
- Some sturdy garden stakes to support the growing plants.
- Gardening gloves
That’s it for planning and preparing. You’re ready for action! Roll up your sleeves, and let’s dig in!
Step 8: Prepare the Garden Bed
Bring your tools close by and begin the work by sizing up the area.
Size-Up the Plant Bed
Measure your plant bed and stick stakes or wood posts in the corners. Tie a rope around them to define the edges. The most common vegetable bed sizes are 4 by 4 feet and 4 by 8 feet, with a 3-foot wide walkway in between each bed.
A width of 4 feet allows you to weed, prune, and harvest your plants without stepping on the bed, avoiding soil compaction.
Remove All Weeds
Use a weed wacker if it’s late in the season. Place cardboard on the planting area to smother the weeds if you can wait 4 to 6 weeks to plant your veggies.
Prepare The Soil
Dig the soil a full length of a shovel and break the clumps using the shovel’s edge.
Spread garden soil over the bed. Use about 2 to 3 cubic feet for a 4 by 8-foot bed.
Mix both soils thoroughly to get a uniform texture. Leaving two different soil layers, one on top of the other, can create water management problems. If some clumps remain, use your (gloved) hand to break them.
Level the plant bed surface with the downside of your garden rake.
There it is! You’re ready to bring in the plants and seeds!
Optional: Garden Bed Edging
Adding an edge to your garden bed makes the garden look neat and clean, keeps grass and trailing weeds out and mulch in, and prevents you from stepping on it by mistake. Consider a material that won’t add pollutants to your soil, such as stone, brick, or untreated wood. Make it a fence if you need to keep pets or pests away.
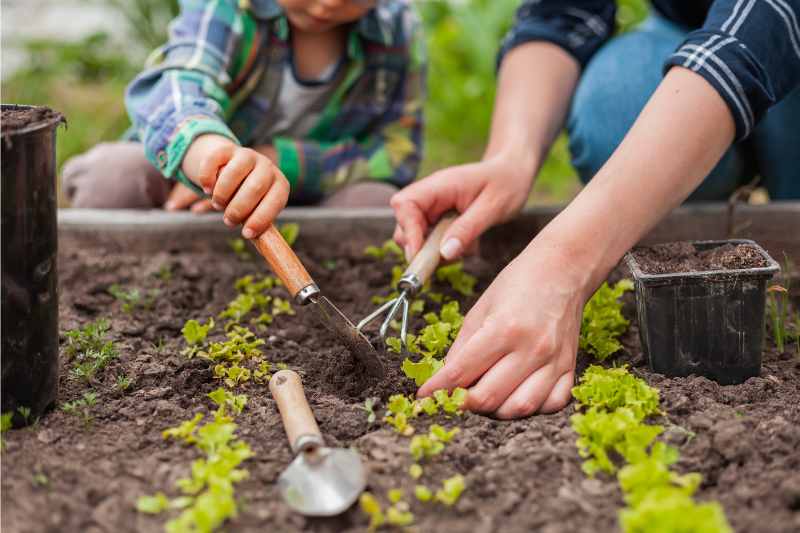
Step 9: Install Transplants and Spread Seeds
Once the vegetable bed is ready, plant your transplants according to your gardening plan. Continue by seeding the veggies and herbs you’re growing directly from seed.
Plant Plugs And Potted Veggies and Herbs
Plugs and potted plants are easy to install in their new home. Here’s how.
- Dig the soil with a garden trowel. Make a hole two times larger than the pot you have your plug or transplant in and a little deeper.
- Spread two tablespoons of balanced organic fertilizer and mix the fertilizer with some soil.
- Pour water generously to moisten the soil in the planting hole.
- Take out the plants from the pot or seed tray. Do your best to get it out with as much soil attached to the roots as possible.
- Place the plant in its place and cover the roots with soil, pressing lightly to ensure the dirt gets close to the roots.
- Stick a garden stake into the ground near the plant. You’ll use it to support the plant when it grows taller. Adding it now prevents damaging the roots later.
- Water the soil around the plant. Avoid wetting the leaves. Let it be for a few days, and water again when the soil gets dry about 1 inch deep.
Repeat for all your transplants.
Spread the Seeds
For plants that you’re growing from seed, take a few seeds in your hand and spread them on the soil where you want the plants to grow. Seeds don’t need to be buried deep. Just rake the soil a bit to cover the seeds with a thin layer of dirt, and press with your palms to compact it so moisture stays in.
Water with a watering can and a nozzle. You need a fine spray of water, not a strong jet. Otherwise, you risk washing away the seeds. Keep the ground moist (not wet) until germination.
Step 10: Cover The Ground With Mulch
In a few days, your seeds will germinate. Now, you can see where each plant is and apply a layer of mulch to protect the soil and roots and prevent weeds from emerging.
Spread a layer of mulch about 2 to 3 inches thick. Leave a free area around each plant, about 2 inches wide, to prevent standing moisture near the stems.
You can use dry leaves, grass clippings, wood chips, hay, straw, garden trimmings, homemade compost, bark, landscape fabric, pebbles, crushed stone, or lava rock as mulch for your garden. Always ensure mulch is clear of weed seeds, herbicides, pesticides, and other chemicals.
Mulch protects the soil from heat, cold, erosion, and compaction, reduces water evaporation, and limits weed growth. Organic options also work as a fertilizer, with amazing benefits for soil and plants. It’s cheap and is worth using. Learn more about it from our detailed guide on mulch.
Step 11: Maintain Your Vegetable Garden
Now that you’ve started your vegetable garden, keep it watered and clear of weeds and pests, harvest spring and summer crops, and later on, prepare it for winter.
How to Irrigate a Vegetable Garden
Most veggies need about 1 inch of water per week, including rainfall. You can irrigate the garden with a sprinkler system or a garden hose with nozzles, but more efficient and safe are soaker hoses and drip irrigation systems.
The main idea is to avoid watering the leaves and limit irrigation only to the soil and roots. Wet leaves can lead to nasty fungal diseases, like early blight on tomatoes or chile wilt in peppers, that can kill your plants.
As for the irrigation frequency, sandy soils require two waterings per week, while loam and clay soils require one weekly watering. Mulch keeps moisture in the ground. If you applied a layer on your veggie beds, you might need to water less often. Watering at the best times of day – early morning or evening – also helps reduce water loss, so you may not have to water your garden as much or as frequently.
Do Vegetable Plants Need Fertilizers?
Heavy feeders grow better if you apply a small amount of balanced, continuous-release fertilizer in each planting hole. For moderate feeders, good drainage and plenty of water are more helpful than fertilizers. If you want to give them a boost, apply a balanced liquid formula. Light feeders don’t need fertilizer if you amend the soil with compost. Here are some examples from each category.
| Light Feeders | Moderate Feeders | Heavy Feeders |
| • Peas • Spinach • Lettuce • Arugula • Mustard greens • Radishes • Turnips | • Carrots • Beets • Pole beans • Parsnips • Sweet potatoes | • Cucumbers • Eggplants • Peppers • Tomatoes • Squash • Kale • Broccoli |
Since you’re consuming plants and fruits, use organic fertilizers as much as possible. You can make fertilizers at home or buy natural formulas like:
- Jobe’s Organics Bone Meal
- Burpee Organic Blood Meal Fertilizer
- Soil Blend Worm Castings
- Organic Liquid Kelp Fertilizer
Keep Away Weeds and Pests
Mulching keeps most of the weeds under raps, but you’ll still need to pull out a few by hand now and then.
As for pests, avoid using chemical insecticides if possible. You’ll contaminate the crops and also kill many beneficial insects. Here are a few gardening tips to help you deter pests safely:
- Collect caterpillars, cutworms, and other large pests by hand and drop them in a solution with water and soap (or relocate them).
- Install insect nets to keep the large ones out, like stink bugs and caterpillars.
- Use natural solutions like garlic water to kill aphids and other small insects.
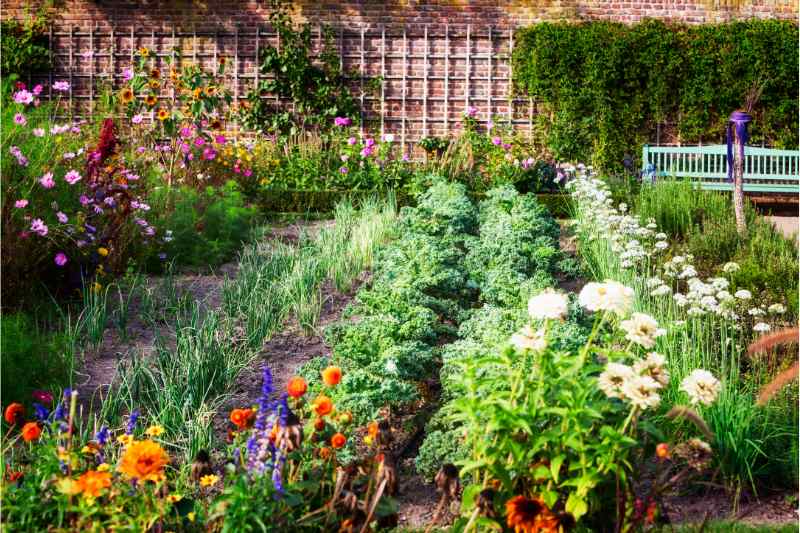
- Include companion plants like marigolds, onion, garlic, basil, and other pest deterrents in and around your vegetable bed.
You might need to install fences for rabbits or deer if they’re present in the area.
Harvesting and Succession Planting
How do you know your veggies and herbs are ready for harvest? There’s no single rule of thumb to determine the right harvest time for all veggies. Each has its own moment of reaching full flavor and perfect texture. Here are some tips for tackling the best time to collect some of the most common starter vegetables.
| Vegetable | When to harvest |
| Radishes | Check for the shoulders of the bulbs that start to pop out from the soil around the time you should collect them. |
| Carrots | The top of the root also pops up at the soil level. Check the gauge compared to what’s expected for your variety. |
| Cucumbers | Harvest young and check the crop every day. They grow fast. |
| Eggplant | Fruits are firm and shiny. Cut, don’t pull, to avoid harming the plant. |
| Kale | Pick exterior leaves with firm and sturdy texture. Better in cold weather. |
| Lettuce | Harvest leaves when they reach about 4 inches in height. |
| Peas | Collect the pea pods when they look full. |
| Spinach | Pick up individual leaves when they are about 6 inches tall. |
| Tomatoes | Ripe fruits have a full color and are slightly soft. |
To grow more crops in a small space, use succession planting. Seed radishes, carrots, and leafy greens in their own rows about a week apart. Harvest gradually and use the free rows to seed the same crop again or different plants.
Also, time your seeding and planting to cover two growing seasons for cold-tolerant vegetables like radishes, kale, and lettuce, plus the summer with warm-season crops.
Preparing the Garden for Winter
Your gardening year is not over until you prepare the plants and soil for winter:
Cold Hardy Veggies
Hardy vegetables like kale, broccoli, and spinach can survive through the winter with little or no protection. They can tolerate hard frosts (25° to 28°F).
You can also leave carrots, beets, and parsnips in the ground and collect them during the winter, but they’ll need some protection, like a thick layer of hay or straw. Collect all tender vegetables (tomatoes, zucchini, peas, beans, etc.) before the first frost.
Cold Hardy Herbs
Sage and thyme don’t need protection from cold. Oregano, rosemary, and parsley are resilient but would benefit from a layer of hay to keep them warm. Basil can’t survive outside in the cold.
Cover the Plant Beds
Add a layer of compost or manure; it will enrich the soil wonderfully for the next season. Cover with mulch or straw to prevent erosion, avoid nutrient leaching, and prevent weeds from emerging. You can also use cardboard, old carpet, or black plastic to cover the soil.
FAQ About Veggie Gardening
Companion plants protect crops from pests and diseases and improve yields by attracting pollinators. For example, growing oregano, parsley, and thyme with tomatoes attracts parasitic wasps that control tomato hornworms.
Add a greenhouse to your yard if you live in the North, with a short growing season. It offers a warmer, sheltered environment to grow in during spring and fall. A greenhouse is also good for growing your seedlings earlier in the season. You can buy a commercial model or build one DIY.
A polytunnel is a tunnel made often of steel and covered with polyethylene. It’s similar to a greenhouse and used for the same purpose, but less expensive to buy and build DIY.
When the soil is no longer frozen, you can seed spinach and peas. Follow with radishes and carrots a few weeks later.
Start Your Vegetable Garden Today!
You’re all set with the basics and ready to start your garden. Not sure where to put it and how it would affect the yard’s appearance? Talk to a professional landscaper. LawnStarter can connect you with talented lawn care and landscaping experts all over the country. Find a landscaping pro near you and start your vegetable garden today with the best looks and delicious food!
Main Image Credit: caelmi / Canva Pro / License