Fertilizer can be pricey, and with nitrogen costs increasing by as much as 34% month over month in March, many homeowners are wondering how to save money and make their own plant food.
Luckily, you don’t have to be a mad scientist to make your own fertilizer. Many organic fertilizer recipes use ingredients you already have at home, or even things you might otherwise throw out. These ingredients have different ratios of three basic essential nutrients: nitrogen, phosphorus, and potassium, also known as “NPK.”
In this article, we’ll teach you how to make your own fertilizer using food and common household waste like eggshells, bones, aquarium water, and more.
10 Ways to Make Your Own Fertilizer
1. Grass Clippings

Don’t put that cut grass on the curb after you mow. Grass clippings can act as a natural mulch and fertilizer for your garden soil. Simply spread them over your flower or vegetable garden to introduce new nutrients and protect your plants.
Warning: If your lawn is struggling with diseases like dollar spot or brown patch, don’t fertilize with clippings. The same applies if you’ve treated your lawn with herbicides or pesticides.
Cost: Because they come from routine lawn care, grass clippings are a completely free fertilizer. The cost of mowing a lawn ranges between $49 and $147, though.
2. Bone Meal
Turn the scraps from your next wing night into an effective and thrifty fertilizer. Bone meal is rich in phosphorus, and while it’s often sold packaged in stores as fertilizer or animal feed, it’s easy to make at home, too.
To make a DIY bone meal fertilizer, follow these steps:
- Save and clean the animal bones from a few meals. Boil them for an hour to remove fat and cartilage, or clean the bones by hand.
- Line a baking tray with the cleaned bones, then bake at 350-400 degrees for at least 30 minutes, or up to a few hours, depending on how much moisture the bones contain. The goal is to remove most of the moisture and kill any pathogens that could transfer to your edibles.
- Grind the baked bones in a mortar and pestle to create a fine powder. A food processor or high-powered blender also works if the bones are very dry.
Note: Bone meal works best in soils with a pH of 6.0 to 7.5. If your soil has a pH above 7.5, the phosphorus may not be available for your plants to absorb.
Cost: Store-bought bone meal ranges from $15 to $30 per bag. You can also make it at home for free.
3. Eggshells
More eggs than chickens in your kitchen? Eggshells are loaded with calcium carbonate, which can make your garden soil more alkaline and provide your plants with essential calcium. Eggshells also contain potassium, one of the three essential nutrients needed for plants to grow properly.
Just wash and grind your eggshells, then scatter them into the garden bed. You can also make a liquid fertilizer by steeping the eggshells to create “shell tea.”
Cost: A dozen eggs cost around $2.35, but you’ll enjoy the eggs first, so the shells used for fertilizer are essentially free.
4. Coffee Grounds
Coffee grounds are a good source of nitrogen (1% to 2%) and can encourage the growth of beneficial microorganisms. You can save the grounds from your morning cup of joe, dry them out, and work them into your soil. Or, incorporate them into a compost pile along with the paper filters.
Just do this in moderation — a light sprinkle once every few months is plenty, as too much can actually harm your soil.
Prefer tea? Spent tea leaves work the same way. High in nitrogen, they can be worked directly into your soil, added to compost, or steeped in water for 24 hours and used to water your plants.
Cost: Ground coffee costs around $9.50 per pound, but since the real value is in your daily cup, the used grounds you turn into fertilizer cost you nothing.
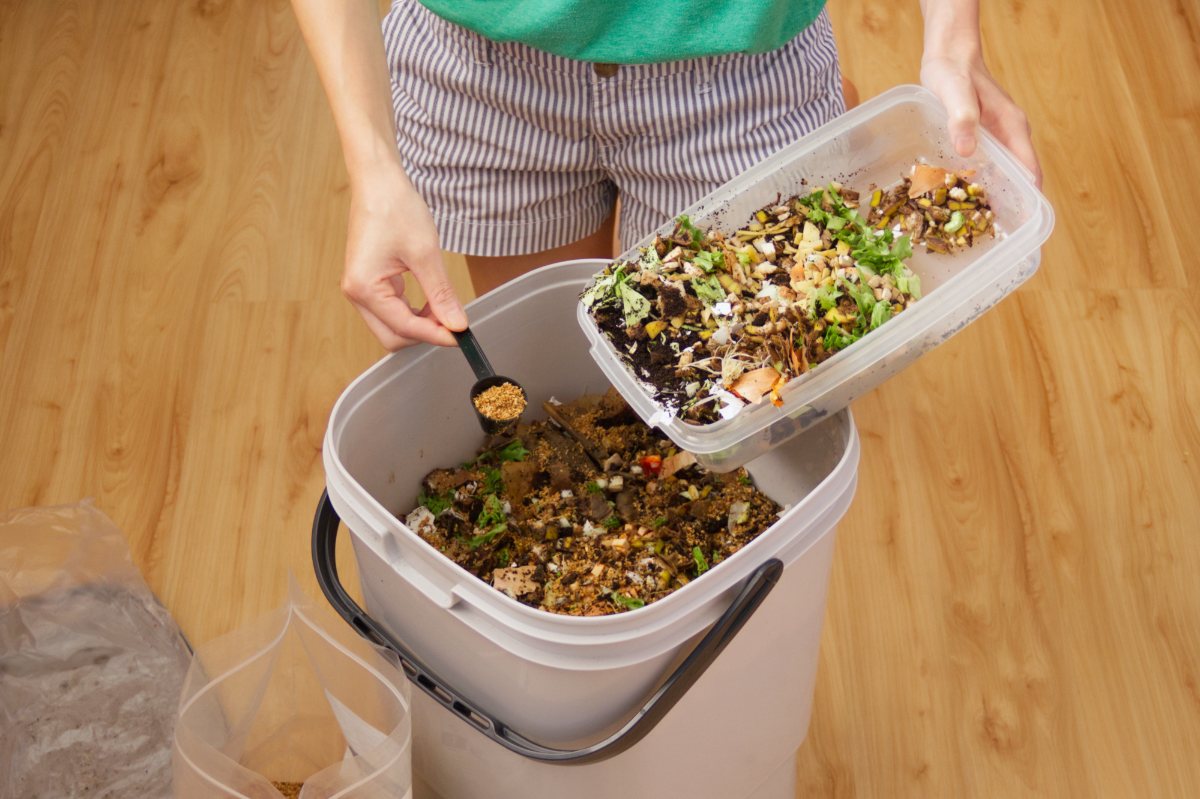
5. Compost
If you want to take your kitchen scraps to the next level, consider making your own compost. Mixing organic matter like eggshells, banana peels, and coffee grounds in a bin or compost pile before you apply it to your yard can create a better nutrient ratio. Composting also allows kitchen scraps to decompose, making the plant food easier to absorb.
Looking for a liquid fertilizer? Mix compost with water to create compost tea.
Warning: “Depending on where you live, a lot of times putting foods in your compost pile or compost bin is not necessarily a good idea because it can attract rodents,” says Jo Ellen Meyers Sharp, an award-winning garden writer. Moreover, “You don’t want to ever put dairy or meats in there,” she says.
Cost: Compost itself is free to make from food and yard waste, though a compost bin can cost $70 to $230, depending on the size and type.
6. Wood Ash

The wood ash in your fireplace is often considered a waste product of burning wood, but in centuries past, wood was often burned to produce ash for fertilizer. It’s full of calcium, but also loaded with other nutrients that plants absorb from the soil, including potassium, phosphorus, and magnesium, giving it around a 0-1-3 NPK ratio.
Wood ash can also raise your soil’s pH, making it more alkaline — so use it in moderation, and skip it entirely if your soil is already alkaline or if you’re growing acid-loving plants like blueberries. Let the ash cool completely before handling, and wear a dust mask, safety goggles, and gloves, as it can be caustic.
Cost: $0
7. Aquarium Water
If you have a fish tank, you also have a fertilizer-making machine. Old aquarium water is bad for your fish, but it’s loaded with bacteria and nutrients that make it great for your houseplants and garden. Save your aquarium water next time you change it and use it to water your plants.
Warning: Use only freshwater from untreated (chemical-free) tanks. Saltwater aquarium water can kill your plants, so don’t use it.
Cost: $0
8. Cooking Water
Don’t pour that water down the drain after boiling or steaming vegetables. The water contains some of the nutrients from your veggies, making it a handy supplement for your garden and houseplants. The water used to rinse rice works well too.
Just let it cool completely before using it to water your plants. Keep in mind this works best as a light nutrient boost alongside your regular fertilizer routine, not as a replacement for it.
Cost: $0
9. Banana Peels
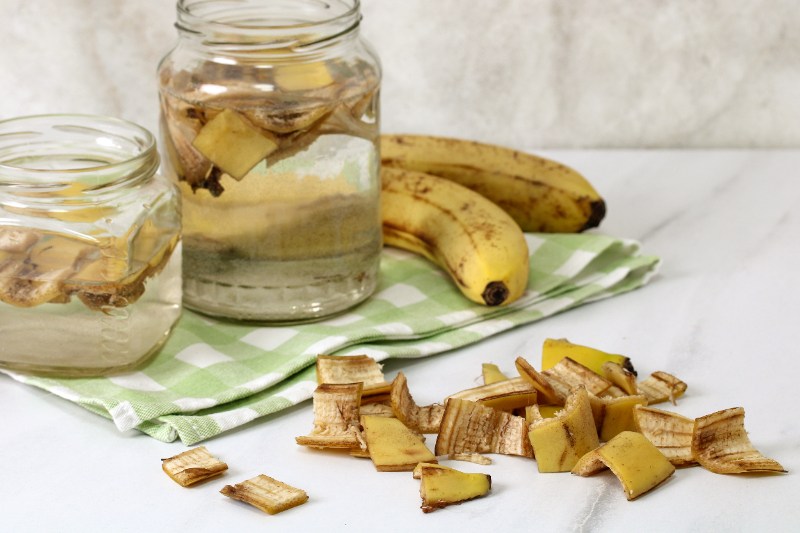
Instead of tossing your banana peels in the trash, put them to work in the garden. They contain some potassium and nitrogen, along with smaller amounts of phosphorus, calcium, and magnesium, making them an effective plant food.
Dry the peels in the oven or dehydrator first, then chop them into smaller pieces. From there, you have a few options:
- Bury the peels directly in your garden bed before planting.
- Blend them into a powder or paste to spread near your plants.
- Soak them in water for up to 2 weeks and use the liquid to water your plants.
Cost: Bananas cost around $0.65 per pound, but you’d normally throw the peels away, so this fertilizer is free.
10. Leaf Mold
One of the many things you can do with fallen leaves is to turn them into leaf mold. Decomposed leaves, known as leaf mold, are sometimes called “gardener’s gold” for good reason. They do wonders for improving soil structure, retaining moisture, and attracting earthworms.
To make it, follow these steps:
- Pile your leaves in an out-of-the-way corner or a compost bin
- Keep them damp
- Turn the pile occasionally so they break down evenly.
- Be patient: Leaf mold takes a year or two to be ready to use.
As Meyers Sharp notes, using leaves also keeps them out of the waste stream, so you’ll be making food for your garden and helping the environment at the same time.
If you’re in a hurry, Meyers Sharp suggests an easier alternative: “Lay them on top of your vegetable bed in the winter. The leaves spread over your garden add some cover to keep weeds from blowing in.”
Cost: While leaf mold is free to make from fallen leaves, the real investment is time. Store-bought versions start at $10 per bag.
FAQ
Like many things, DIY fertilizer has its pros and cons. Here are some of its downsides:
• It’s difficult to find out just how many nutrients are in natural DIY fertilizer. If your garden or lawn is sorely lacking specific nutrients, it may be difficult to address the issue if you rely solely on homemade fertilizer.
• It’s slow-release. This is actually great for the long-term health of plants, but it’s not ideal if you have a lawn that needs a boost of nutrients ASAP.
• It can take a while to make. Composting and making leaf mold can take months to produce anything usable. Making your DIY fertilizer is definitely a long-term project if you want the best results.
Not always. While many homemade fertilizers are safe for general use, some plants have specific needs. For example, wood ash can raise soil pH, which isn’t ideal for acid-loving plants like blueberries, and too many coffee grounds can overwhelm soil with nitrogen. It’s best to match the fertilizer to your plant type.
Good for Your Garden and Your Wallet
Making your own garden fertilizer from household items and waste is a fun and thrifty way to ensure your plants get plenty of nutrients. You’ll save money on fertilizer, do wonders for your organic garden, and put things to use that would otherwise go into the garbage or down the drain.
But if you need immediate help with your lawn, why not hire a pro to fertilize or provide recurring mowing services? LawnStarter can connect you with local lawn care pros with just one click.
Main Image: Making homemade fertilizer with kitchen scraps. Image Credit: MyBears / Adobe Stock