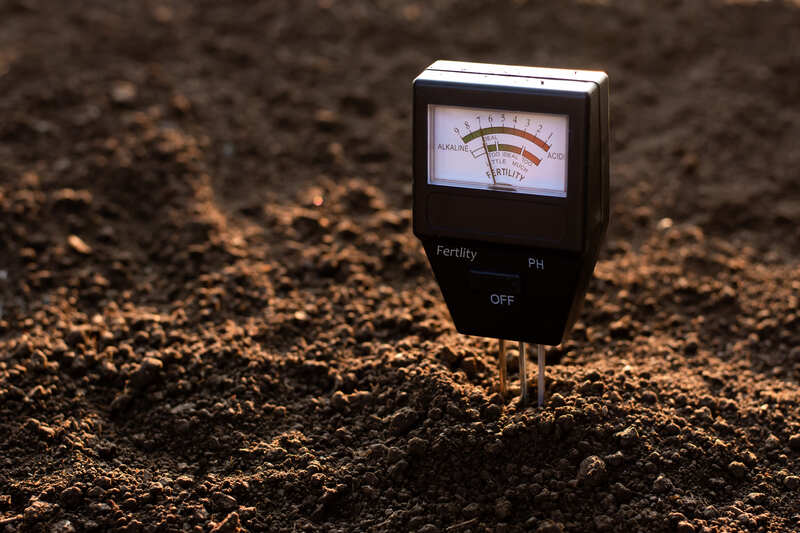
A soil test kit analyzes your lawn’s pH and nutrient levels (nitrogen, phosphorus, potassium) to guide fertilizer choices. Collect soil samples from across your yard, mix them, and follow kit instructions to combine soil with reagents. Compare results to reference charts.
Testing your soil is like those chemistry sets we had growing up, except this one helps your lawn thrive. The insights you’ll gain are worth the time and modest cost.
With a master’s degree in soil fertility, I’ve tested thousands of soil samples, validated an alternative soil testing method, and taught undergraduates proper soil testing techniques. I practice what I preach by regularly testing my own lawn and garden.
| Soil testing is just one piece of maintaining a healthy lawn. If you’d rather leave the work to professionals, LawnStarter connects you with local pros for complete, year-round lawn care — from mowing and bush trimming to leaf removal |
| Key Takeaways: |
|---|
| ● Test the soil every 2 to 3 years. ● Standard kits measure pH, nitrogen, phosphorus, and potassium. ● Collect 6 to 20 samples across the lawn. ● Sample depth: 4 to 6 inches deep. ● Follow the test kit instructions carefully. |
What Does a Standard Soil Test Kit Include for Lawns?
A standard at-home soil test kit for lawns includes everything you need to measure the four most critical factors: pH (acidity/alkalinity), nitrogen (N), phosphorus (P), and potassium (K).
Most basic kits contain:
- Detailed instruction manual
- Test chambers or vials for each test
- Color-changing reagent capsules
- Dropper or measuring tools
- Reference color charts for interpreting results
Step-By-Step Guide: How to Test Lawn Soil
Gather Your Materials
- Soil testing kit
- Garden trowel, spade, or soil probe (avoid rusty equipment)
- Clean plastic bucket
- Distilled water
- Paper and pen for recording results
Collect Samples
The goal is to collect soil from several spots in your yard and mix it. You’ll then test a small portion of the composite sample.
Select 6 to 20 random spots, depending on your lawn size. For my quarter-acre suburban lot, I take 8 samples when testing lawn soil — 6 from the back and 2 from the front — and another 6 to 8 for my garden.
My Tip: Avoid sampling areas considerably different from the rest of your yard — where your compost pile used to be, places with standing water, or a corner the neighborhood cat uses as a litter box. These spots skew results. Sample them separately if you want that information.
Clean your trowel, probe, or shovel before starting. Scrub off caked-on dirt and wipe with rubbing alcohol or a disinfecting wipe to minimize cross-contamination.
How to collect each sample:
Dig a small hole at each spot, then take a half-inch slice from the side of the hole as your sample. If using a soil probe, push it straight down into the ground and pull straight back up, removing a core.
Place collected soil in the bucket.
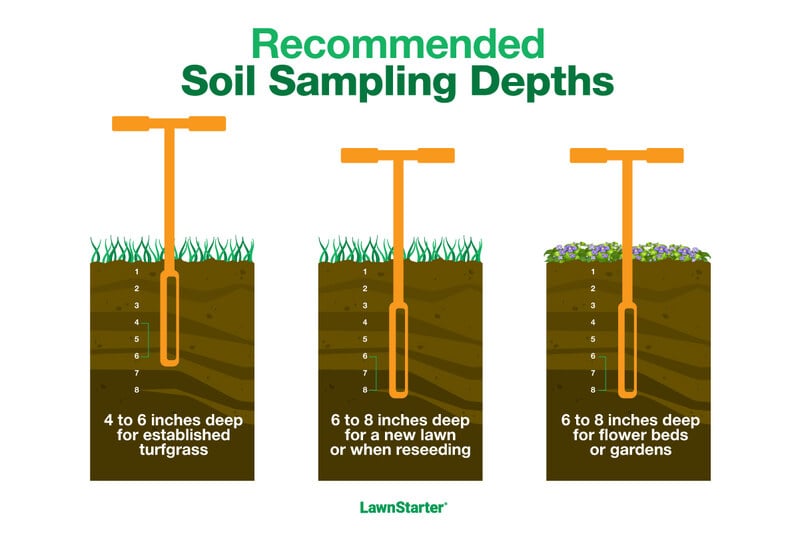
Sampling depth matters:
- 4 to 6 inches deep for established turfgrass
- 6 to 8 inches deep for new lawn or reseeding
- 6 to 8 inches deep for flower beds or gardens
Related:
Prepare Your Sample
Follow the sample prep instructions for your specific soil test kit. It’s not necessary, but the soil is easier to work with if you let it air dry.
- Remove rocks, roots, plant material, or debris from the composite sample.
- Mix the soil in the bucket with your hands or trowel, breaking up large clods.
- Spread soil on a newspaper in a thin layer.
- Allow to air-dry for 24 to 48 hours.
- Mix soil on newspaper, break up remaining clods, then put 2-3 cups in a plastic zip-top bag.
My Tip: I previously used a sand strainer from my kids’ beach toys to sift out rocks and clumps after drying. I couldn’t find it this year, so I used a cheap colander from the dollar store.
Analyzing the Soil
These instructions are for the Luster Leaf Rapitest Soil Test Kit. Other kits may vary slightly.
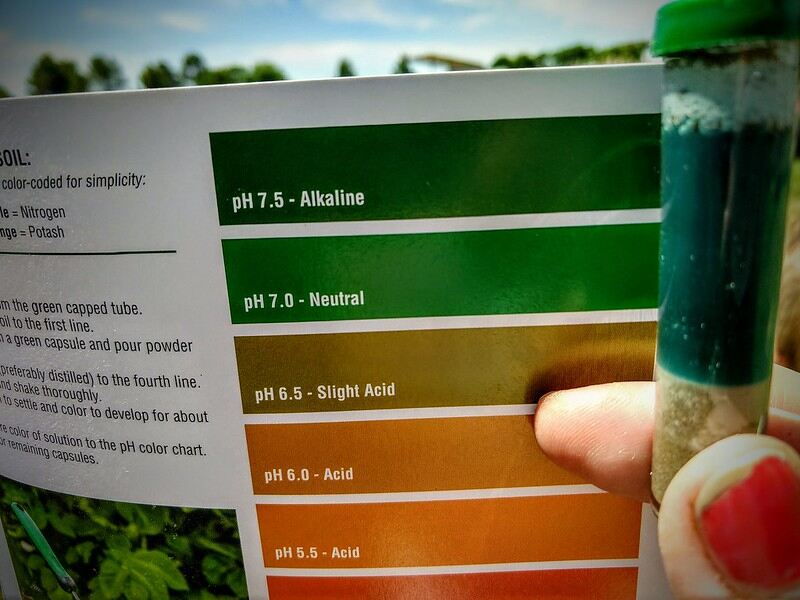
How to Test Soil pH at Home
- Fill test chamber to soil fill line with your sample.
- Separate the pH testing capsule halves and add powder to test tube.
- Use dropper to add distilled water to water fill line.
- Cap and shake vigorously until well mixed.
- Allow soil to settle and color to develop (approximately 1 minute).
- Compare resulting color to pH reference chart.
Testing Soil Nutrients (N, P, and K)
- Combine 1 cup of soil sample and 5 cups water. Shake or stir for 1 minute, then let soil settle out (30 minutes to 24 hours, depending on soil type).
- Use dropper to transfer solution from the soil sample to N, P, and K test compartments, filling to water fill line. Transfer only liquid; avoid disturbing sediment.
- Separate each testing capsule halves and add powder to color-coordinating compartment.
- Cap and shake vigorously.
- Allow color to develop for 10 minutes.
- Compare each compartment’s color to coordinating reference chart.
Interpreting Test Results
When using an at-home kit, interpreting color comparison results is critical. The results determine whether you apply fertilizer or adjust soil pH, and by how much.
| Test Type | What the Colors Mean |
| pH Test | Blue/purple = alkaline soil (above 7.0) Green = neutral soil (around 7.0) Yellow/orange = acidic soil (below 7.0) |
| Nitrogen (N) | Pale pink/purple or no color = low nitrogen Medium to dark pinkish purple = moderate to high nitrogen |
| Phosphorus (P) | Light blue or no color = low phosphorus Medium to dark blue = moderate to high phosphorus |
| Potassium (K) | Clear or slight yellow to orange = low potassium Medium yellow to orange = moderate to high potassium |
Tips for Accurate Soil Test Results
Before Collecting:
- Clean all equipment.
- Test in fall or early spring. Avoid testing right after applying fertilizer or lime.
- Wait at least 6 months after applying amendments for accurate baseline readings.
During Collection:
- Collect samples in a randomized pattern across the entire lawn.
- Avoid sampling near driveways, buildings, or structures that may potentially contaminate soil.
- Avoid sampling areas significantly different from the rest of your yard.
During Testing:
- Follow the kit instructions carefully, especially processing times.
- Use distilled water. Tap water may contain minerals that can affect results.
- Read results in natural daylight, not under artificial lights.
- Follow the exact times in the instructions. Reading too early or too late causes inaccurate interpretations.
- Place the color chart and sample on a white background to reduce distortion.
- Hold the test tube next to the color chart, not on top of it.
- If the color falls between two references, record it as a range.
How Soil Testing Helps You Choose Fertilizer
A soil test is a chemical analysis that determines soil composition and quality. It also shows you exactly what nutrients your soil has and what it’s missing, allowing you to:
- Prevent over-fertilization. For example, if your test shows high phosphorus, choose a fertilizer with little or no phosphorus (like 20-0-5 instead of 10-10-10).
- Identify deficiencies. If your test reveals low nitrogen or potassium levels, you can select fertilizers that specifically address those gaps.
- Save money. Many homeowners buy all-purpose 10-10-10 fertilizers without knowing their soil needs. A soil test might reveal you need a 3-1-2 ratio of N-P-K, so you aren’t over-applying phosphorus and under-applying nitrogen and potassium.
- Optimize pH for nutrient availability. Soil pH affects whether grass roots can absorb nutrients. If your pH is too low (acidic soil) or too high (alkaline soil), nutrients may be “locked up” even if they’re present. Your test shows if you need to change the soil pH by adding lime to raise it or sulfur to lower it.
By testing before problems start, you can avoid nutrient deficiencies and pH imbalances that lead to poor grass growth and common lawn diseases.
Related:
- How to Fertilize Your Lawn
- How Soil pH Affects Lawn Health
- Fertilizer Numbers: What They Mean and How to Use Them
- When to Test the Soil pH of Your Lawn
- Lime for Lawns: Why, When, and How to Lime a Lawn
FAQ About Using a Soil Test Kit
Test every 2 to 3 years. Routine testing helps you monitor changes and adjust practices before problems become serious.
Test immediately if you’re:
• Establishing a new lawn or (test before planting grass seed).
• Making significant landscaping changes (including applying soil amendments to change pH).
• Post-construction (disturbed and compacted soil affects health).
• Seeing lawn stress (yellowing grass, poor growth, patchy areas).
At-home kits are available at Amazon, local nurseries, hardware stores, and big-box retailers (Walmart, Home Depot, Lowe’s).
For professional lab testing, you can purchase mail-in kits from MySoil, SoilKit, or Soil Savvy. Or you can send samples to labs directly, following the directions they provide.
Basic DIY soil test kits cost $10 to $20 and give you (almost) immediate results, measuring pH and major nutrients (N, P, K).
Labs affiliated with the Cooperative Extension Service provide professional soil testing at a cost of typically $10 to $50 per sample. You can request analysis of additional nutrients like calcium, magnesium, sulfur, and micronutrients (iron, manganese, copper, zinc, boron). You’ll receive a detailed analysis in 2 to 3 weeks and personalized fertilizer recommendations in the soil test report.
Let LawnStarter Connect You With Local Lawn Care Pros
Regular soil testing might seem like a chore, but it’s a small effort that pays off in lawn health and beauty. By testing your soil and meeting its needs, you’ll keep your grass thriving.
But lawn care doesn’t stop at soil testing. Consistent mowing, aerating, and fertilizing are essential. If you feel overwhelmed or need expert advice, LawnStarter makes it easy to find qualified local lawn care professionals.
Here’s how LawnStarter helps:
- Get matched with licensed, vetted lawn care pros in your area.
- Request fertilization, aeration, and other treatments.
- Book services online in minutes.
- Enjoy peace of mind with our satisfaction guarantee.
Whether you need a one-time leaf removal or bush trimming or ongoing maintenance, LawnStarter connects you with professionals who can help you achieve a lush lawn you’ll enjoy all year round.
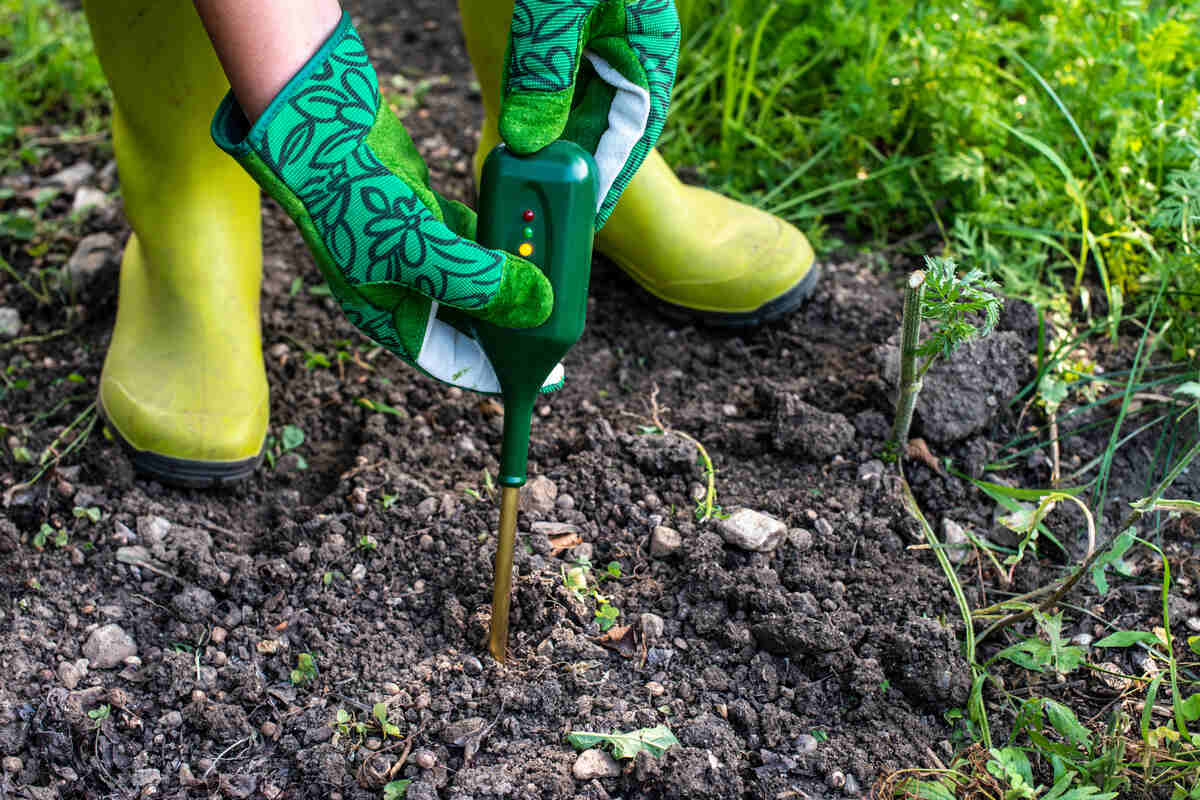
Main Image: Person using a device for soil testing. Image Credit: Deyan Georgiev / Adobe Stock Free / License