If your lawn looks tired, you may need dethatching or aeration. Dethatching removes the layer of dead grass and organic debris that builds up between your soil and healthy grass, while aeration loosens compacted soil so roots can breathe.
Both treatments can help your lawn breathe, but they solve different problems: thatch buildup versus compacted soil. This guide breaks down what each service is, when they’re needed, and provides expert tips on how to get the best results.
Ready to dethatch or aerate your lawn? Connect with a local landscaping pro through LawnStarter for expert service without the hassle.
| Key Takeaways |
|---|
| • Dethatching removes buildup from grass and debris; aeration relieves soil compaction • Dethatch when the layer exceeds 1/2-inch thick (typically every year or two) • Always dethatch before aerating if doing both |
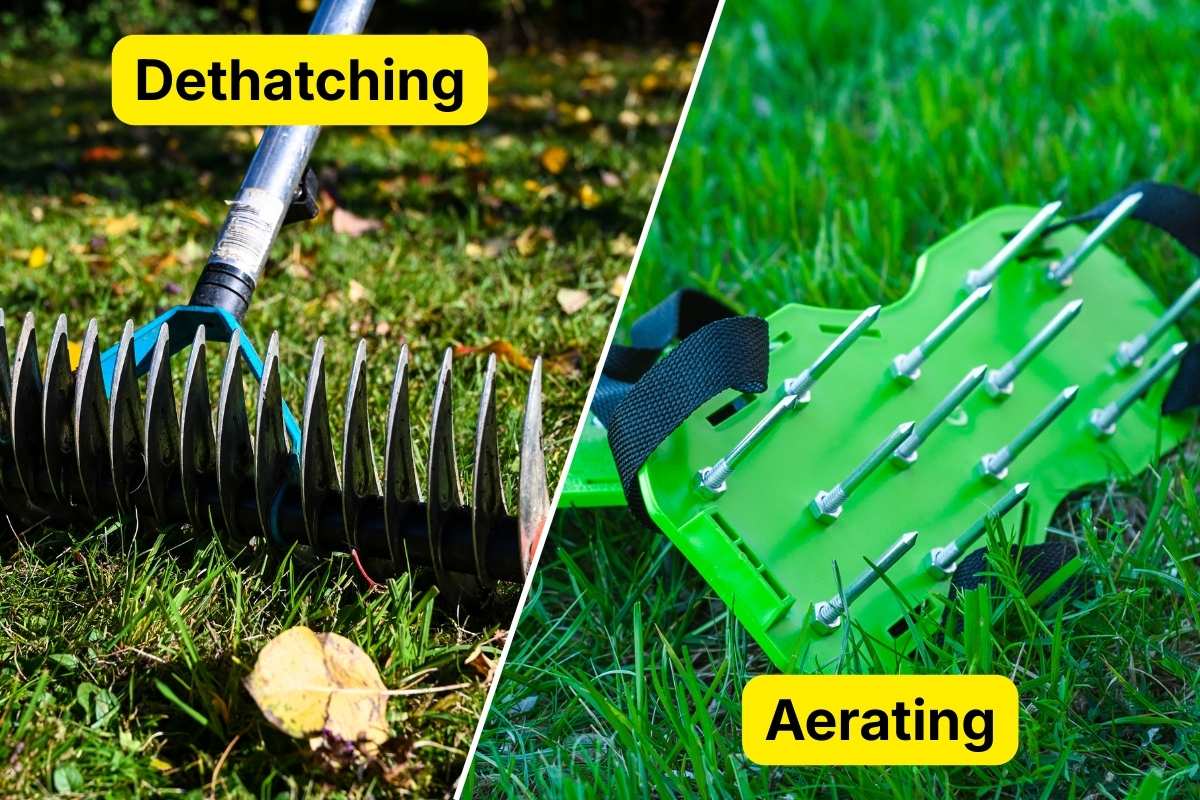
Dethatching vs. Aeration: Direct Comparison
Although they’re often performed around the same time of year, dethatching and aeration address different lawn problems, so it helps to look at them side by side.
The table below compares their purpose, timing, and key differences to help you choose the right option for your lawn:
| Factor | Dethatching | Aeration |
| Purpose | Removes grass and debris buildup | Relieves soil compaction |
| What it does | Pulls up the thatch layer | Creates holes 2-3″ deep |
| Frequency | Every year or two | Annually (problem areas) or every 2-3 years |
| Best timing | Cool-season grass: FallWarm-season: Late spring | Cool-season grass: FallWarm-season: Late spring |
| Cost (DIY) | $75-$100 (tool rental) | $100 per day (tool rental) |
| Cost (Professional) | $65-$165 per treatment | $107-$202 per treatment |
| Difficulty | Moderate to difficult (can damage grass if done wrong) | Moderate (physical effort required) |
| Recovery time | 2-4 weeks | 2-4 weeks |
What Is Dethatching?
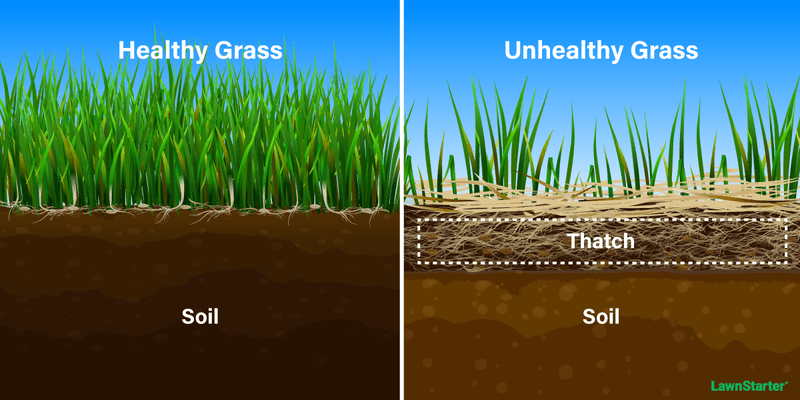
Dethatching removes the spongy layer of grass stems, roots, and organic debris that accumulates between the soil and grass blades. A thin layer is beneficial: It insulates roots and retains moisture. But when thatch grows thicker than 1/2 inch, it blocks water, air, and nutrients from reaching the soil.
According to Hayden Bock, assistant professor of landscape sustainability at Penn State, “Not all turf grasses readily produce thatch, but certain species…do, and they have a tendency to produce more of it under high fertility conditions.”
In general, warm-season (southern) grasses are more prone to thatch buildup than cool-season (northern) grasses. If you have a warm-season lawn or cool-season Kentucky bluegrass, check thatch levels annually.
How to check your thatch: Cut a small wedge from your lawn and measure the brown layer between grass and soil. If it’s more than 1/2-inch thick, it’s time to dethatch.
See Related: What is Dethatching?
Why Dethatching Is Important
Excessive thatch creates multiple problems that gradually weaken your lawn. “Think of it as a factory,” says Bock. “The grass produces this layer of dead tissue, and the soil biota (living organisms) help it to decompose as they utilize the thatch as a food source.”
“In situations where the plant is growing rapidly (i.e., when we are putting out a lot of fertilizer), this thatch material is produced at a rate faster than can be decomposed by the biota, and so it begins to accumulate,” he explains. And that’s when the problems start:
- Prevents water and nutrient absorption: Thick thatch acts like a sponge, absorbing water and fertilizer before they reach roots. Your grass stays thirsty even after irrigation.
- Harbors diseases and pests: The damp, dense environment is ideal for fungal diseases and lawn pests like grubs and chinch bugs.
- Reduces stress tolerance: Grass with shallow roots (trapped above thatch) struggles with heat, drought, and cold. It yellows quickly and recovers slowly from damage.
- Creates uneven, spongy turf: Walking on heavily thatched lawns feels bouncy and soft, a clear warning sign that your lawn can’t breathe.
Best Time to Dethatch
Dethatch during your grass’s active growing season: late summer to early fall for cool-season grasses or late spring to early summer for warm-season grasses. Dethatch every year or two, or when thatch exceeds 1/2 inch.
See Related: When to Dethatch Your Lawn
What Is Aeration?
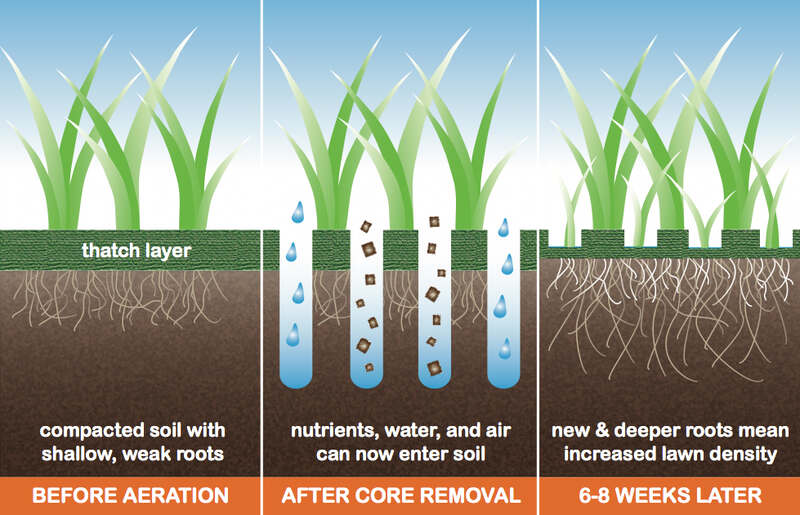
Lawn aeration creates small openings in your soil, typically 2-3 inches deep, allowing air, water, and nutrients to penetrate the grass roots. The process relieves soil compaction caused by foot traffic, heavy equipment, or natural clay content.
Core aeration (also called plug aeration) is the gold standard. This method removes soil plugs from your lawn and allows them to break down naturally. Unlike spike aeration, it doesn’t compress the surrounding soil.
Why Aeration Matters
Compacted soil creates a hostile environment for grass roots. When soil particles press too tightly together, roots can’t spread, water runs off instead of soaking in, and your lawn suffocates slowly. Here’s what aeration fixes:
- Improves water penetration: Aeration holes channel water directly to root zones instead of letting it pool on the surface or run off. You’ll notice fewer puddles and better drought resistance.
- Enhances nutrient delivery: Fertilizer reaches roots more effectively, maximizing your investment. Beneficial microorganisms also get the oxygen they need to break down thatch and enrich soil.
- Strengthens root systems: With better access to water and oxygen, grass roots grow deeper, creating a more resilient lawn that handles heat, foot traffic, and pests.
- Prepares for overseeding: Lawn aeration is a great way to prepare your lawn for overseeding, as it increases seed-to-soil contact. Aeration cores create perfect seed pockets for germination.
According to Alison O’Connor, professor of horticulture with Colorado State University Extension, “Seeding can be very successful if the area is heavily aerated. Make several passes over the seeding area — the goal is to make lots and lots AND LOTS AND LOTS of holes. The more holes, the better,” she adds.
Best Time to Aerate
Aerate during your grass’s active growing season, the same as dethatching: late summer to early fall for cool-season grasses and late spring to early summer for warm-season grasses. For clay soil or high-traffic areas, aerate annually; sandy soil typically needs aeration only every 2-3 years.
How to Tell If Your Lawn Needs Dethatching or Aeration
Still not sure whether your lawn needs dethatching, aeration, or both? A few simple signs can tell you which problem you’re dealing with and which service to choose:
You need DETHATCHING if:
- Your lawn feels spongy when you walk on it
- Grass looks dull or yellowish
- You measured thatch over 1/2-inch thick
- Water runs off instead of absorbing (when soil isn’t compacted)
See Related: Signs Your Lawn Has Too Much Thatch
You need AERATION if:
- Water pools on your lawn instead of soaking in
- Grass feels hard and compacted underfoot
- A screwdriver won’t penetrate 6 inches into soil
- You have heavy foot traffic or clay soil
- Grass looks thin despite regular watering and fertilizing
You might need BOTH if:
- Your lawn shows symptoms from both lists
- You haven’t maintained your lawn regularly
- You’re preparing for major overseeding or renovation
Should You Dethatch Before Aerating?
Yes, always dethatch before aerating if doing both treatments. Here’s why:
When you aerate first, the hollow tines pull up soil plugs and create channels. If you then run a dethatcher over those fresh holes, you’ll push thatch debris down into them, defeating the purpose of aeration. Those clogged holes won’t absorb water or nutrients effectively.
The correct sequence:
- Dethatch first to remove surface debris.
- Rake up and remove thatch (don’t leave it on the lawn).
- Aerate to create clean holes in freshly cleared soil.
- Overseed and fertilize for maximum results.
See Related:
– Can You Dethatch and Aerate at the Same Time?
– Can You Fertilize and Overseed at the Same Time?
Tools and Equipment Options
Once you know whether your lawn needs dethatching or aeration, the next question is how to do it. The tools range from affordable DIY options to professional-grade machines, and the right choice will depend on your lawn size and budget.
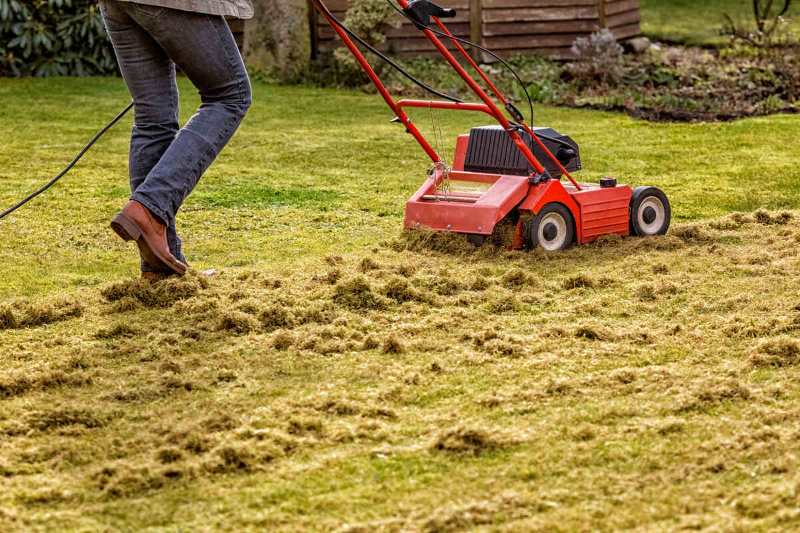
Dethatching Tools
Here’s what you or a professional will need to dethatch your lawn:
| Tool Type | Cost Range | Best For |
| Manual Rake | $20-$35 | Small lawns, light thatch |
| Electric Dethatcher | $127-$190 | Medium lawns, moderate thatch |
| Tow-Behind | $109-$199 | Properties over 1 acre |
| Power Rake | $750-$2,100 | Large properties, heavy thatch |
Most cost-effective: Rent a power rake ($75-$100 a day) or hire a local lawn care professional if dethatching infrequently.
Aeration Tools
Aeration tools vary widely in effectiveness. Cheap options like aerator shoes and spike aerators are easy to use, but core aerators deliver better results by removing soil plugs instead of compressing the ground.
| Tool Type | Cost Range | Best For |
| Aerator Shoes | $8-$45 | Very light compaction only |
| Manual Spike Aerator | $28-$35 | Mildly compacted lawns |
| Manual Core Aerator | $32-$99 | Small lawns, spot treatment |
| Push-Behind Aerator | $82-$280 | Medium lawns (up to 1/2 acre) |
| Tow-Behind Aerator | $140-$320 | Large lawns (professional use) |
| Self-Propelled Aerator | $3,990 and up | Large lawns (professional use) |
Tip: For most homeowners, renting a core aerator ($100 a day) or hiring a lawn aeration professional offers better value than purchasing equipment.
See Related: Core Aeration vs. Spike Aeration: What’s the Difference?
FAQ
Yes, but always dethatch first. Remove all thatch debris before aerating to prevent clogging the aeration holes. This sequence ensures both treatments work effectively. Most professionals complete both services in one visit.
Professional dethatching costs $65-$165 per treatment for an average lawn (5,000-10,000 square feet). Aeration costs $107-$202. Many companies offer package pricing for both services, which is often more economical and time-effective than renting equipment.
Both treatments temporarily stress grass but don’t cause lasting damage when done correctly and at the right time. Your lawn should recover within 2-4 weeks and emerge healthier. Avoid treating during dormancy or extreme heat, and don’t dethatch too aggressively (set blades shallow initially).
Get Professional Help for Dethatching and Aeration
Dethatching and aeration require the right timing, proper equipment, and some physical effort. While DIY is possible for small lawns, most homeowners find professional service more convenient and effective.
Luckily, LawnStarter connects you with experienced local lawn care pros who can assess your lawn’s specific needs and handle dethatching, aeration, or both.
Sources:
- Alison O’Connor, professor of horticulture with Colorado State University Extension, Fort Collins, CO. Personal interview.
- Hayden Bock, assistant professor of landscape sustainability at Penn State University, University Park, PA. Personal interview.
Main Image: Side by side image of Dethatching and Aerating.
Image Credits:
Dethatching shoes: ThePhotoFab / Adobe Stock Free / License
Aeration: Влад Варшавский / Adobe Stock