Are you thinking of starting your lawn over from scratch? As a seeding method, hydroseeding can give you the best results: a fast-growing and healthy lawn for less money than sod. In this day and age, homeowners can even take a crack at hydroseeding their lawns DIY.
Tools and Materials
Before you start your do it yourself hydroseeding project, you need the following tools and materials:
- Soil test results (from a home soil test kit or a lab)
- Hydroseeding equipment (hydroseeding machine, DIY hydroseeder, or a hydroseeding kit)
- Hydroseeding slurry materials
- Grass seeds
- Mulch
- Fertilizer
- Water
- Tackifier (optional)
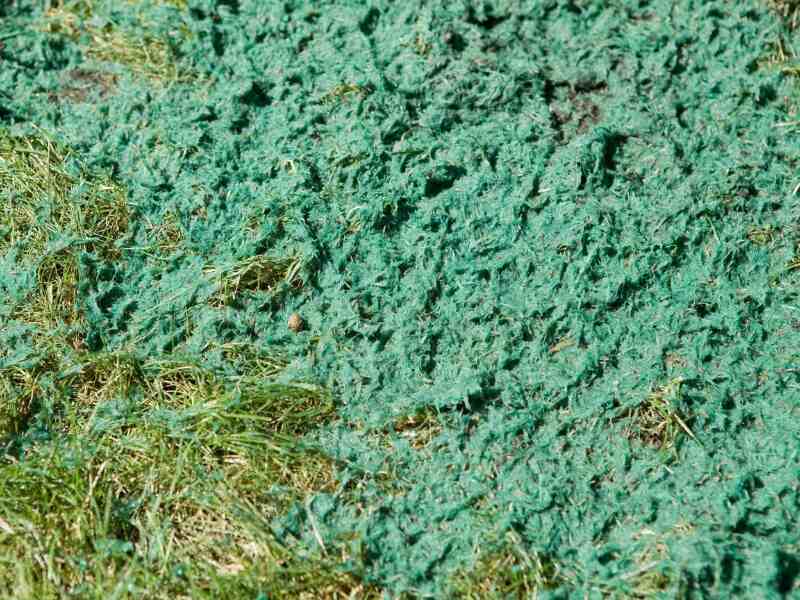
- Green dye (optional)
- Rake
- Yard leveler
- Topsoil
- Compost
- Sulfur or lime (optional)
- Protective equipment
- Sun protection
- Garden gloves
- Close-toed shoes
- Face protection
It’s smart to have all of your materials and tools ready before attempting to hydroseed your lawn. You should only hydroseed on bare soil for best results. If necessary, you can remove your existing grass using a sod cutter before hydroseeding new grass.
Step 1: Plan Your Hydroseed Slurry
Before you start your hydroseeding project, you should plan out what your hydroseed slurry will be like. The two main things you should keep in mind are the types of seeds you’ll use and what mulch you’ll be adding.
Select Your Seeds
You should choose which seeds you’ll be working with. If you want to plant grass seeds, take your area’s climate into account. You can go with just a single type of grass or go with a blend of grass seeds. For the best lawn possible, choose a cool-season grass if you live in the North or a warm-season grass if you live in the South.
Pick Your Mulch
There are different types of mulch that you can use in a hydroseed mixture. Some of these mulch types are:
- Wood fiber mulch: Expensive but very effective
- Paper mulch: Cheapest but least effective
- Blended mulch: A mix of wood fiber and paper mulch
- Bonded fiber matrix mulch: Best for areas with heavy erosion or steep slopes
Step 2: Perform a Soil Test
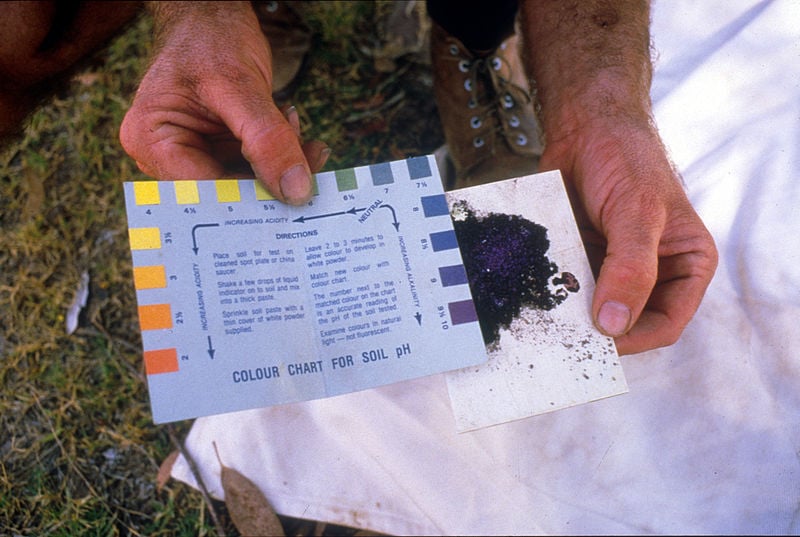
A soil test can reveal your soil’s state, such as its pH level and nutrient composition. These are important to know because they affect your turf’s growth. The soil test results will reveal what your soil is lacking so that you can add soil amendments before seeding your lawn.
Your soil pH should be between 6.0 to 7.0, as this is the range that most grasses will grow in. If your soil is too acidic or too alkaline, your grass might struggle or even die. Add lime if your soil is too acidic and sulfur if it’s too alkaline.
Knowing what nutrients your soil is missing will help you pick what fertilizer to include in your hydroseed slurry.
Step 3: Prepare Your Lawn
There’s a lot of preparation involved before you can start hydroseeding. Your lawn has to be cleared, graded, and leveled for it to be fit for hydroseeding. Here’s what you need to do:
- Clear the Ground
- Mark Sprinkler Heads
- Grade the Soil
- Apply Topsoil, Compost, and Soil Additives
- Re-grade and Level your Lawn
Clear the Ground
Hydroseeding shows the best results when sprayed on bare soil, hence why it’s a great method for growing a brand-new lawn. Clear out everything aside from your irrigation system; get rid of those weeds, old plants, and dead grass. Don’t forget about rocks, tools, toys, and other debris, too.
Mark Sprinkler Heads
Make sure to mark your sprinkler heads so you won’t bump into them while operating the hydroseeding machine.
Grade the Soil
Grading your soil is the act of adjusting its slope so that rainwater and runoff don’t flow toward your house. Grading also levels the soil, making it as smooth as possible.
Grade your soil so that it’s 2 ½ to 3 inches below the grade you want it to be when you’re done; in other words, how high you want your lawn to be. Fill in any holes and level with a rake and a yard leveler.
Add Topsoil, Compost, and Soil Additives
Next, you’ll need to add your topsoil, compost, and other soil amendments like sulfur or lime. The topsoil and compost will help your grass take root deeply and supply it with nutrients.
Add about 3 inches of topsoil and compost throughout your lawn, and then churn it into your existing soil.
Re-grade and Level Your Lawn
After applying soil additives and topsoil, you’ll need to re-grade your lawn and level it to prepare for the hydroseeding process itself.
Step 4: Prepare the Hydroseeder and Slurry
If you don’t have your own hydroseeder, you have three options: rent hydroseeding equipment, make a homemade hydroseeder, or buy a DIY hydroseeding kit. DIY hydroseeding kits are a better option for smaller projects.
- Where to rent a hydroseeding machine: United Rentals / Sunbelt Rentals / MacAllister Rentals
- How to make a homemade hydroseeder:
- Where to buy a DIY hydroseeding kit:
After acquiring your hydroseeding equipment of choice, you can start mixing your slurry.
The specific ratio of seeds, fertilizer, mulch, and water depends on the area you’re spraying; your materials supplier would be better to ask. However, you typically need about 5 to 7 lbs. of seed, 20 lbs. of fertilizer, and 40 to 50 lbs. of mulch for every 1,000 square feet you’re spraying. Then, you need enough water to fill your hydroseeder about 3/4 of the way.
Generally, you start by filling your hydroseeding machine with water and letting it run for 30 seconds before adding your slurry ingredients. Let it mix until there are no more clumps. Always consult the manual for your hydroseeding equipment because each model has slight differences.
Step 5: Spray the Hydroseed Slurry
Finally, it’s time to spray your lawn! Pick a calm and cool day to spray; light rain is fine. Before spraying, don your protective equipment. You could be out for a while, and it’s best to protect yourself from the sun.
Plan your path before spraying so that you don’t step on newly-sprayed areas as you make your way through your lawn. Spray slowly and evenly, keeping the nozzle at least 3 feet from the ground. You can overlap your slurry a little bit as you spray to be sure that there aren’t any gaps. It’ll be easier to see and correct missed spots if you add dye to your slurry.
How to Maintain Your Hydroseeded Lawn
Hydroseeding is only the first step toward a lush lawn. You must maintain your new lawn to ensure it grows strong and healthy. Here are a few important things to keep in mind:
- Water your lawn often and keep it moist. Water your lawn two to three times a day for its first month to help with germination and grass growth. Run your sprinklers for 15 minutes each time. After the first month, you can water less frequently.
- Avoid walking on your lawn. For the first month, you should keep your feet off of the growing grass. No playtime for your kids and pets either.
- Fertilize your lawn. After 30 days, consider fertilizing your lawn with a starter fertilizer or a slow-release fertilizer. This will give it the extra nutrients it needs to grow well.
- Mow your lawn after four to six weeks. Wait until the new grass is 3 to 4 inches tall before mowing your lawn. The grass will usually reach this height in about four to six weeks. Always remember to cut off no more than 1/3 of your turf’s height at a time.
- Postpone weed control. Wait until your new lawn is three to four months old before using any weed killers.
FAQ
Why Should You Hydroseed?
There are many pros to hydroseeding:
● It’s cost-effective, especially in large areas.
● It has better coverage than traditional seeding.
● It gives you a healthier lawn than sodding.
● Hydroseed lawns sprout faster than seeds on their own.
● It’s a soil erosion control solution.
● It’s customizable.
You can read our article on the benefits of hydroseeding to find out more.
What Do You Need to Make Your Own Hydroseeder?
To make a homemade hydroseeder, you need a pump, a drum, and a sprayer. Some homeowners can get by with a shrimp pump attached to a bucket of hydroseed mixture, too. (If you decide to attempt hydroseeding at home.)
When Should You Hydroseed?
The best time of year to plant grass seed, including hydroseeding, depends on what type of grass you’re trying to grow. Warm-season grasses like Bermudagrass should be planted in late spring or early summer. Cool-season grasses like Kentucky bluegrass, fescues, and ryegrasses should be seeded from late summer to early fall.
However, it’s best done in the spring or fall. You can hydroseed in the summer, but you’ll need to water your lawn more often.
Is Hydroseeding Better Than Overseeding?
Hydroseeding is best done on bare soil. Spraying hydroseed slurry on existing grass can kill it. Consider overseeding instead if you need to fill out bare patches in your existing lawn.
How Much Does Professional Hydroseeding Cost?
The national average cost of professional hydroseeding ranges from 8 to 20 cents per square foot.
Do It Yourself Hydroseeding vs Professional Hydroseeding
While you can save money on labor if you learn how to hydroseed your lawn DIY, there are a few benefits to hiring a lawn care professional to do it instead. Getting a pro to do it means you don’t have to rent (or buy!) equipment and learn how to use it. And nine times out of ten, a pro will produce better results than the homeowner hydroseed approach.
So, why not sit back, relax, and hire a lawn care company to hydroseed your new lawn for you? Connect with capable lawn care pros in your area today for a free quote.
LawnStarter participates in the Amazon Services LLC Associates, an affiliate advertising program. LawnStarter may earn revenue from products promoted in this article.
Main Photo Credit: Sue Thompson / Flickr / CC BY-ND 2.0