Like your car, a gas lawn mower’s engine requires clean and well-lubricated oil to run efficiently. You should change lawn mower oil every 25-50 hours of operation to make the most of your engine’s lifespan. We’ll walk you through when and how to change the oil in a lawn mower to maintain optimum performance for as long as possible.
How to Change Lawn Mower Oil: Step-by-Step Guide
Safety first! Before you change the oil in your lawn mower’s engine, place the mower on a level surface and verify the engine has cooled. Set up your equipment and materials, and keep an oil-absorbent mat or rag ready to wipe up any spills. Then follow the steps below:
Step 1: Gather the Necessary Tools and Materials
First, it’s essential to gather the right tools and materials, including:
- New oil (preferably SAE 30 motor oil for small engines)
- Oil pan for collecting old oil
- Oil filter wrench (if your mower has a replaceable filter – usually only riding mowers)
- New oil filter (usually only riding mowers)
- Dipstick (if it isn’t included in your mower’s oil fill cap)
- Thick work gloves
- Safety glasses or goggles
Step 2: Warm Up the Engine
Start your lawn mower and let it idle for around 15 minutes. This will warm up the oil left in the engine, making it easier to remove and clean out. Turn off the engine before moving forward.
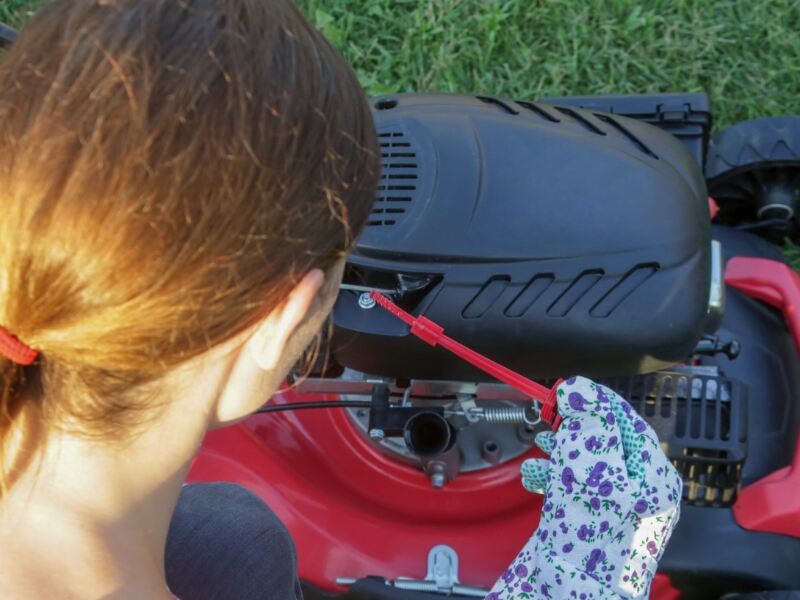
Step 3: Disconnect the Spark Plug
Disconnect the spark plug wire of your lawn mower to avoid accidental starting while you’re changing the oil. This is also a good time to check the spark plug for buildup or damage and determine if it needs to be cleaned or replaced. For more spark plug advice, see our guide on How to Change Spark Plugs on a Lawn Mower.
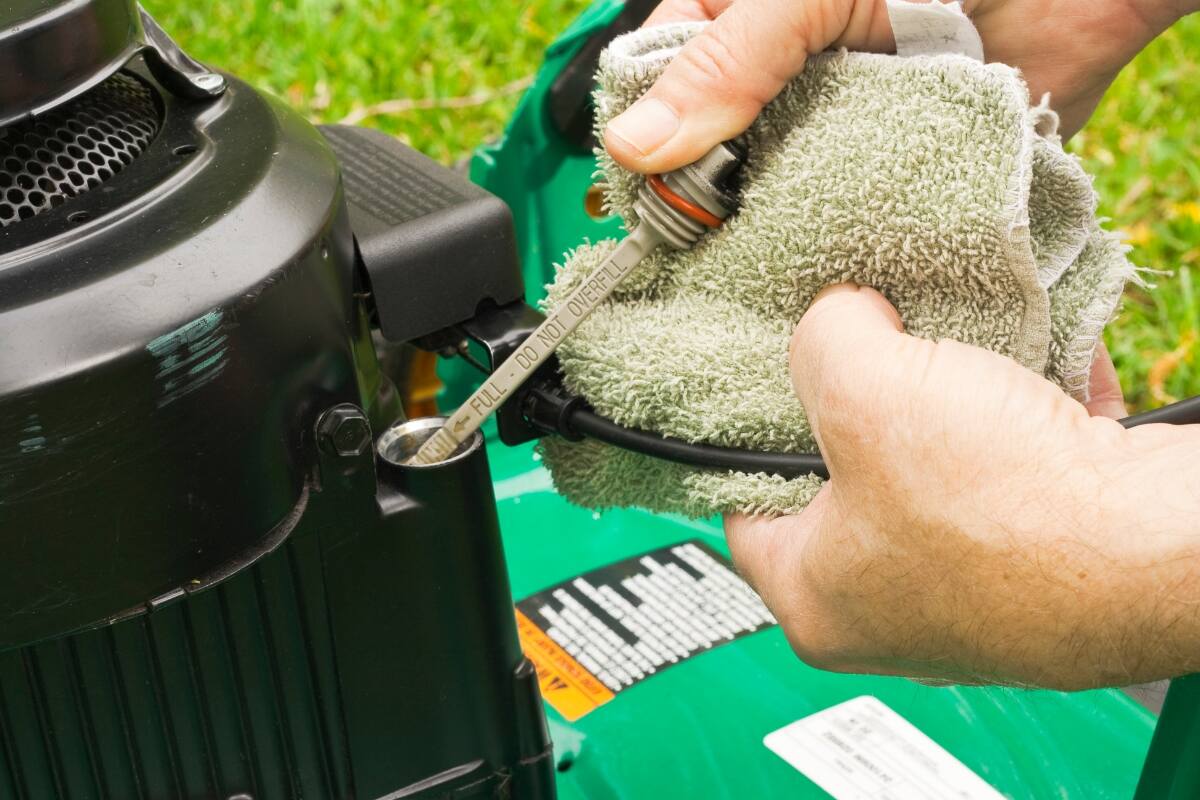
Step 4: Locate the Oil Fill Cap
Locate the oil fill cap on your lawn mower’s engine. The oil fill cap is usually located on the top or side of the engine. It may have an “oil” label and is typically a plastic or metal cap. If you need help finding it, see the owner’s manual for your mower.
Step 5: Drain the Old Oil
Firmly grip the oil fill cap and rotate it counterclockwise to loosen it. Once the lid is sufficiently loosened, you can remove it by lifting it straight up. Some oil fill caps also have the dipstick attached. If that’s the case with your lawn mower, be mindful of the dipstick as you remove the cap. Now, tilt the lawn mower with the oil side downwards and air filters upwards to drain the old oil.
To remove dirty oil from the engine, use an oil pan. Remove the oil cap and let the oil drain from the engine into the drain pan. Ensure your oil pan is positioned beneath the drain plug to catch the old oil. After removing the stopper, wait a few minutes and allow the oil to drain entirely into the pan.
Pro Tip: After collecting the old oil, keep it in a container with a lid. Do not drain it directly on the ground or into a drain pipe.
Step 6: Change the Oil Filter
If your lawn mower has an oil filter, it’s a good idea to replace it when you change the oil. The filter’s purpose is to prevent dust from entering the motor. Riding lawn mowers typically have an oil filter, while walk-behind mowers often don’t.
Remove the old filter by fastening an oil filter wrench around it and turning it in a counterclockwise motion. Carefully replace the old oil filter with a new one. Apply a light layer of fresh oil to the rubber gasket before fitting the new filter into place to guarantee a proper seal.
Tighten the new filter by hand, then turn it slightly more using the filter wrench. Rotate the filter clockwise to fix it back.
Step 7: Add New Oil
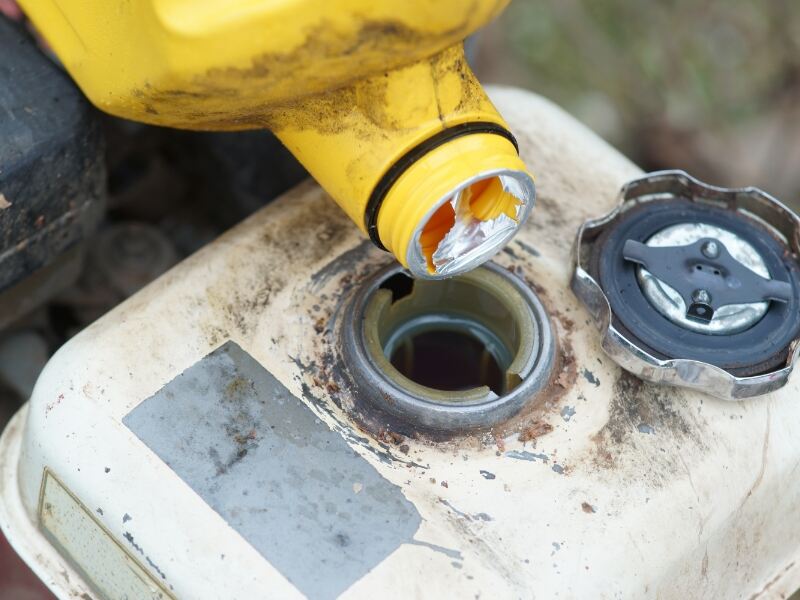
Once the old oil has been entirely drained, you’ll add the new oil. Generally, the best oil to use in a lawn mower engine is SAE 30. If you’ll need to start your mower in cold temperatures (below 40° F), you might try SAE 10W-30. Double-check your owner’s manual for specific oil requirements or recommendations.
To add the new oil, turn your lawn mower back into a standing position. Pour the fresh oil into the oil-fill tube slowly. Use a funnel to prevent any spillage.
Now, use a dipstick to check you’ve poured the right amount of oil. Insert and remove the dipstick into the oil. The oil level indicated on the dipstick should be within the approved range according to your mower’s manual. Remember to clean off the dipstick every time you use it to prevent inaccurate measurements in the future.
Add extra oil as required and inspect the level until it is exactly where it should be, but avoid overfilling. When you are satisfied with the tank’s oil level, screw the oil fill cap back into place and wipe off any oil that spills out.
Step 8: Clean the Area and Properly Dispose of Old Oil
Wipe any spilled oil from the mower and surrounding area. Old oil and filters should never be discarded carelessly. Find a recycling facility or auto parts store that takes spent oil for appropriate disposal. Most AutoZone stores will accept used oil.
Step 9: Start the Engine and Check
Start your lawn mower’s engine and let it run for a few minutes with the fresh oil in place and everything tightly fastened. The oil may now circulate through the system. After running, switch off the engine and inspect the drain plug and oil filter for leaks. If everything seems fine, you’re good to go!
When to Change Oil in Your Lawn Mower
Changing the oil in your lawn mower should be part of your routine maintenance. As a general rule, change the oil every 25-50 hours of operation. If you don’t keep track of running hours, changing the oil at least at the start of each mowing season is your best bet. It guarantees that your lawn mower begins the season with fresh, clean oil, providing excellent lubrication and protection.
You can also consult the owner’s manual to know precisely how often to change the oil in your particular mower. If you use a push mower (operated by a person on foot), an oil change is recommended at least every 50 hours of run time. But for riding lawn mowers (operated by a person riding in a seat), you should consider oil replacement after every 100 hours of use or at least once a season.
Aside from time, there are additional indicators that show an oil change is due:
- When testing with the dipstick, the oil seems black, unclean, or gritty.
- The engine produces odd noises or sounds harsh.
- The mower’s performance is slower or less efficient than expected.
- You see a lot of smoke or smell a burning odor from the engine.
Always maintain a maintenance journal to ensure you change the oil at the proper intervals. Keep track of the date of each oil change, the number of hours on the mower, and any other details concerning its performance. For detailed maintenance advice, visit our DIY Lawn Mower Maintenance Guide.
How to Check Oil in Your Lawn Mower
Before replacing the oil, inspect your engine to ensure it needs an oil change. You can check your oil with the following steps.
1. Locate the Oil Fill Cap: Find the oil fill cap on your mower’s engine. It’s typically located on the side of the engine and may have a dipstick attached to it. The cap may have an “Oil” or ”Fill” label for easy identification.
2. Insert the Dipstick: Remove the oil fill cap and dipstick. Wipe the dipstick clean with a cloth or paper towel. Insert the dipstick back into the oil fill hole, then remove it again to check the oil level.
3. Read the Dipstick: The dipstick usually has markings indicating the appropriate oil level range. It may have “Full” and “Add” marks or be notched. Ideally, the oil level should be within the designated range. If the oil level is near or below the “Add” mark, it’s time to add more oil.
4. Check if Old Oil Needs to be Replaced: Even if your mower has enough oil, it might be old or dirty and need to be replaced. If the dipstick is fine-dipped and the oil is amber in color, there is no need to change the lawn mower oil. If the oil is black or otherwise dirty, it should be changed.
FAQ About Changing the Oil in a Lawn Mower
Why is changing the oil important in a lawn mower?
Regular oil changes in a lawn mower help maintain the engine’s lubrication, cooling, and performance. Fresh oil reduces engine wear and ensures the efficient operation of your lawn mower.
How often should I change the air filter in my lawn mower?
The air filter should be checked before each mowing season and cleaned or replaced if needed. A clogged air filter can affect engine performance and fuel efficiency. For more details, visit our guide on How to Clean and Change a Lawn Mower Air Filter.
When is the best time to change the oil in a new lawn mower?
Change the oil in a new mower after the first 5-10 hours of operation to remove any manufacturing residue and ensure a smooth engine break-in.
What type of fuel should I use for my zero-turn mower?
Most zero-turn mowers usually use regular unleaded gasoline with the appropriate octane rating recommended in the owner’s manual. However, some models require ethanol-free gasoline for optimal performance.
Should you drain oil from a lawn mower engine before winter?
You can typically leave oil in your lawn mower engine over winter, and it shouldn’t cause any damage. It might be better for the engine to drain the oil before winter, but this isn’t necessary. Gas, on the other hand, is another story. Always drain the gas from your lawn mower before putting it away for winter.
Other steps to winterize your lawn mower include:
- Changing the spark plug and air filter
- Sharpening the mower blades (which you can also do at the beginning of the season)
- Cleaning the underside of the mower (which you should do regularly throughout the season)
- Inspecting the parts for rust or damage
- Covering and storing the mower in a safe place, such as a garage or shed
Ready to Quit Mower Maintenance? Hire a Lawn Care Pro
Maintaining a healthy and effective lawn mower means ensuring that every component operates harmoniously. Regular oil changes are an essential part of this maintenance program. Don’t skimp on them if you want your mower to last longer than a few years.
Don’t have time to keep up with mower maintenance? Consider hiring a local lawn care pro to handle all the lawn chores for you. LawnStarter can connect you with service providers right in your neighborhood.
Main Photo Credit: rookman / Canva Pro / License