Whether you choose LMN or Yardbook as your software solution, your landscaping business is in good hands. It all boils down to what your priorities are.
We tried out both software programs and found that Yardbook’s lack of features makes it better for startups just breaking into the landscaping or lawn care industry, while LMN’s extensive list of features makes it better suited for established businesses.
We’ll cover the following in this article:
LMN vs. Yardbook: Side-by-Side
| Starting Price | Free | Free |
| Free Trial? | ✗ | ✗ |
| Free Version? | ✓ | ✓ |
| Pricing Model | By Features | By Features |
| Made For | Landscaping | Landscaping |
| Platform | ||
| iOS/Android App | ✓ | Android only |
| Web Browser Access | ✓ | ✓ |
| Features | ||
| Appointment Scheduling | ✓ | ✓ |
| Billing and Invoicing | ✓ | ✓ |
| Dispatch Management | ✓ | ✓ |
| Work Order Management | ✓ | ✓ |
| Time Tracking | ✓ | ✓ |
| Payroll Management | ✓ | ✗ |
| Quotes/Estimates | ✓ | ✓ |
| Routing | ✓ | ✓ |
| Payment Processing | ✗ | ✓ |
| Customer Relationship Management (CRM) | ✓ | ✓ |
| Inventory Management | ✗ | ✗ |
Both software programs offer basic functionality like billing and invoicing, customer management, and quoting and estimating.
However, LMN has more features than Yardbook does and is much more expensive, especially as you add more users and features.
LMN
LMN is a business management software designed exclusively for the landscaping industry. From budgeting and estimating to scheduling, time tracking, and invoicing, LMN helps grow your business, increase revenue, and decrease costs.
If you want to know more about its features, see our LMN review.
Scheduling
LMN’s scheduling feature is called Schedule Templates, and it allows you to schedule multiple services for a single job all at once. For example, if you offer a maintenance package that includes mowing, bed maintenance, and pruning, you can create a package with all of those services together.
There are three types of schedules you can create:
- Manual: if you know the start and end date
- Weekly: if this is a regular recurring visit
- Waitlist: if a job is hard to schedule (i.e. you want to do fertilization or fall cleanup, but you don’t know exactly when yet), add it to the waitlist
Time Tracking and Timesheets
LMN’s timesheets and time tracking features help you see how many hours your employees are working and how efficient they are at their jobs.
Creating Timesheets
Creating a timesheet is easy – just click Timesheet List on the left. There are many steps, but as a whole, it’s very straightforward, requiring you to:
- Change the date
- Punch in an employee
- Assign them to a jobsite in your database
- Let them know what they will be doing at the jobsite
- Provide the date and time
Editing Timesheets
Editing timesheets is no more difficult than creating them. Once you go to Timesheet List and click on the employee below, just edit the fields (job, task, date, and time).
From there, click the green OK button to save the changes and the black Submit button to submit the timesheet.
Customer Portal
LMN’s customer portal lets your customers see where all of their jobs will take place in real time and make online payments anytime, anywhere.
To let your customer access the customer portal, you need to send them an invitation through the CRM tool. Once they gain access, they can register for a new account by clicking Register New Account on the login screen. From there, they can create a username and password and use them to log in.
We weren’t able to access the customer portal, but we watched LMN Academy tutorials to understand how it works.
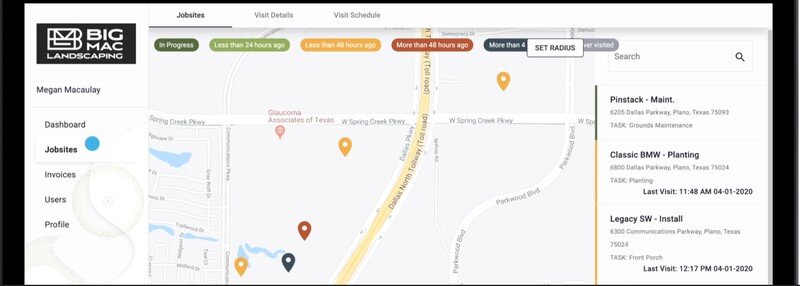
Jobsites
Jobsites is the first screen your customers will see after they login. There, they can see all their properties that you or your employees have visited in a time frame, marked by several color-coded pins (think Google Maps):
- Green = you currently have someone on the jobsite
- Light green = you had someone on the jobsite less than 24 hours ago
- Orange = you had someone on the jobsite less than 48 hours ago
- Red = you had someone on the jobsite more than 48 hours ago
- Dark blue = you had someone on the jobsite more than 4 days ago
- Gray = you haven’t had anyone on the jobsite at all yet
All the data comes from your employee’s timesheets in LMN.
Hover over the pin to see the property name and the task being worked on.
Dashboard
Customers can get a quick overview of all their properties you or your employees visited by clicking Dashboard on the lefthand menu. They can see all visit details for their property, including pictures.

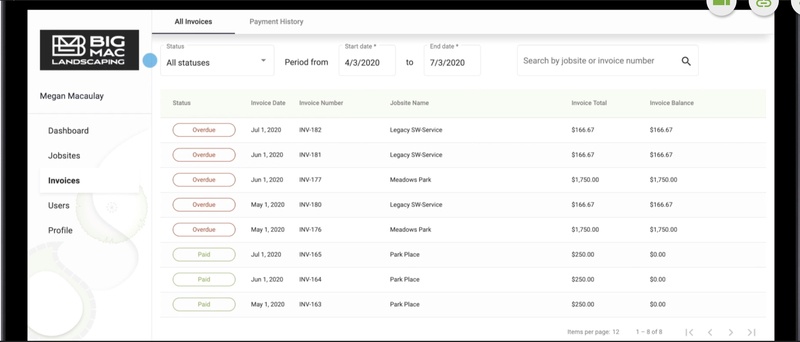
Invoice
If your customer needs to pay an invoice, they can click on the Invoice tab on the lefthand side. There, they’ll see all invoices that you published to the portal. From there, your customer just needs to click on an invoice to start the payment process:
Step 1: The invoice will pop up. They can review all details before clicking the black Checkout button at the bottom.
Step 2: Your customer can pay with a debit card, credit card, or an ACH transfer.
Step 3: Regardless of payment method, your customer just needs to put in their information and click the Save button at the bottom. It’s as easy as ordering something on Amazon.
Step 4: If your customer needs to make a full or partial payment, they can click the pencil icon and put in the amount. Finally, they click Pay Now on the right to finish up. Your customer will recieve an email confirming the payment went through, with all of the details.
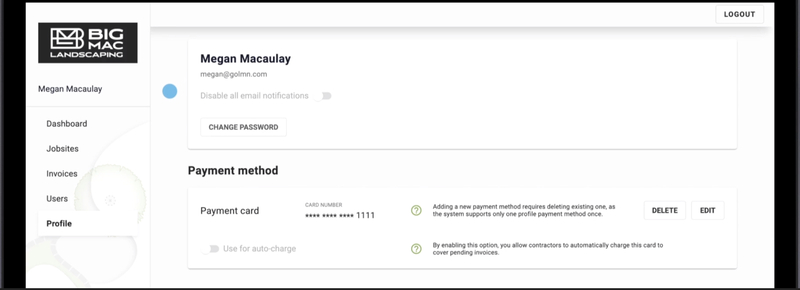
Profile
Your customers can manage their own user profiles by clicking on the Profile tab. There, they can:
- Disable email notifications
- Change their account password
- Delete or edit their existing payment method, e.g. change what credit card they use
Cost
LMN has three pricing plans:
- The Free Pro plan for free
- The Pro plan for $297 per month
- The Pro Plus plan for $394 per month
For a one-time fee of $847, both Pro and Pro Plus offer implementation help, in which LMN’s employees help get you started with the software.
Gro Plan
The only way to access LMN’s mobile app, LMN Pro, is through the Gro Plan. This plan lets you run your landscaping business from your phone for $99 per month (the first month is free), plus five more tiering plans for additional users:
- Tier 2: Up to 3 users; $129.99/month
- Tier 3: Up to 5 users; $149.99/month
- Tier 4: Up to 10 users; $189.99/month
- Tier 5: Up to 20 users; $249.99/month
- Tier 6: 21+ users; $349.99/month
Pros and Cons
| Pros | Cons |
| ✓ Rich in features ✓ Helpful LMN academy training ✓ Clean user interface | ✗ Can be hard to set up ✗ All plans after free pro are expensive ✗ Users complain that some features are hard to use |
User Reviews
Lots of helpful features: “Every feature of LMN is impactful and has changed the way we do business. We are able to set up estimates quickly and see real-time results for the first time in our business.” – Kali P from GetApp
Can be hard to set up: “Cumbersome to set up at first; even with video tutorials, we needed expert advice, and took the classes. It takes a commitment to get it up and running consistently.” – Laurie M from GetApp
Expensive: “I do consider LMN to be expensive. Before running our startup, we were struggling to afford LMN. It took time to have convenient revenue in order to have LMN.” – Marina V from g2
Yardbook
Compared to LMN, Yardbook isn’t rich in features. However, what it does have is still useful for managing your business.
The following three features are just a few examples of what this software can do. To learn more, read our Yardbook review.
Pro Tip: Yardbook lets you edit the menu on the left. Click the blue button on the top left corner of the dashboard (with the gears) to access the Settings page. Go to the bottom, and you’ll see a list of features you can add to or remove from the menu.
Timesheets
Thanks to Yardbook’s timesheet tracker, you can have employees clock in and out or have them manually create their own timesheets. We’ll go over each option in more detail.
Click Time Clock to get started.
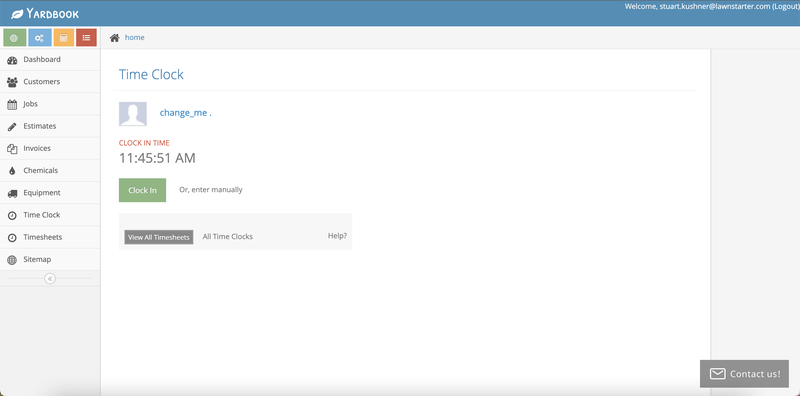
Time Clock
Using the time clock to record your employee’s hours couldn’t be easier.
Step 1: Click Clock In. A set of options will greet you, and you can pick which one to clock into:
- General: Any task
- Driving: when your employee is en route to their destination
- Lunch: when your employee is on a lunch break
- Break: when your employee is on a non-lunch break
If you don’t find these options specific enough, you can update the timesheet settings to add new options (see Change Settings below).
Step 2: Click on the option you want. The timesheet will register that you were clocked in to the job/task.
To clock out, just click Clock Out. You’ll see the timesheet entry recorded on the Earlier Today section of the page.
Manually
The other option lets you manually add a timesheet and record the number of hours worked – no time clock needed. However, you can’t track the start and end time using this method like you can with the time clock.
Step 1: Go to the timesheet, but instead of Clock In, click Or, enter manually. You’ll be taken to the timesheet entry page.

Step 2: Enter the number of hours, choose the task type or job, and click the green Save button.
Change Settings
As we mentioned above, the options Yardbook gives you for clocking in and out of a job aren’t very specific. However, you can add jobs and tasks depending on what your needs are.
Step 1: Click on the Timesheets menu on the left. You’ll get sent to the Timesheets page. Click on the blue Settings link on the right.
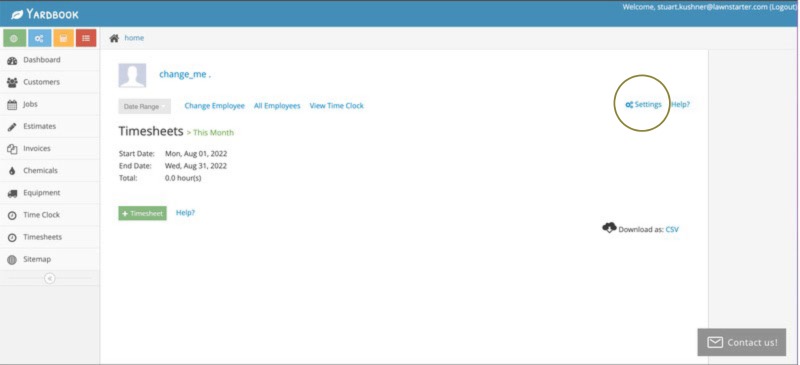
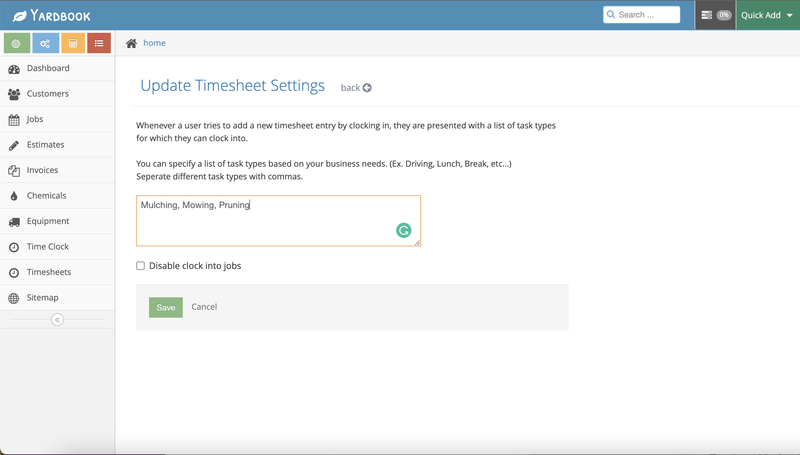
Step 2: You’ll see a text box where you can specify jobs and tasks depending on your business. Separate them with commas and click on the green Save button.
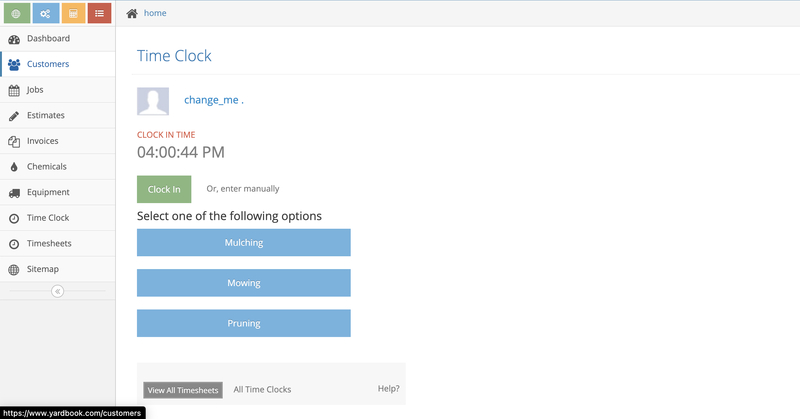
Now, rather than the vague tasks provided, the menu options will change to the tasks you entered. For example, I deleted all of the options above and replaced them with mulching, mowing, and pruning.
Creating Jobs
Yardbook makes it easy to create jobs. You can create:
- One-time job: a “one-and-done” kind of service that only occurs once
- Recurring job: a job that repeats on a schedule, such as weekly, bi-weekly, or monthly
There are two ways to create a job: with the Jobs tab on the lefthand menu or through the Quick Add drop down menu on the top right corner of the screen. Using Quick Add is faster than using the Jobs tab.
Job Creation Process
To create a job, fill in the relevant information. Though Description is the only required field, you can also add:
- Address (crucial for routing – see the Routing section below)
- Start date
- Start time
If this is a recurring job, click the checkbox next to Set to Recurring. From there, you can pick the day of the week and define if the service will occur daily, weekly, monthly, or yearly.
Routing
Creating efficient job routes saves your landscaping business time and money, and Yardbook’s routing feature lets you create routing sheets tailored to the jobs you have in your system. These sheets allow you to:
- Optimize your routes
- Find the shortest driving time
- Configure your route settings
Pro Tip: To use this feature, you need to have at least two customers, both with addresses, in your system. Yardbook takes the addresses from your system, so you can’t just type in a starting point and a destination and hope it will pick it up – this isn’t Google Maps.
Create Routing Sheet
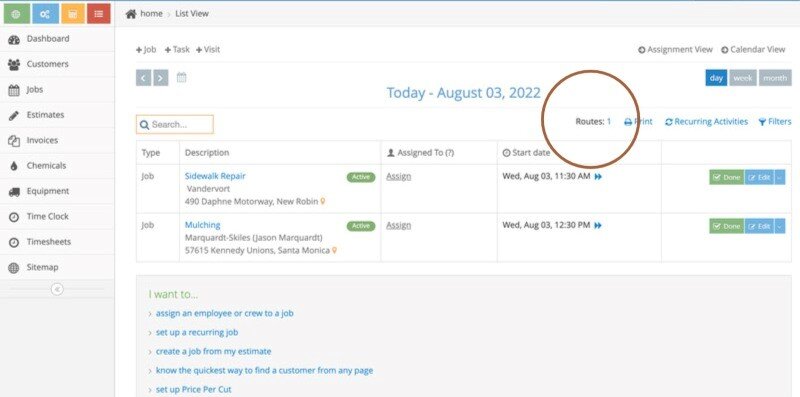
It’s very easy to create a new route. Just go to the Job screen (pictured above) and click on the Routes link on the top right corner of the screen. Clicking this link takes you to the routing map view, where you’ll see the route with your jobs on the left side of the page.
Add Job to Route
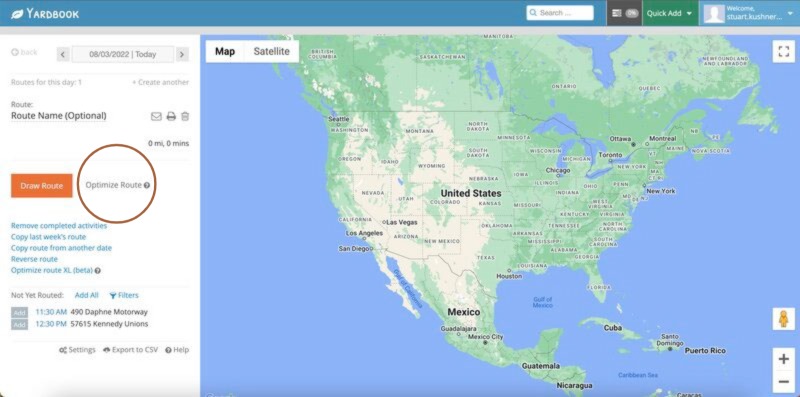
After arriving at the Google Maps-esque route view, you’ll see the jobs on the lower left corner of the screen, in the Not Yet Routed section. Click on the grey Add button to add each job to the route. The jobs will move from the Not Yet Routed section to the Route section.
Configure Your Route
Yardbook’s routing software uses a drag and drop interface, so if you need to make changes to the route, just click the location and move it to where you want it in the Route section.
Optimize Your Route
Yardbook lets you optimize your route based on the shortest distance. Click on the grey Optimize Route link next to the orange Draw Route button. The route will become much shorter, meaning you get to your destination in less time.
One thing to remember is Yardbook doesn’t take start time into consideration, so if you have a job planned for a certain time, you will need to adjust your route to account for it.
Cost
Yardbook has three pricing plans, each with more features than the last. You can use all of them on your computer or phone.
- Starter: Free; lets you manage customers, schedules, and billing
- Business: $34.99/month; all Starter features plus features like GPS tracking and writing emails and text messages in bulk
- Enterprise: $49.99/month; all Business features plus QuickBooks integration and a company portal
Pros and Cons
| Pros | Cons |
| ✓ Free ✓ Easy to use ✓ Clean UI | ✗ Lack of features ✗ App has lots of issues ✗ No iPhone app |
User Reviews
- User-friendly: “Really like the simplicity of the software. I’m not a computer person, but I still can navigate and do everything I need for my business.” – Josh A from Capterra
- Lack of features: “I wish there were many more import features. I would like to import a list of properties that belong to one property management company, versus having to manually put them in.” – Julie L from g2
- Mobile app can be buggy: “Jobs set themselves active and inactive by themselves, before and after pictures often don’t upload or duplicate befores and afters, jobs don’t complete even when you hit the yes button.” – Logan Clark from Google Play
Buyers Guide to Landscaping Software
Before picking software, you need to have a clear idea of what you want it to do for your business. Here are some important features to consider when choosing your business software.
CRM (Customer Relationship Management)
CRM is a basic component of most business management software. It typically includes a cloud-based customer database you can access from a computer or mobile device. The database stores information such as:
- Contact and payment information
- Service history
- Communication history
CRM makes customer service quick and easy, and it’s a must-have.
Routing
Business management software with GPS mapping can help you put routes together for your field teams. Not only that – some software includes route optimization, which means it automatically schedules your appointments in the most efficient order. With route optimization, you’ll spend less time on the road and less money on gas.
Schedule Jobs
Jobs are what earn you money, and good management software should be able to schedule jobs efficiently. Your team should be able to access the schedule from a computer in the office or a mobile device in the field.
In case of cancellations (for example, due to bad weather), your software should also be able to reschedule jobs.
Time Tracking
Time tracking software makes payroll easier and more accurate. Look for software that includes a time clock in its mobile app so your employees can clock in and out from a jobsite, just like they would at a regular office job. With a time clock, payroll won’t rely on your employees’ memories of how many hours they worked after the fact.
Customer Support
No matter how user-friendly your software is, problems will eventually come up that you can’t solve on your own. You want a software solution with reliable, easy to reach customer support so you can get help when you need it. Look at user reviews to find out how the software’s existing customers feel about their experience with customer support.
Some software companies operate a 24/7 customer service line, which can be useful if you often find yourself working late into the night.
FAQ About Landscaping Software
What is landscaping business software?
Landscaping business software is a software that simplifies your employees’ jobs, tracks how well your employees are doing, manages communication with your customers, and automates billing and invoicing.
How much does landscaping business software cost?
Depending on the size of your company and the features you need, landscaping business software usually costs anywhere from $60 to $400 per month.
However, this is not a hard and fast rule. Some programs, like LMN and Yardbook, offer free plans, and Yardbook has a plan for just $34.99 per month.
Some software services offer multiple pricing plans with different sets of features, and others charge based on the number of employees using the software.
Who uses landscaping business software?
The primary users are landscaping businesses looking to grow their companies with the help of technology.
However, lawn care companies need to evaluate where their time is going daily, weekly, and monthly, so they use it, too. If your workday has too many manual tasks, communication issues, and no time for growth planning, you should look into business management solutions.
Final Thoughts
Yardbook is much more limited in what it can do than LMN, reflected in its lower monthly cost. For this reason, we recommend Yardbook if you are a newer company looking to optimize existing processes. As your company grows, consider upgrading to LMN down the line.
For more software solutions that might fit your landscaping business better than Yardbook or LMN, see our recommendations for the best landscaping software on the market this year.
Main image from Canva Pro with text overlay
Related Posts
 mHelpDesk vs. Vonigo: Field Service Software Compared
- HindSite: Software Reviews, Demo, & Pricing Info
- mHelpDesk: Software Reviews, Demo, & Pricing Info
- Breezeworks: Software Reviews, Demo, & Pricing Info
- Fergus: Software Reviews, Demo, & Pricing Info
- ReachOut Suite: Software Reviews, Demo, & Pricing Info