Winter’s coming, and your mower deserves some TLC before it hibernates. Proper lawn mower winterization involves several steps, including removing or stabilizing fuel, sharpening blades, and servicing spark plugs, oil, and air filters.
| Project difficulty: Intermediate Estimated time to complete: 1 hour for electric mowers; 2 to 4 hours for gas-powered mowers Project cost: Electric mowers have minimal winterization costs related to the engine; gas-powered mowers typically cost around $30 to $40 to DIY. For all mowers, the cost to sharpen or replace the blades ranges from $5 to $40. Expect to pay $100 to $200 for professional winterization, depending on the type of mower. |
Note: Electric mowers still require winterization, but the process differs. You won’t need to worry about spark plugs, fuel, engine oil, or air filters, cutting your mower maintenance tasks by about half.
1. Take Out the Battery
The first few steps are necessary for storage, but they are also important safety measures that should be completed before proceeding with the other winterization steps. So, if you have an electric mower, or your gas-powered lawnmower has an electric start, start by removing the battery. Remember, first disconnect the negative (black) terminal, followed by the positive (red).
Battery preparation varies slightly depending on the type:
- Remove any corrosion from lead-acid terminals using a wire brush and a baking soda and water solution.
- Check the electrolyte levels on non-sealed batteries (common on riding mowers), and top off with distilled water if necessary.
Then store the battery in a cool, dry place where the temperature remains above freezing. Consider using a battery tender to keep your lead-acid battery fully charged through the winter; lithium-ion batteries should be stored at 50% to 80% charge.
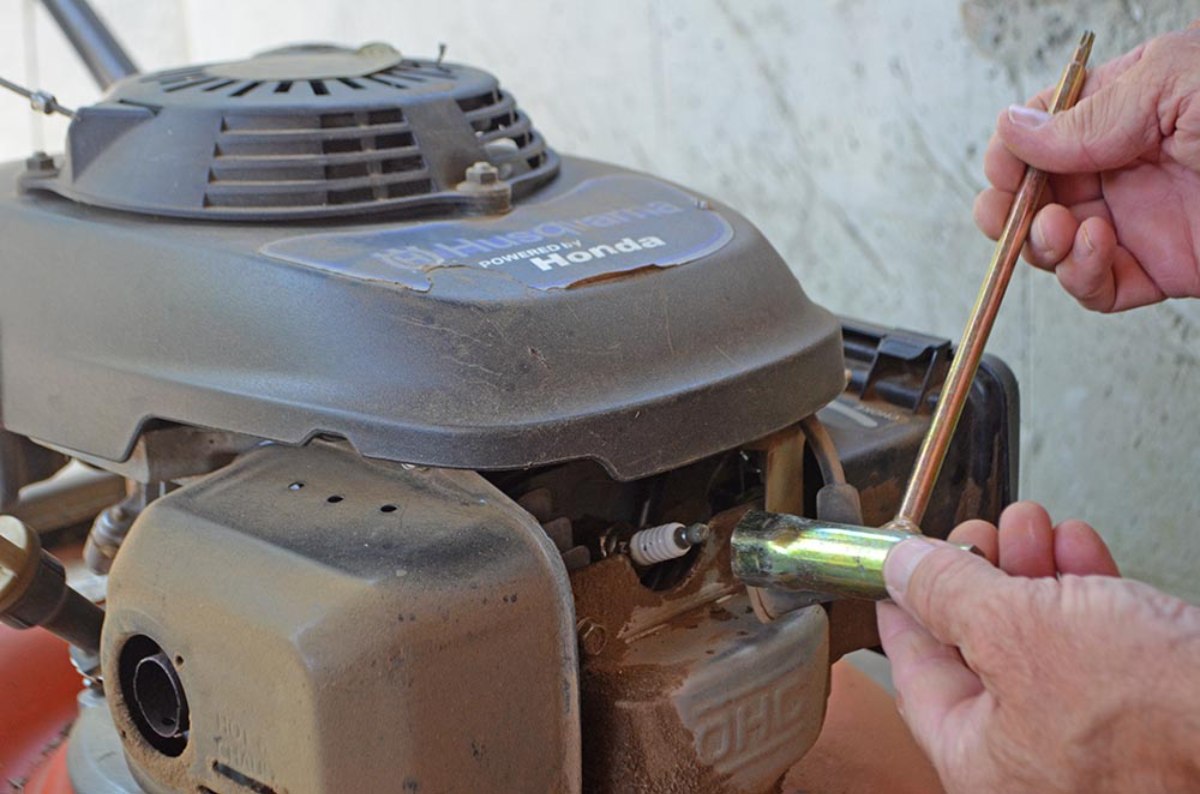
2. Replace the Spark Plug
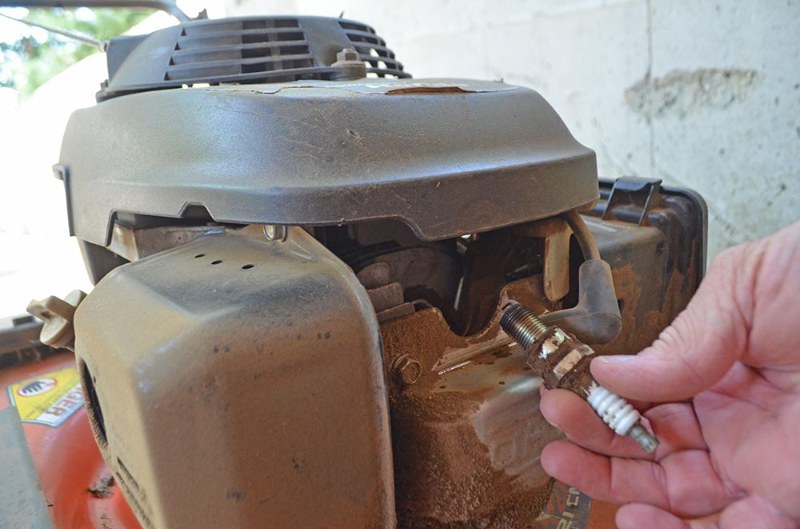
- Disconnect the spark plug wire, and remove the old spark plug using a special spark plug socket (which is longer) or a spark plug wrench tool.
- Check the gap on the new plug, and use a gapping tool so it matches your manual’s specifications.
- Hand-tighten the new plug, and then give it another quarter-turn with the wrench. Don’t overtighten it or you’ll strip the threads.
Do not reconnect the spark plug wire until spring!
3. Remove or Stabilize the Fuel
Over time, fuel degrades, and the gummy residue can clog fuel lines and fuel filters, causing big problems. Therefore, one of the most important steps of winterizing is to drain the mower’s fuel completely or add stabilizer to the gas tank.
You can drain the fuel a few different ways: using a siphon pump, tipping the mower, or disconnecting the fuel line.
If using a stabilizer, add the recommended amount to a full tank and then run the mower for 10 minutes.
4. Clean Your Mower Thoroughly
Cleaning your mower makes it easier to winterize, plus storing it clean helps prevent rust and corrosion.
I like to start with the toughest job first, which is cleaning the underside of the deck. Prop one side of the mower up (I put chunks of wood under it), and remove the blades. Use a plastic scraper or putty knife to remove as much of the buildup as you can.
My Tip: If the bottom of the deck is really bad, soak the grass with the hose, and then try to scrape it off.
Then hose everything down, keeping water away from the engine, air filter, and electrical components. Use a soft scrub brush to remove caked-on dirt.
Let everything dry, and then coat it with a thin layer of WD-40.
5. Sharpen the Blades
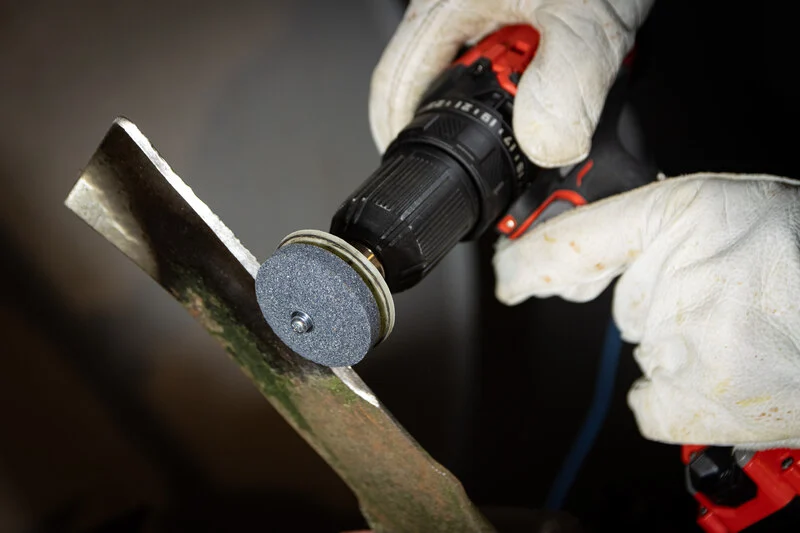
Since you removed the blades to clean under the deck, inspect them for nicks, cracks, or excessive wear. If they’re good for another year of use, you’ll want to sharpen them and reinstall. If they aren’t in good condition, buy a new pair to put on the mower.
See Related: How Often Should You Sharpen Lawn Mower Blades?
6. Change the Engine Oil
My Tip: Run the mower for a few minutes to warm the oil and make it easier to drain.
Place an oil pan underneath or next to the mower, and then remove the drain plug or tip the mower (with the spark plug and gas cap side up) to empty the oil.
Replace the oil filter if your mower has one, and fill the mower with the correct type of oil. Your manual should tell you what to use. Most mowers use a thinner oil, typically SAE 30 or 10W-30.
Note: Avoid using car oil in your mower, and use a small engine oil specifically designed for lawnmower engines instead. Car oil is formulated for the high temperatures and vibration of automotive motors. It will work in a pinch, but you risk engine damage and voiding your warranty.
7. Service the Air Filter
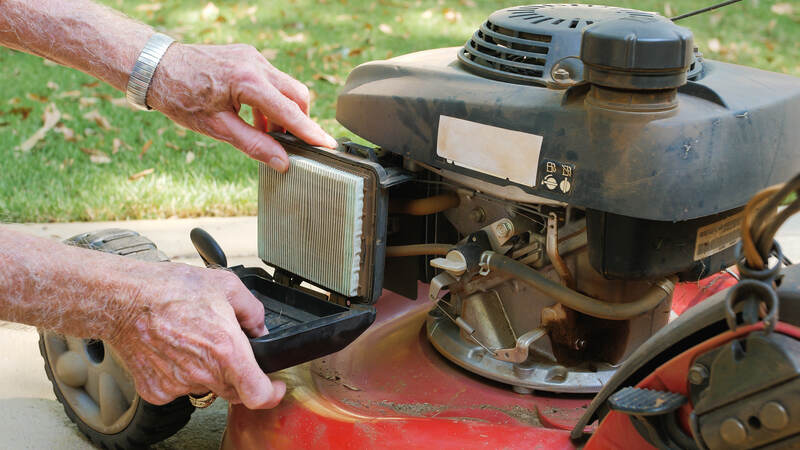
Remove the air filter (only on gas-powered mowers) and inspect it carefully. A dirty, clogged filter restricts airflow, making your mower work harder.
- Paper filters should be replaced if they are dirty or damaged. Never try to clean them with water.
- Foam filters can be washed in warm, soapy water, squeezed dry, and then lightly oiled with engine oil.
8. Check Belts and Cables
Give everything a once-over, making sure the belts on riding mowers and any cables (throttle, choke, pull-start) aren’t frayed or worn. Replace anything that shows excessive wear.
9. Lubricate Moving Parts
Lubrication keeps the mower’s moving parts operating smoothly, preventing seized parts that can be costly to repair.
- Apply a thin coating of a light machine oil or spray lubricant like WD-40 to cables, pivot points, and other moving components. Pay special attention to wheel bearing and height adjustment mechanisms. Plus, don’t forget the choke and throttle linkages on gas mowers.
- Pump grease fittings (if your mower has them) with fresh grease until it expels the old grease.
After everything is lubricated, wipe off excess lubricant to prevent dirt accumulation.
10. Prepare for Storage
The best storage location is a clean, level spot that’s away from moisture and protected from temperature extremes. It should be well-ventilated and away from heat sources.
- If your mower handle folds down and you need to conserve space, fold it down.
- Place cardboard under inflatable tires to prevent flat spots.
- Cover your mower with a breathable tarp or a specially designed mower cover.
If you have no choice but to store it in a damp area, purchase some moisture absorbers to place around it.
FAQ About How to Winterize Your Lawn Mower
Start winterizing just after you’re done mowing for the season, which is typically late fall, just before the first hard frost for your area. Don’t wait until it’s freezing cold and it’s uncomfortable to work outside, even in your garage or shed.
A high-quality fuel stabilizer claims it can keep gas fresh for 12 to 24 months, but by about the one-year mark, even stabilized fuel will start to degrade.
Once you winterize your mower, leave it alone until spring. Starting it up when it is still super cold can cause condensation in the engine and uneven fuel distribution. If you prepped it following the above steps, your mower should fire right up come spring.
Fuel stabilizer prevents stored gas from degrading and becoming gummy. Octane booster improves a fuel’s resistance to detonation in high-performance engines, minimizing “knocking” and preventing engine damage from low-octane fuel.
Turn to the Pros for Help
As sure as winter comes each year, you will need to prep your lawn mower for storage. Don’t just leave it parked outside after the final cut of the year. Take an afternoon or two to winterize it so it will work better come spring and last longer.
If mechanical work isn’t your forte, contact a local LawnStarter lawn care pro to take care of the mowing (and the resulting lawn mower maintenance) instead.
Main Image: Winterize your lawn mower and change the spark plugs. Image Credit: Derek Lacey / LawnStarter