Properly mulching around your trees is beneficial for their health and simple to do: Apply 3 inches of mulch in a donut shape, covering the root zone yet keeping it away from the trunk.
Done correctly, mulch conserves moisture, regulates soil temperature, and improves soil health. But improper mulching threatens your tree’s survival.
As a longtime landscape designer, I’ve seen both scenarios. I’ll show you how to mulch trees the right way, including pro tips on choosing the right mulch and situations to avoid.
| Need professional help with mulching or other landscape maintenance? LawnStarter connects you with top-rated local landscapers who can mulch your trees correctly and keep your yard healthy year-round. |
| Key Takeaways |
|---|
| • Follow the 3-3-3 rule: 3 inches deep, 3-foot radius, 3 inches away from trunk • Wood chips or shredded bark support tree health better than stone or rubber • Avoid piling mulch against the trunk; expose the root flare |
| Project difficulty: Beginner Estimated time to complete: Approximately 2 hours per tree (with a 3-foot mulch circle, and the root flare already visible) Project cost: The cost of mulch varies by type, your location, and amount. Expect to pay $3.25 to $6.50 per bag for a DIY job, or from $77 to $94 per cubic yard professionally installed. Garden edging costs $15 to $100+ depending on the type. |
Why Proper Tree Mulching Matters
Proper tree mulching enhances both tree health and landscape appearance. When done correctly, organic mulch (from natural, once-living materials):
- Retains soil moisture: Reduces watering needs.
- Regulates soil temperature: Keeps roots cooler in summer, warmer in winter.
- Prevents weed competition: Blocks grass and weeds from stealing nutrients.
- Improves soil quality: Adds organic matter and nutrients as it decomposes.
- Protects from damage: Creates a buffer zone from mowers and trimmers.
However, improper mulching (especially volcano mulching and over-mulching) causes bark rot, pest infestations, and girdling roots that can kill trees.
The 3-3-3 Mulching Rule Explained
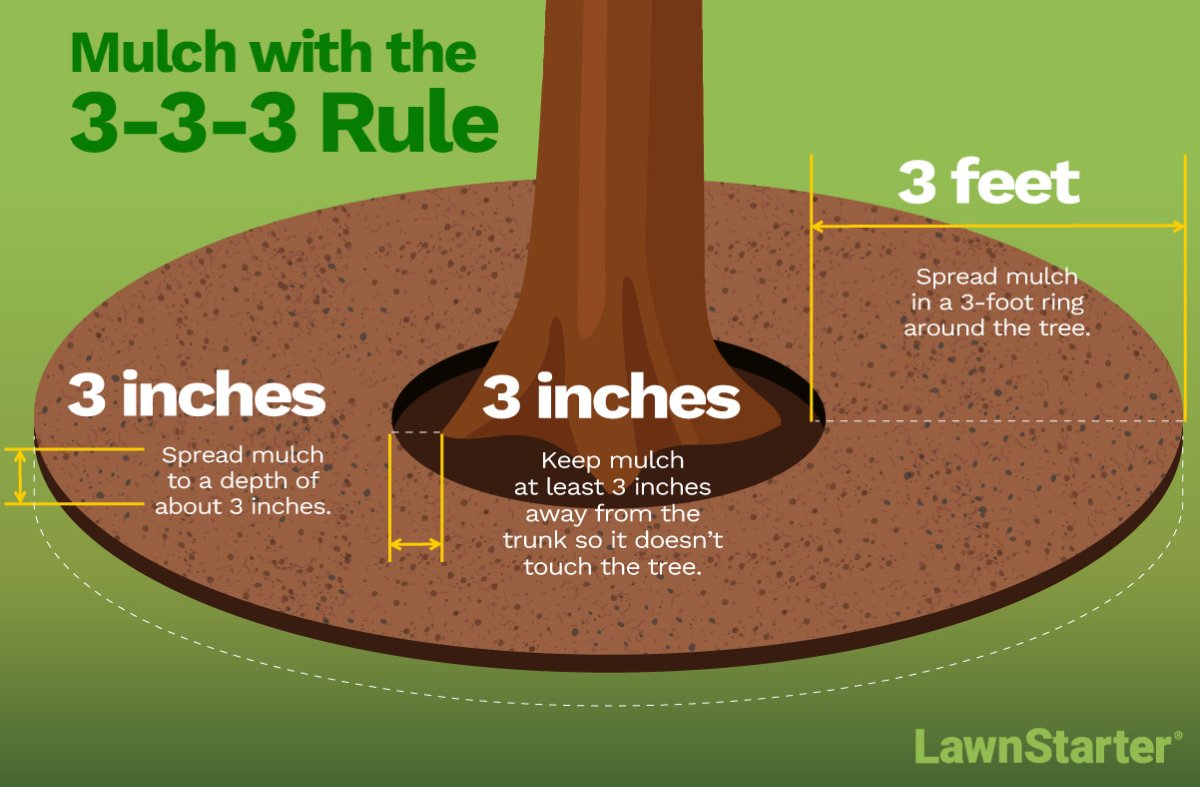
Ideally, mulch extends to the tree’s drip line (the canopy edge), but in most yards that’s not practical. That’s where the 3-3-3 rule provides an easy framework:
- 3 inches deep: Apply mulch in a 3-inch layer.
- 3-foot radius: Extend mulch roughly 3 feet from the trunk.
- 3 inches away: Keep mulch at least 3 inches from the trunk.
This creates the essential “donut shape” around your tree — mulch surrounds the root zone but never touches the bark.
Pro Tip: Use our mulch calculator to determine exactly how much mulch you need. Following the 3-3-3 rule makes estimating simple, preventing over-buying or under-buying.
Step-by-Step: How to Mulch Around Trees Properly
What You’ll Need
Materials:
- Organic mulch (wood chips, shredded bark, or cedar mulch)
- Garden edging or landscape border materials
- Pre-emergent herbicide (optional)
Tools:
- Wheelbarrow
- Rake
- Spade or sod cutter
- Measuring tape, tie-down strap, or string
- Hand trowel
- Manual edger
Step 1: Choose the Right Mulch for Trees
According to Kansas State University Extension, wood-based mulches are best for tree health. They resist pests and diseases while enriching soil as they decompose — benefits that inorganic mulches like rubber or stone cannot provide.
Best organic mulch options:
- Shredded hardwood or bark: Fine texture, excellent moisture retention, attractive appearance. Breaks down faster (needs replenishment every 6-12 months). Best for formal landscapes.
- Wood chips: Chunky, long-lasting (12-18 months), promotes air circulation. Retains less moisture but decomposes slowly. Ideal for natural, low-maintenance yards.
- Cedar mulch: Naturally insect-repellent, pleasant scent, very durable. Premium price but excellent for dry climates or pest-prone areas.
Avoid these mulching materials around trees:
- Stone or rock (traps heat, adds no nutrients, damages equipment)
- Rubber mulch (doesn’t decompose, may leach chemicals)
- Fresh grass clippings (compacts, generates heat as it decomposes)
- Non-shredded leaves (mats down, blocks water and air)
My clients consistently preferred triple-ground hardwood mulch for its polished appearance and moisture retention, despite needing more frequent top-ups. For low-maintenance properties, chunky wood chips provide better aeration and longevity.
See Related:
Step 2: Measure and Edge Your Mulch Ring

Create a circular edge 3 feet from the trunk. For precision:
- Loop a tie-down strap or string around the tree trunk.
- Extend it 3 feet outward while keeping it taut.
- Use a manual edger to cut along this circle.
- Walk around the tree, maintaining consistent distance.
Note: If you have space, you can extend the mulch boundary to the drip line, the imaginary circle on the ground directly beneath the outermost edge of the branches.
Step 3: Remove Grass and Prepare the Soil
Clear the area inside your mulch circle:
- Remove existing grass with a sod cutter or spade.
- Pull all weeds by hand, especially near the trunk.
- Apply pre-emergent herbicide to bare soil (optional, but recommended).
- Rake smooth to level ground and mix in pre-emergent.
Step 4: Install Garden Edging as a Mulch Barrier

Garden edging keeps mulch contained and creates clean separation between your lawn and mulch ring. Choose edging based on your budget and permanence needs:
No-dig edging (Budget-friendly, $15-$30)
- Flexible plastic or rubber rolls with pre-drilled holes
- Quick weekend installation
- Easy to adjust or replace
- Best for: Temporary solutions, frequent landscape changes
In-ground edging (Long-term, $40-$100+)
- Cobblestones, pavers, bricks, or metal borders
- Set in shallow trench with gravel/sand base
- Withstands mower impact and harsh winters
- Best for: Permanent installations, high-traffic areas, premium landscapes
I recommend in-ground edging like cobblestones for durability and timeless aesthetics. They resist mower damage, won’t shift during freeze-thaw cycles, and enhance property value.
See Related:
Step 5: Locate and Expose the Root Flare
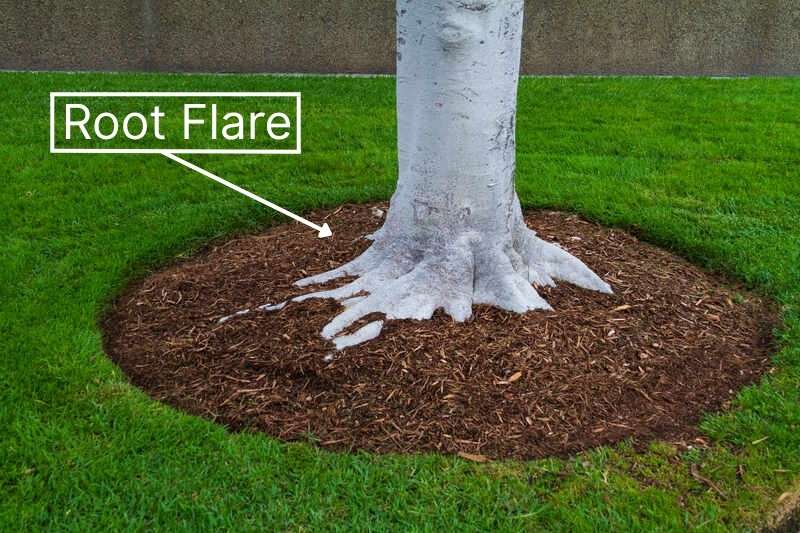
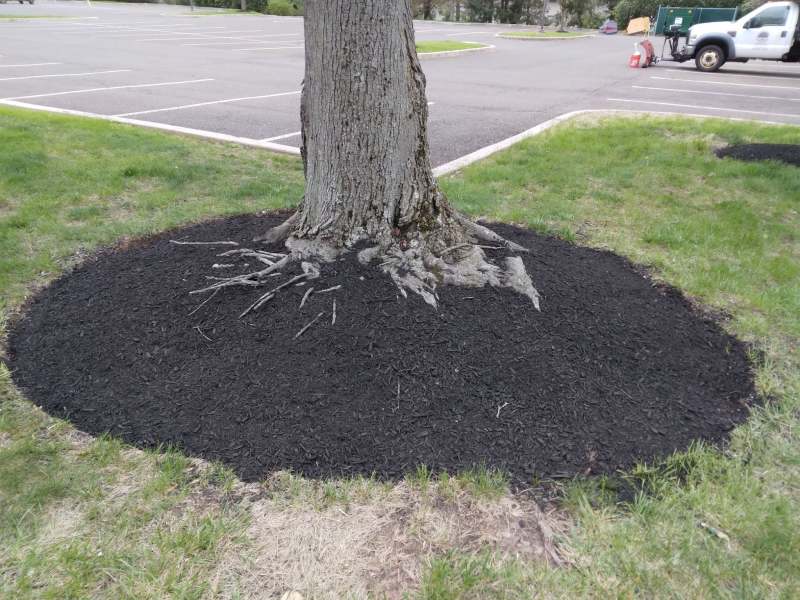
The root flare (or root collar) is where the trunk widens as it meets the primary roots. This critical area must remain visible and above the mulch line. Buried root flares cause girdling roots that eventually strangle the tree. Exposing them before mulching prevents this deadly problem.
If you can see the root flare (trunk visibly widens at soil level): Perfect, proceed to applying mulch.
If the trunk looks like a telephone pole (straight into the ground with no visible roots): The root flare is buried. Carefully excavate:
- Use a hand trowel to gently remove soil around the trunk base.
- Work in a circle, digging 2-4 inches deep.
- Stop when you see the trunk begin to widen (the flare).
- Remove soil until the top of major roots are visible.
When to call an arborist: If roots are buried more than 6 inches deep, hire a certified arborist with an Air Spade. This pneumatic tool removes soil with compressed air without damaging deeply buried roots.
Step 6: Apply Mulch in a Donut Shape
Now comes the actual mulching:
- Pour mulch into your prepared circle using a wheelbarrow.
- Spread evenly with a rake to 3-inch depth.
- Create the donut hole by pulling mulch back 3 inches from the trunk.
- Check depth with a ruler or your hand (about palm-width thick).
- Smooth the surface for a finished appearance.
Maintenance note: Refresh mulch every 6-18 months as it breaks down. Add more when depth drops below 2 inches or color fades significantly. Learn more in our guide on how often to replace mulch.
3 Common Tree Mulching Mistakes to Avoid
Even well-intentioned homeowners make these harmful mulching errors. Here’s what to watch for:
1. Volcano Mulching
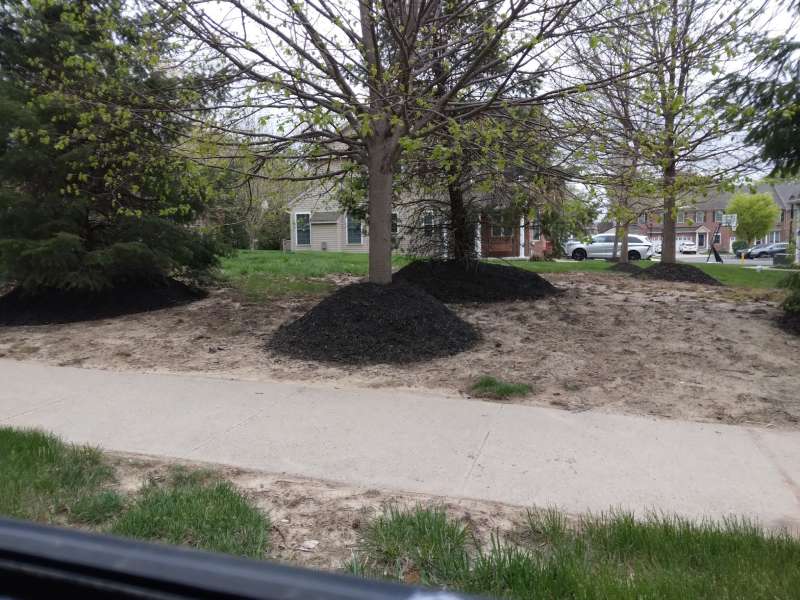
What it is: Piling mulch in a cone or volcano shape against the tree trunk.
Why it’s harmful: Buries the root flare and creates constant moisture against bark, leading to:
- Bark rot and decay
- Pest infestations (carpenter ants, termites, borers)
- Disease entry points
- Girdling roots growing around the trunk
- Premature tree death
How to fix it: Pull mulch back to create a 3-inch bare zone around the trunk, exposing the root flare completely. Reshape into a flat donut.
2. Over-Mulching
What it is: Applying more than 4 inches of mulch or repeatedly adding layers without removing old mulch.
Why it’s harmful:
- Suffocates roots by blocking oxygen
- Prevents water from reaching soil
- Encourages shallow root growth
- Promotes root rot and fungal diseases
How to fix it: Rake away excess mulch until you reach a 3-inch depth.
3. Stone or Rock Mulch Around Trees
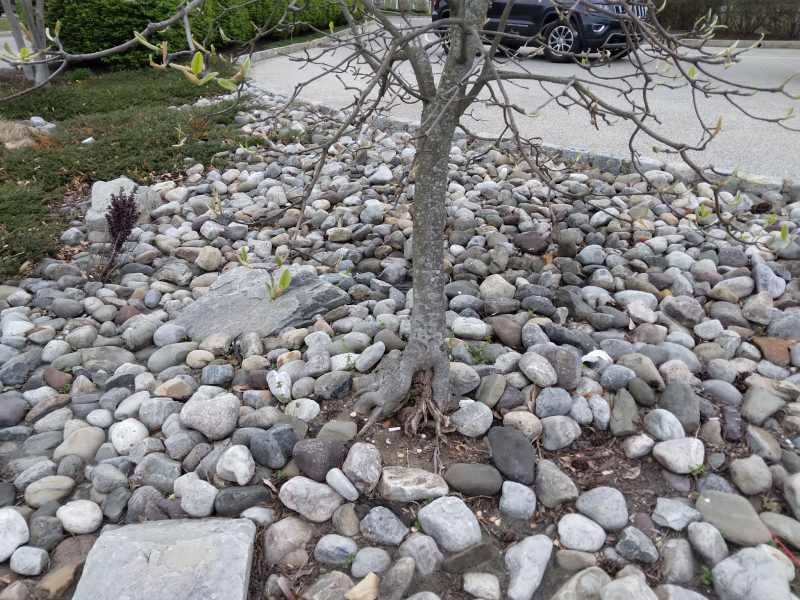
What it is: Using decorative stones, river rock, or gravel instead of organic mulch.
Why it’s harmful:
- Traps and reflects heat, stressing roots
- Provides zero nutrients to soil
- Increases water evaporation
- Shifts easily, damaging mower blades
- Makes future planting or root care difficult
Better alternatives: Stick with organic wood-based mulches that decompose and enrich soil. Save stones for pathways and non-planting areas.
Want professional help fixing mulching mistakes? LawnStarter’s landscaping pros can restore proper mulching around your trees and prevent future damage.
Special Mulching Situations
Trees with exposed roots: Spread 3 inches of mulch gently over surface roots to protect from temperature extremes and mower damage. Don’t add soil — use mulch only, and never pile against the trunk.
Newly planted trees: Create wider mulch rings (4 to 6 feet from trunk) to encourage root development. Expand the ring annually as the tree grows, and check weekly that mulch hasn’t shifted against the trunk.
Multiple trees close together: Create one large mulched bed rather than individual circles. This mimics natural forest conditions, is easier to maintain, and looks more cohesive. Maintain bare zones around each individual trunk.
Frequently Asked Questions About Mulching Trees
No, landscape fabric blocks water and air from reaching roots and prevents beneficial decomposition. Over time, weeds grow on top of the fabric anyway. Instead, apply pre-emergent herbicide to bare soil, then add 3 inches of mulch — this naturally suppresses weeds without blocking essential resources.
Spring (April-May) and fall (September-October) are ideal. Spring mulching conserves moisture during summer heat, while fall application insulates roots before winter. You can mulch anytime, but these seasons offer the best conditions and timing for tree health.
Get Professional Mulching Help
Proper tree mulching takes time and physical effort. If you’d rather ensure your trees get expert care without the work, LawnStarter connects you with top-rated local landscapers who know how to mulch correctly, avoid common mistakes, and keep your trees healthy. Get a free quote today.
Sources
- “How to Mulch the Trees the Right Way.” K-State Research and Extension Johnson County.
- “Proper Mulching Techniques.” Forestry Division of the Department of Public Works, Oak Creek, WI.
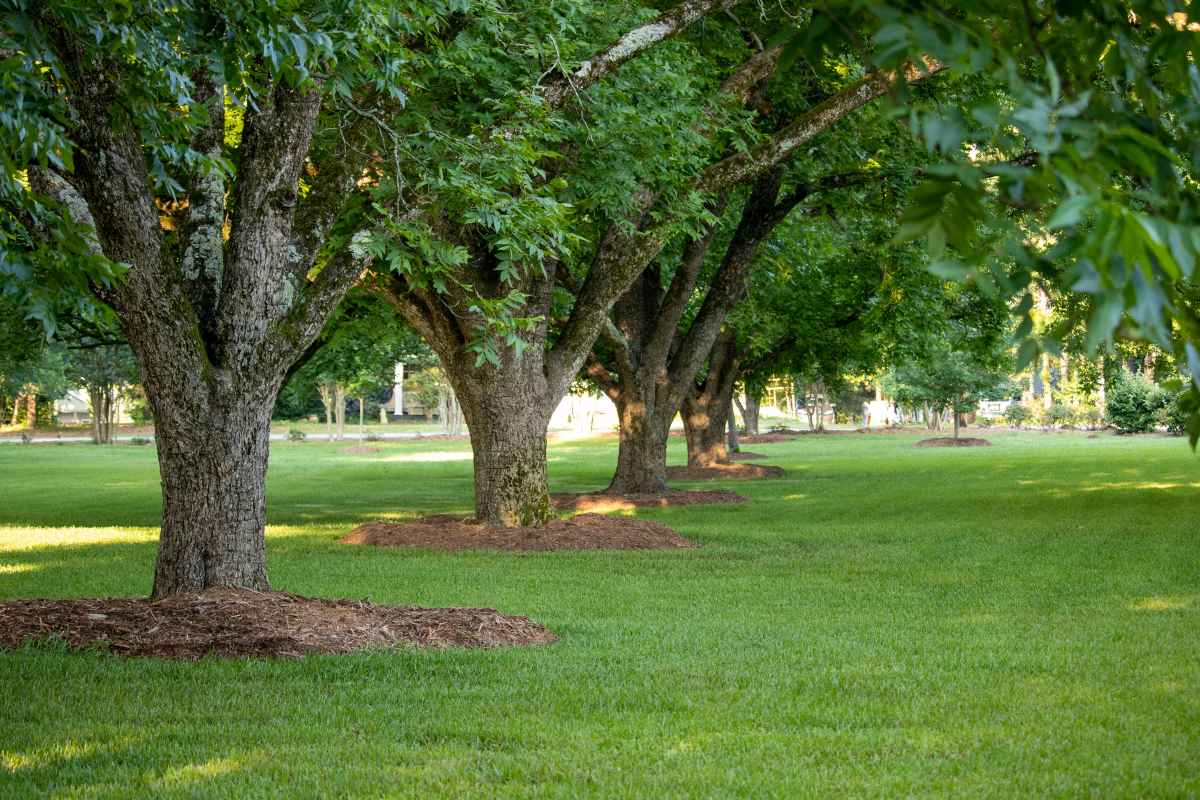
Main Image: A row of mulched pecan trees in a park. Image Credit: Jen Wolf / Adobe Stock