I’ll admit that at first the idea of backing a tree up against a wall, flattening it into a single plane occupying a mere few inches, and then training branches to grow outward instead of upward seemed rather silly. Why would anyone need to know how to espalier a fruit tree? Why wouldn’t you plant a tree with the intent of having it grow large and full?
And then, I started learning more about the art/practice of espaliering trees and may have spent some time in my backyard this morning scouting sections where I could try it myself! If you have no idea what an espaliered tree is, no worries. Many people don’t. In this case, an old practice dating back all the way to the ancient Egyptians is making a big comeback.
Espaliered trees — trees pruned to occupy just one plane — have come into favor again as homeowners and gardeners look for ways to grow trees in small spaces or create a living (and often delicious) fence or privacy screen. It is one of several advanced tree-training techniques collectively known as arborsculpture.
Basic Espalier Forms
There are a handful of basic espalier (es-PAL-yer OR es-pal-YAY) forms to choose from, with the following four the most commonly used. The forms vary in the amount of time and work it takes to create the desired shape.
The basic framework of simple designs may be established in three or four years, while intricate designs will take longer.
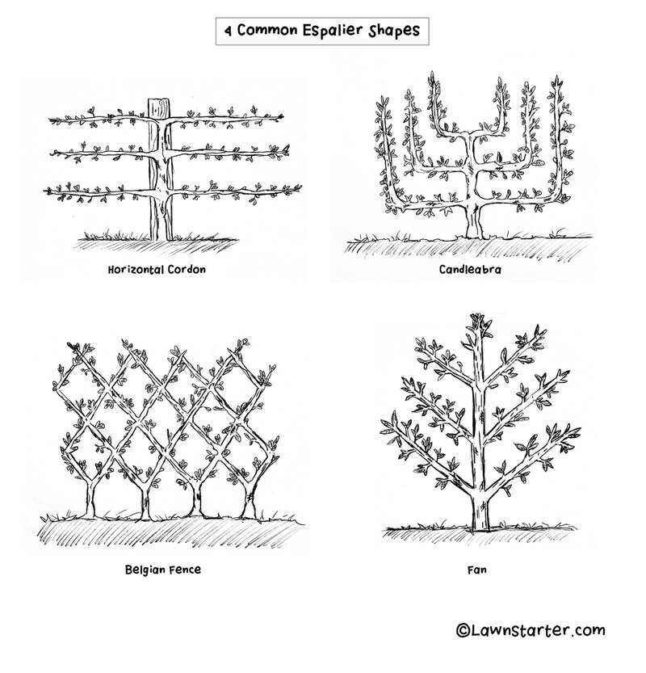
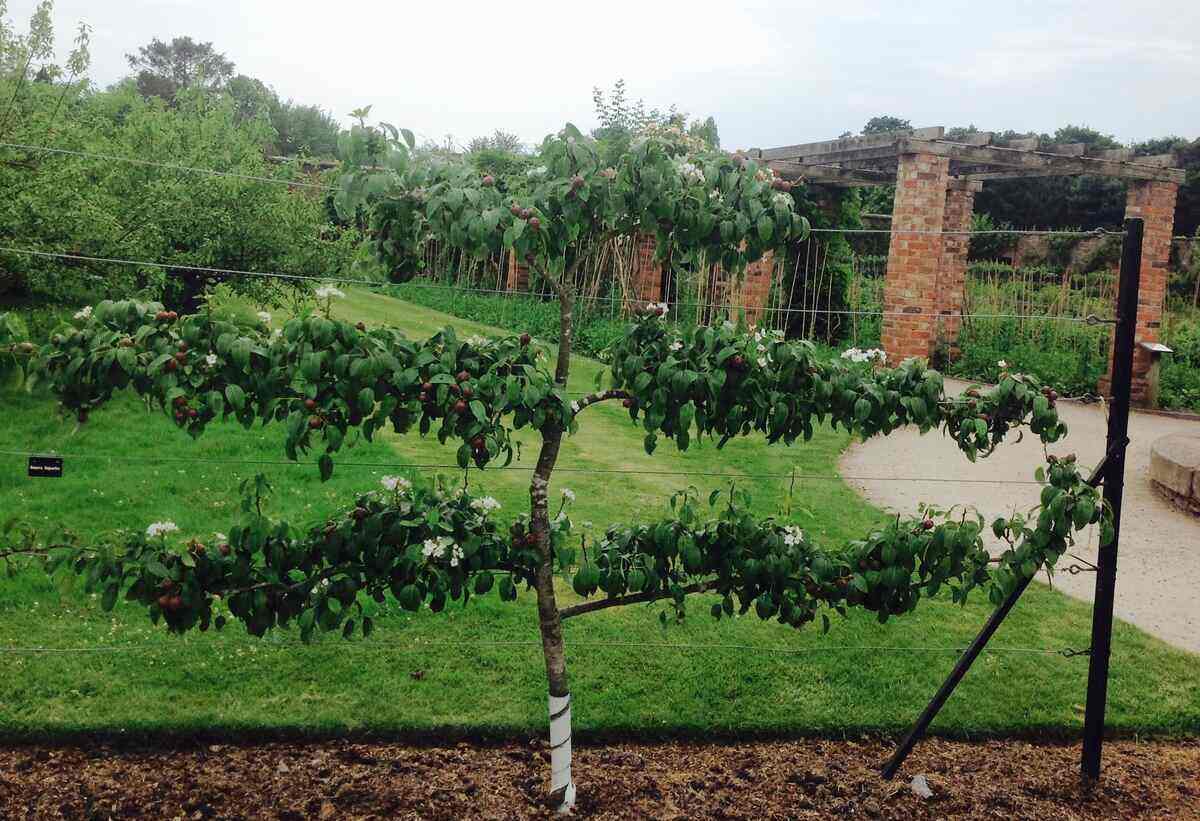
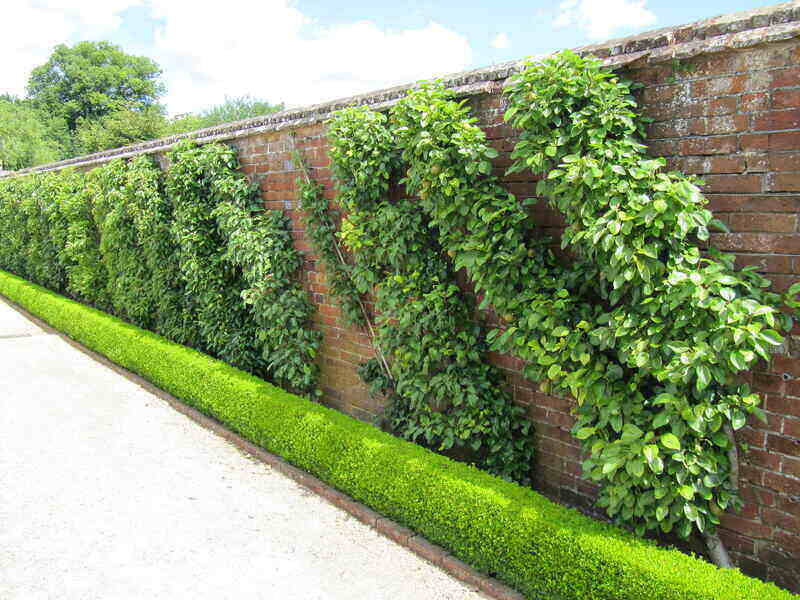
- Horizontal cordon: The most common framework, a central trunk is grown with lateral branches growing outward horizontally. A 3-tier design is the most common.
- Candelabra: A low horizontal branch comes off the central trunk, with vertical branches growing upward at regular intervals to create a candelabra shape.
- Belgian lattice: Also known as the Belgian fence, three or more V-shaped espaliers are woven together to create a lattice effect. The trees on either end are modified to maintain the intended finished edge.
- Fan: A central trunk has branches angling out at 45-degree angles to create a fan shape.
How to Espalier a Tree
Before you get started on espaliering a tree, it’s important to understand this process is time-consuming and takes a lot of time and dedication. These trees aren’t any less work than growing trees traditionally.
It’s best to start this process in early spring with a bare root specimen.
Choosing a Tree
Regardless of if you opt to espalier apple trees, another fruiting variety, or an ornamental, keep in mind a couple of things when purchasing a tree:
- When choosing trees, a dwarf tree or semi-dwarf variety works the best because of their naturally shorter stature. It’s also best to choose a fast-growing specimen as this will make the training process quicker and easier.
- Young saplings that are only 1 or 2 years old work best. Their limbs are still quite pliable compared to an older tree.
- If you are planting a fruit tree, opt for self-pollinating types of fruit trees if you are only planting one. If planting an apple, choose apple trees that are spur-bearing since they produce more fruit.
Selecting a Planting Site
Look for a spot in your yard that receives full sunlight at least 6 to 8 hours a day (more if you are planting a fruit tree), and has at least 6 to 8 feet of open linear space for your espalier design.
You want the soil to drain well, and optimally have a soil pH between 6.0 and 7.5.
Building a Support Structure
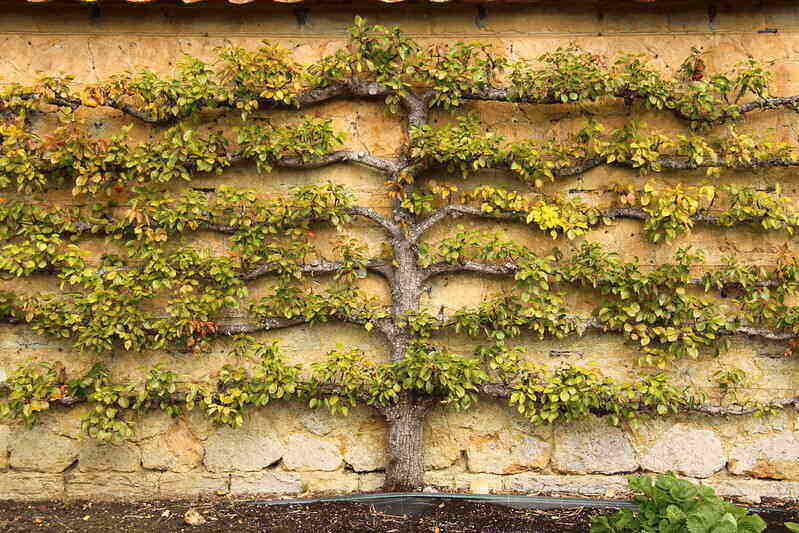
Photo Credit: Muffinn / Flickr / CC BY 2.0
In order to train your tree to grow in the desired shape, you need to have a support structure in place until the tree matures enough so the wood hardens. This support structure can be:
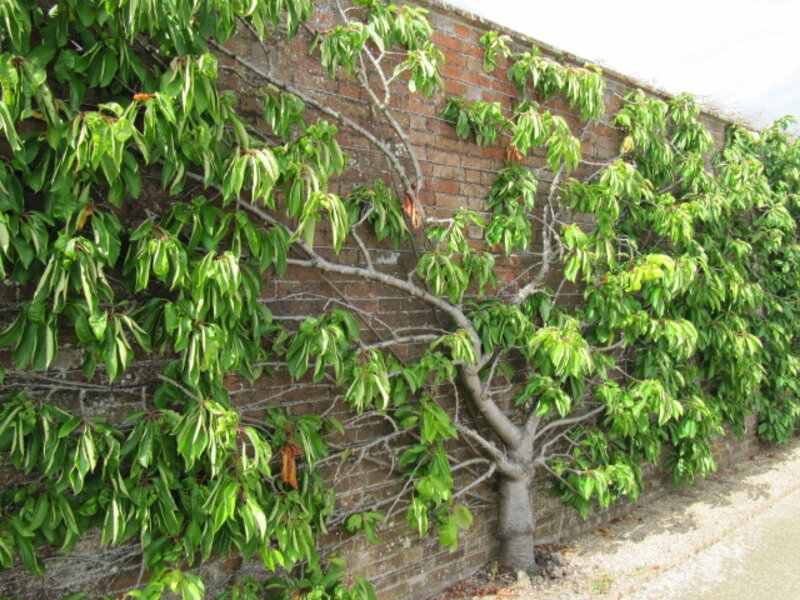
- Against a wall, typically brick or stucco as they are more resistant to weathering and damage than walls of your home that have vinyl or aluminum siding.
- Along an established fence, a pergola, or trellis, or trellises that are already in your yard.
- Across a structure composed of sturdy, free-standing posts and horizontal wires similar to how the majority of wine grapes are grown.
Before even planting your tree, this support structure needs to be constructed. As many homeowners choose to espalier trees against a wall or along a fence, the following directions are tailored to those two situations. I’m also going to describe how to build a 3-tier horizontal cordon, as they are the most common.
Equipment
To build the structure you will need:
- Measuring tape
- Pencil or chalk
- Drill with a 3/16” bit (masonry bit if you are building against a brick or stucco wall)
- 3/16” eye bolts (or wall mounts on masonry)
- 12-gauge wire
- Wire cutter
- Pliers
- Eye protection
- Heavy-duty gloves
Building the Structure
- Take measurements: Determine the approximate center spot of the open linear space in the intended location. Measure 4 feet up from the soil surface. Draw a line from the soil to the 4-foot point, using a pencil or chalk. This is where the central trunk of your tree will grow.
- Mark the tiers: Along this vertical line, make marks at 16-inch intervals to create three evenly spaced tiers. At the first 16” mark measure outward 3½ feet in both directions to create the first tier, marking these horizontal lines. Repeat for the second and third tiers.
- Install eye bolts along the center: Now that the basic outline is in place, don your eye protection and work gloves and break out the tools. Using your drill, install eye bolts along the central trunk at ground level and where each of the three tiers intersects.
Note: The opening on the eye bolts should be 4″ to 6” from the wall or trellis once installed. This allows the tree room to grow, promotes air circulation, and allows you to access the wall to perform maintenance if necessary.
- Install eye bolts horizontally: Again, using your drill, install eye bolts at each end of the three horizontal tiers.
- Thread wire through the bolts: Starting from the base of the central trunk, thread wire through the four eye bolts creating the vertical structure. Twist the wire using pliers at either end to secure it, and then snip with a wire cutter.
- Repeat the process to thread wire vertically, creating the individual tiers.
Planting Your Tree
Photo Credit: Malcolm Manners / Flickr / CC BY 2.0
After you have the support/wire structure in place you can go ahead and plant your tree. Here’s a quick tutorial on how to do so:
- Dig a hole that is slightly bigger than the root system on your tree, about 4 inches out from your structure. Using a sturdy digging shovel (I prefer one with a pointed center) if you can. Aim for a hole that is about two to three times as wide as the roots and only 2 to 3 inches deeper, regardless if you are planting bare-root or a container tree.
- Place the root ball in the planting hole so the graft union — the visible spot where the rootstock was grafted to the fruit tree — is slightly above the soil surface line. A good way to ensure this is to lay a piece of lumber, a bamboo cane, or a fence post across the top of the hole to give you a visual indicator of ground level when the hole is filled in.
- Begin filling in under the roots until it rests, unassisted, in the bottom of the hole. Once the tree rests in the hole, spread the roots out evenly and begin the process of filling in the rest of the hole.
- Gently tamp the soil down with your foot as you fill the hole in, trying to remove all air pockets, without compacting the soil around the roots. Create a slight bowl or depression as you reach the top of the hole to allow water to settle naturally around the tree. Make sure you do not mound soil up around the trunk.
Pro Tip: Water thoroughly throughout this process to ensure there are no air pockets.
How to Care for an Espaliered Tree
Train and Prune
Now that your tree is planted, it’s time to work on training your tree into your chosen espalier shape.
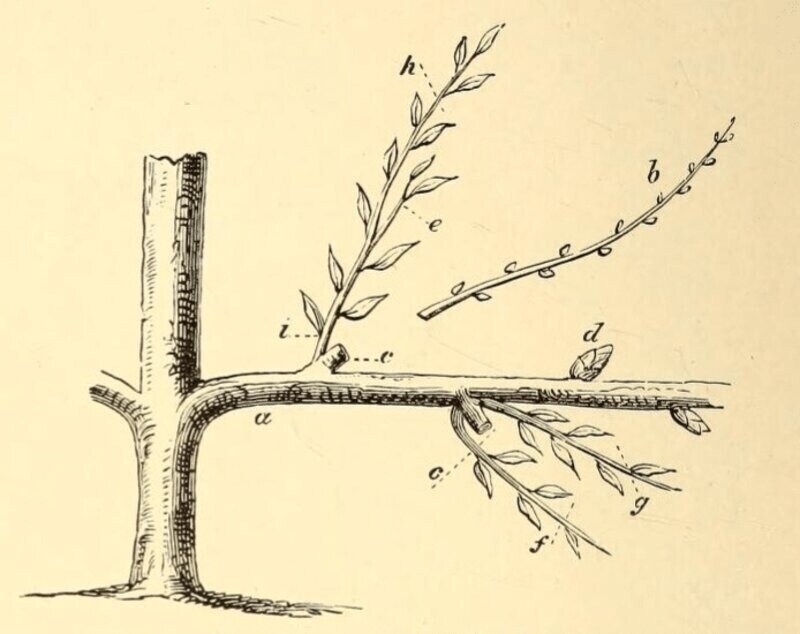
The principle behind espaliering a tree is simple: Plants have a main growing point or stem, known as a leader. If you remove this leader, shoots emerge from buds found on the sides of the stem, and below the cut.
You then choose the best side shoots to guide/train them to create the boughs of your espalier tree. The topmost shoot becomes the new leader and will eventually become the trunk. As the desired pattern emerges, you will want to regularly prune the new growth that takes away from your desired shape. You want to keep the plant low-growing.
5 Steps for Pruning an Espaliered Fruit Tree
The following instructions are for training and pruning a fruit tree such as an apple or pear tree.
- Attach the trunk of the tree to the vertical wire below the first tier using plant ties, rubber grafting bands, or stretchy strips of rags.
- Prune the center trunk about 1-2 inches above the first tier using a heading cut while making sure there are at least three buds below the cut.
- Select the two healthiest shoots to attach to the bottom-most horizontal tier as the tree comes out of dormancy the first year and begins to grow.
- Keep trimming the vertical growth of the tree to about 6 inches above the first tier to force horizontal growth until the horizontal branches grow to about three-fourths of the length of the support wires.
- Regularly remove suckers that grow straight up from the lateral branches. Prune off extra spurs, the stubbier shoots, leaving one every 6-inches. As the spurs grow, prune them so they only have three leaves.
- In the second year, you should have enough growth along the first horizontal tier to begin on the second. Allow the vertical trunk growth to come up above the second junction. Follow the same procedure you did with the first, training the two healthiest shoots along the support wire.
- In the third year, repeat the process to create the third tier.
- As your tree is growing, prune offshoots along the horizontal branches to about 4-5 inches in length. Prune any suckers (the new growth near the trunk of the tree) or water sprouts that grow. Prune off growth along the vertical trunk. Remove any fruit that develops during the first four years.
- Once your espaliered fruit tree reaches the desired height and width, switch to maintenance pruning. You want to keep your horizontal shoots at the proper length and any offshoots shorter to maintain separation between the tiers. Pruning the tips of the horizontal shoots will encourage more spurs to grow and develop fruit.
Water
How to water new fruit trees: Generally, new fruit trees should be watered heavily in the first few weeks after planting. Apply 2 to 5 gallons of water per tree each week. During the growing season, when there is less than one inch of rainfall, apply 5 gallons of water around the base of the tree every week.
Do not over-water young trees. Their roots are not yet established and they are more susceptible to flooding.
How to water 2 to 5-year-old fruit trees: Watering fruit trees that are 2 to 5 years old will depend on the type of soil, the type of tree, and the type of climate you live in. As a general rule, fruit trees in sandy soil need 2-3 inches of water every 10-14 days. If you have clay soil, 2-3 inches every 15-20 days should do the trick.
Pro Tip: For new and established trees, water slowly so that water penetrates the soil enough to soak into the roots.
Fertilize
How to fertilize fruit trees: Now that your fruit trees are well watered, you might decide it’s time to fertilize. But wait — not all trees need fertilizer. Some soils lack certain minerals while others have them in abundance (ex. phosphorus, potassium, magnesium, and boron). Before you go crazy with fertilizer, test your soil to get a better understanding of what it needs.
Aside from a soil test, there are many factors that determine how much and how often you should be fertilizing fruit trees, such as age and the previous year’s growth.
- If you fertilize when you plant your tree, pay attention to the growth over the next few years. If there is adequate growth on the tree, you won’t need to add any more fertilizer for a few years.
- A young fruit tree that isn’t old enough to produce fruit should be showing 15-30 inches of new growth each year. A tree producing fruit should be averaging 8-15 inches of growth a year. Anything less than this might warrant some fertilizer.
- For fruit trees that do need extra minerals, a balanced fertilizer should do the trick. Use 1 pound of fertilizer (10-10-10) for each year of a tree’s age (a 5-year-old tree should get 5 pounds of fertilizer).
Note: Do not exceed 10 pounds per tree.
When to fertilize fruit trees? If your soil requires fertilizer, apply in the spring. Don’t fertilize too late in the season, though, as this may lessen the tree’s winter hardiness. Always read the fertilizer label and plant information before fertilizing. If in doubt, contact your local Cooperative Extension office for more information.
Benefits of Espaliered Trees
It takes time and dedication to espalier a tree, but many believe it is well spent, as the end result is a beautiful, decorative accent in your landscape. An added bonus? If You choose to espalier a fruit tree, you can literally pick the fruits of your labor.
While it may seem counterintuitive to plant a tree and then prune it so you are only growing a limited “slice” of the canopy versus the whole tree, there are some prominent benefits to this type of arborsculpture.
- Bring fruit down to eye level, making it easier to harvest ripened fruit than a traditional tree.
- Take up far less space, so this is greatly beneficial for homeowners with small spaces or limited garden space.
- Create a microclimate: South-facing walls provide shelter from the elements. The wall also reflects heat throughout the day from the sun, generating a microclimate of sorts. This allows gardeners to plant trees that may be slightly out of their hardiness growing zone.
- Sunlight penetrates through the canopy more efficiently, leading to better fruit ripening.
What Fruit Trees Are Good for Espalier
Apple, crabapple, and pear trees are the typical choices but many fruit trees work well to espalier. Apple and pear are traditionally used because their fruiting spurs can produce fruit for many years and the branches are quite pliable when the trees are young, allowing you to train them into the espalier shapes.
The following cultivars are some of the more popular apple, crabapple, and pear trees.
Apple (Malus cv.):
- Arkansas black
- Red Delicious
- Golden Delicious
- Liberty
- Freedom
- Empire
Ornamental Crabapple (Malus cv.):
- White Cascade
- Prairiefire
- Golden raindrops
Pear (Pyrus cv.):
- Kieffer
- Magnus
- Bartlett
- Red sensation Bartlett
- Harrow’s delight
If you’re looking for fruit trees besides these options, the following also work well: pomegranate, fig, cherries, lemon, orange, tangerine, nectarine, apricots, plum, and peaches.
What Other Plants Are Good for Espalier?
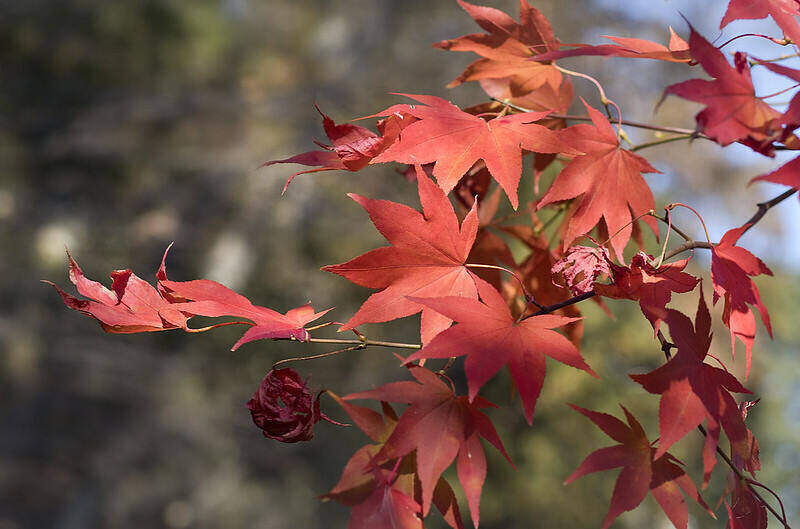
Photo Credit: C Watts / Flickr / CC BY 2.0
Sometimes people opt to go with a non-fruiting tree to espalier. Fortunately, almost any tree or ornamental shrub that has a climbing nature or long, pliable stems/branches can be espaliered against a trellis.
Some good ornamental choices include:
- Magnolia
- Rose of Sharon
- Bougainvillea
- Camellias
- Cotoneaster
- Forsythia
- Flowering quince
- Gingko
- Japanese maple
- Viburnum
FAQ About Espalier
Yes, all fruit trees can be espaliered. Fruit trees with fruit on long-lived spurs and easy-to-trim branches are easiest. Trees with naturally spreading branches work best as well. There are a few popular fruit tree options that are proven to work well in this form:
• Apple
• Pear
• Fig
• Peaches
• Cherry
• Pomegranate
If you can’t get enough of this space-saving method, here’s good news: Just about any flexible, woody plant with branches can be espaliered.
Technically yes, but it’s more difficult, and requires more time. It’s best to espalier when a fruit tree is in its first or second year. Older, more mature trees are difficult to train and shape. It can take up to three years to bend mature branches. Whether on young or older trees, espalier pruning can take 5-10 years to reach a finished design.
There are some espaliered apple trees still producing fruit after 150 years. When looked after properly, espaliered trees can have an incredibly long lifespan. The strong branches are less likely to break, which accounts for the tree’s longevity.
Having the branches so spread out also helps the airflow in the tree and, therefore, means fewer insect and disease problems. A spaced-out branch structure also makes finding and dealing with diseased branches faster and more manageable.
When to Call the Professionals
Fruit trees can look magnificent when espaliered. But nothing worth doing is ever easy. That’s no different with these beautiful, yet intricate, espalier designs. If you get to a point in this process where you have bitten off more than you can chew, consider calling in a tree care professional.
Even if you’ve gotten through the years of pruning and are finally able to enjoy the design you worked so hard to create, tree care can still be a pain. Let the pros deal with the upkeep while you enjoy the appearance and productivity of your espaliered fruit tree.
References
Solovchenko, A. E., Avertcheva, O. V., & Merzlyak, M. N. (2006). Elevated sunlight promotes ripening-associated pigment changes in apple fruit. Postharvest Biology and Technology, 40(2), 183-189.
Additional Sources: Fine Gardening, University of Wisconsin, University of Illinois, University of Florida
Main Image Credit: Ellen Thompson / Flickr / CC BY 2.0