Removing grass to reseed your lawn, create a new garden bed, or install hardscaping? A sod cutter is the fastest, cleanest tool for the job. What would take days with a shovel takes just hours with the right equipment.
A sod cutter slices horizontally through soil to remove grass and roots in manageable strips. The basic process: Prepare your lawn (mow, water, and mark), then guide the cutter in straight passes with the blade set to 1.5-3 inches deep.
This guide covers everything from choosing the right type of cutter to mastering the technique for your specific project.
| Once you’ve removed the old sod, LawnStarter’s landscaping pros can reseed, install new sod, or plant flowers in your landscaping beds — ensuring your project is completed right. |
- Which Type of Sod Cutter Do You Need?
- Essential Tools and Materials
- Pre-Cutting Preparation: 6 Steps for Success
- How to Use a Motorized Sod Cutter: Step-by-Step Instructions
- How to Use a Square-Edge Sod Cutter
- How to Use a Manual Kick Sod Cutter
- Tips for Cutting Sod on Slopes and Uneven Terrain
- When to Hire a Professional Instead
- Frequently Asked Questions About Sod Cutters
Which Type of Sod Cutter Do You Need?

Choose your sod cutter based on your project size:
| Cutter Type | Best For | Project Size | Rental/Purchase Cost |
| Square-Edge Spade | Small patches, lawn edging | Under 500 sq. ft. | $35-$80 to buy |
| Manual Kick-Plow | Medium areas, no gas needed | 500-1,000 sq. ft. | $20-$40/day rental; about $350 to buy |
| Motorized Walk-Behind | Most residential projects | 1,000-10,000 sq. ft. | $100-$140/day rental |
Quick Decision Guide:
- Removing grass around your mailbox: Square-edge spade
- Replacing 500 to 1,000 sq. ft. of damaged lawn: Manual kick-plow or small motorized
- Removing more than 2,000+ sq. ft.: Motorized walk-behind
- Clearing multiple acres: Hire professional landscapers
Important to Know:
- Square-edge spades are the most affordable but require significant physical effort — only practical for small areas.
- Manual kick-plow cutters are physically demanding and work best for smaller projects when you need a gas-free option.
- Motorized walk-behind cutters are the go-to choice for most homeowners — fast, efficient, and widely available at rental stores.
Essential Tools and Materials
Before you start cutting sod, gather these items:
Core Equipment:
- Sod cutter (rented or purchased based on project size)
- Lawn mower
- Garden hose or sprinkler system
- Tape measure
- Marking paint or chalk spray
- Rake for debris removal
Safety Gear:
- Safety glasses or goggles
- Heavy-duty work gloves
- Steel-toed boots or work boots
- Ear protection (for motorized cutters)
For Cleanup:
- Wheelbarrow for hauling sod strips
- Utility knife for cutting strips into manageable sections
Having everything ready beforehand prevents mid-project trips to the hardware store and keeps your workflow efficient.
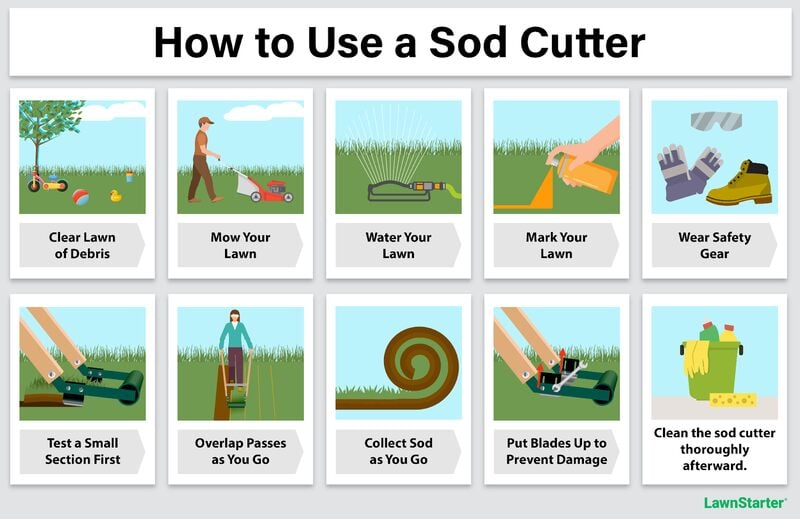
Pre-Cutting Preparation: 6 Steps for Success
1. Call 811 Before You Dig
Contact your utility marking service at 811 at least 2-3 business days before starting. They’ll mark buried lines at no charge. Hitting electrical, gas, or water lines poses serious hazards and can lead to expensive repairs.
My Tip: Call 811 at least a week before you want to cut sod. I needed something marked last summer, and the local service was booked almost 10 days out.
2. Clear the Work Area
Remove toys, rocks, sticks, and debris from your lawn. Even small stones can damage blades and become projectiles.
3. Mow Your Grass Short
Mow your lawn at the lowest deck setting 2-3 days before cutting. Shorter grass makes it easier to see your progress and reduces strip weight.
4. Water the Lawn Properly
Water 1-2 days before cutting, so the soil is moist but not muddy. The “screwdriver test” confirms ideal moisture: You should easily push a screwdriver 4-6 inches into the soil. Avoid cutting immediately after heavy rain.
5. Mark Your Cutting Area
Use chalk spray to outline the area you plan to remove. Mark straight, rectangular sections when possible. Also mark sprinkler heads and irrigation lines, being careful to avoid any utility lines marked by 811.
See Related: Types of Sprinklers for Your Lawn and Garden
6. Inspect Your Rental Equipment
Before leaving the rental yard, verify the blade isn’t damaged, check tire pressure and oil level, fill the gas tank, and test all controls. Ask for a demonstration if you’re unfamiliar with the model.
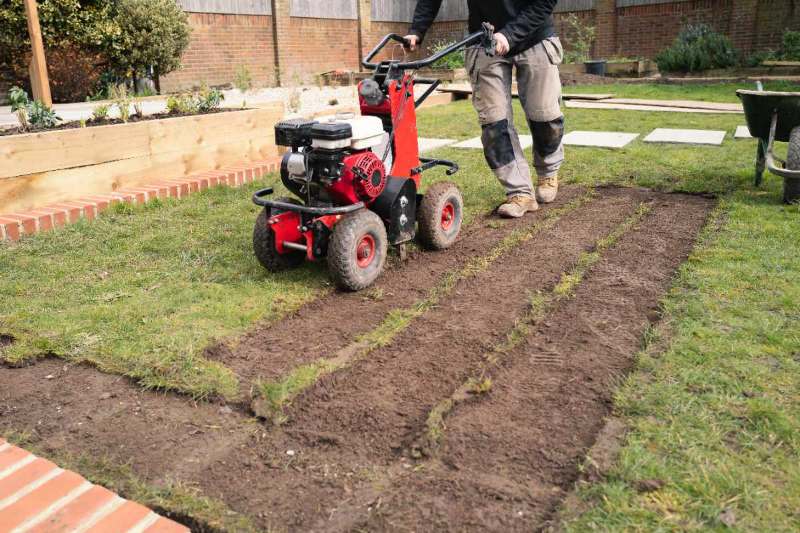
How to Use a Motorized Sod Cutter: Step-by-Step Instructions
Important: These are general instructions. Specific controls and start sequences vary by manufacturer.
Step 1: Position the Sod Cutter
Make sure the cutting blade lever and wheel drive lever/clutch are in the off or upward position, and the blade is raised. Push the machine to the starting edge of your marked area.
Step 2: Start the Engine
Most models follow this sequence:
- Open the fuel valve.
- Set the choke (fully closed for cold starts, open for warm engines).
- Turn the ignition switch to ON.
- Pull the starter cord smoothly until the engine catches.
- Adjust the choke to the run position once the engine warms up.
Let the engine idle for 30-60 seconds before engaging the blade.
Step 3: Set the Cutting Depth
Use the depth adjustment knob to set the blade between 1.5 and 3 inches deep:
- 1.5 inches for basic grass removal
- 2 to 2.5 inches if you plan to transplant the sod elsewhere
Note: The deeper you cut, the heavier each strip becomes, so find the shallowest depth that cleanly removes all grass and roots.
Step 4: Lower the Blade and Begin Cutting
Push the cutter blade handle forward toward the engine. Raise the main handle upwards so the front nose of the sod cutter rests on the ground. Lower the height adjustment bar to rest on the depth gauge.
As you lower the back of the machine so the blade rests on the ground, gently squeeze the throttle to cut into the sod. Release the throttle and engage the wheel drive. Now, squeeze the throttle and push forward slowly. The machine should begin cutting immediately.
After advancing 3-4 feet, disengage the wheel drive and inspect your cut. This test strip verifies your blade depth (should be 1.5-3 inches) and level cutting. The blade should glide smoothly beneath the grass without digging too deep or leaving roots behind.
Adjust settings before continuing with your whole area. (You’ll remove this test strip along with the complete pass once you reach the opposite end.)
Step 5: Complete Your First Full Pass
Once your test cut looks good, engage the wheel drive and push the throttle, continuing in a straight line until you reach the opposite end of your marked area. Keep a steady pace — rushing causes uneven cuts, while moving too slowly wastes time and fuel.
When you reach the end, raise the handles slightly to remove the blade and sever the sod strip from the uncut grass, and release the throttle.
Step 6: Remove the Sod Strip
Disengage the wheel drive and move the sod cutter out of the way. Roll up the cut sod strip (with the soil facing outwards), or use a utility knife to cut it into 3- to 5-foot sections. Place sections in a wheelbarrow and move them out of your work area.
Disposal Options:
- Compost the sod in a dedicated pile (grass-side down)
- Use it to fill low spots in your yard
- Offer it to neighbors for their landscaping projects
- Transplant it to bare areas if the grass is healthy
Step 7: Continue Row by Row
Move the sod cutter to the start of your next row and position it to overlap the previous cut by 2-3 inches. This overlap ensures you don’t leave strips of living grass between rows.
Repeat steps 5-6 until you’ve removed all the sod in your marked area.
Step 8: Shut Down Properly
When finished, disengage the wheel drive. Gently press the throttle and lift the handles so the blade cuts out of the sod, shaking off dirt and debris. Release the throttle and move the cutter blade lever to the off or upward position. Raise the height adjustment bar and turn off the engine.
Clean soil and grass debris from the blade and undercarriage before returning rental equipment.
Pro Tip: First-time projects typically take longer than expected. Rent for a full day to avoid time pressure.
How to Use a Square-Edge Sod Cutter
A square-edge sod cutter is simply a straight-edge spade that you can use to remove small sections of sod in your yard. Some even come with a foot pad that makes it easier on your foot as you push it into the soil.
The technique uses two motions: Angle the spade at 45 degrees to get under the sod, then push horizontally to separate it from the soil.
- Push the spade straight down, 1.5-3 inches deep, around the perimeter of your area.
- Starting at one edge, angle the spade approximately 45 degrees and push it into the ground with your boot to slide the shovel tip beneath the grass roots.
- Lower the handle so the blade is parallel to the soil surface, and push it horizontally in straight lines, keeping the blade 1.5-3 inches below the surface. Work in 12-18-inch wide strips.
- As you complete each strip, use the spade to pry up the loosened sod. Flip sections grass-side down and roll them up, or cut into 2-3-foot chunks for easier handling.
- Continue until all sod is removed.
How to Use a Manual Kick Sod Cutter
- Set the blade depth to 1.5-3 inches using the adjustment mechanism.
- Position the cutter at the edge of your work area.
- Kick the crossbar firmly with your boot (wear work boots, not sneakers).
- Continue kicking in a rhythm, advancing the blade forward.
- Listen for roots slicing with each kick.
- At the opposite end, raise the handles to sever the strip.
- Roll or cut the strip into manageable sections.
- Repeat for each row, overlapping by 2-3 inches.
Take regular breaks — this method is physically exhausting.
Tips for Cutting Sod on Slopes and Uneven Terrain
Wear Proper Footwear: Boots with excellent traction prevent slipping.
Use Four-Wheel Drive: When renting a motorized cutter, choose a 4WD model, if available, for better traction.
Cut from Top to Bottom: Work downhill for better control and less effort.
Work Slowly: Rushing on slopes increases the risk of losing control.
Adjust Depth Frequently: Uneven ground requires frequent depth adjustments.
| For steep slopes (over 15-20 degrees), consider hiring a professional landscaping service. |
When to Hire a Professional Instead
Consider hiring pros if:
- Your project exceeds 5,000 square feet
- You have steep slopes or complex terrain
- The work area has numerous utility lines or utilities close to the surface
- You need same-day removal and installation
Professional landscaping services typically charge $0.50-$2.00 per square foot for sod removal and disposal, including equipment, labor ($45 to $95 per hour), and cleanup.
When you factor in rental costs ($100-$140), as well as your time and labor, professional service often provides excellent value.
Frequently Asked Questions About Sod Cutters
Major equipment rental companies carry motorized sod cutters, including Home Depot, Lowe’s, United Rentals, Sunbelt Rentals, and local rental shops. Call ahead to check availability and reserve equipment, especially during spring and fall.
Most sod cutters can cut up to 2.5-3 inches deep, though some models reach 4 inches. For residential projects, set your blade between 1.5 and 3 inches. A 1.5-inch depth efficiently removes grass and roots without taking excess topsoil. Use 2-2.5 inches if transplanting sod, as the extra soil helps the roots survive the move.
Pro Tip: Avoid depths over 3 inches; they create heavy strips and remove valuable topsoil.
Freshly cut sod degrades within 24-48 hours, especially in warm weather. Replant the same day for best results. Keep sod in shade and mist lightly if delayed. Sod left in piles for over 2 days begins composting and can’t be transplanted.
Ready to Transform Your Lawn?
Using a sod cutter effectively requires the right equipment, proper preparation, and good technique. Whether you choose a motorized walk-behind model for an extensive lawn renovation or a simple square-edge spade for small patches, following the steps in this guide ensures professional-quality results.
Not ready to tackle this project yourself? LawnStarter’s professional landscaping experts handle sod removal and complete your project from start to finish — new lawns, garden beds, patios, and more. Get a free quote and let the pros do the heavy lifting.
Read Next:
- How to Use a Grass Tiller to Remove Your Lawn
- 4 Ways to Remove Lawn Grass
- How to Lay Sod (Step-by-Step Guide)
- When is the Best Time to Plant Grass Seed?
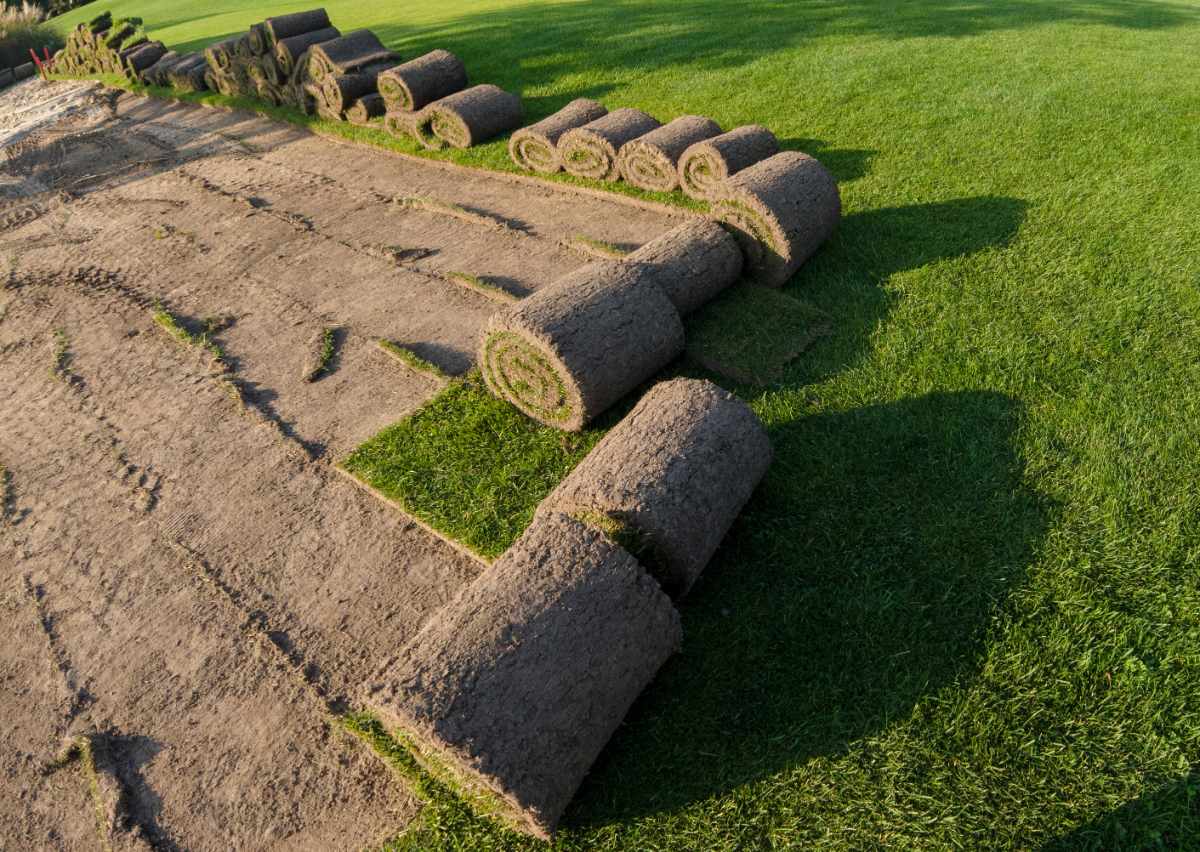
Main Image: Rolls of freshly cut sod on a lawn. Image Credit: riakhinantonUkraine / Adobe Stock