Training trees? You may have read that and had a sinking feeling because it’s one more project to add to your to-do list. Hear me out, though. Training a young tree significantly improves limb strength while encouraging vigorous growth and increased longevity. Which is well worth a little extra work if it means better tree health overall.
Thankfully, you don’t need to be an arborist to train trees. All you need is a basic understanding of the training systems (plus basic tree care) and a plan of attack.
What is tree training?
Tree training is a way to direct your tree into a specific shape as it grows, using selective pruning techniques and limb positioning to achieve the desired end result. The structure of the tree is altered in such a way that the resulting shape is incredibly beneficial for both you and the tree.
Benefits of Early Tree Training
While it is much easier to let a tree grow willy-nilly with no training, training it from an early age has many benefits besides making the tree more neat and attractive.
The biggest benefit of training a tree is that it creates a strong structure that improves the overall health of the tree. As the tree matures there is a reduced need for pruning and trees experience less storm damage since their branches are stronger and more resilient to winds.
The decrease in storm damage and a reduction in pruning as trees mature means there is less chance for pest or disease problems through open wounds.
Training fruit trees also encourages earlier fruit production.
What Types of Trees Can Be Trained
Deciduous trees — those that are adorned with leaves that fall off every autumn — are the most-commonly trained.
- Shade trees can be trained to develop strong, healthy trees that are aesthetically pleasing and look tidy.
- Fruit trees are usually trained to strengthen limbs, making them better able to support a heavy crop without limb breakage.
- Evergreen trees, on the other hand, are typically pruned to their desired shape versus training young trees.
3 Basic Tree Training Systems
There are a few different tree training systems to choose from and its best to decided on a system of training at the time of planting. This helps you put a plan in place, allowing you to get started with the process as soon as possible.
Keep in mind the tree species you are working with will aid in determining what type of tree shape you should try to achieve and how much work the project will take. Shade trees like oaks and sycamores form strong branching habits with minimal training; elm, crabapple, and fruit trees will require more time and effort to accomplish the desired shape.
The three main systems for tree training describe the resulting limb and trunk structure:
- Open center system.
- Central leader system.
- Modified central leader system.
1. Open Center Training System
Also known as vase-shaped, in the open center system the center of the tree is kept free of large branches or a main trunk and vigorous suckers and water sprouts are routinely pruned to allow sunlight to filter in through the center of the tree to reach the lower wood.
Commonly used on: Almond, apricot, cherry, fig nectarine, peach, plum, and prune trees; it is sometimes used for pear trees, apple trees, and pistachio trees.
2. Central Leader System
The central leader system trains trees to have a dominant upright branch (trunk) and then several scaffold limbs are trained to grow at an upward angle. This results in a triangular shape similar to Christmas trees. Sunlight reaches lower branches from the sides of the tree and between lateral branches. This system most closely resembles the natural upright growth habit of many trees.
Commonly used on: Apples, oaks, and sycamores and sometimes for pears, pecans, and quince — these trees naturally have a dominant central leader that lends itself to this type of training.
One drawback to using the central leader system occurs when training apple and pear varieties as many are susceptible to fire blight. Open center is preferred in case a major limb is lost to fire blight; the tree can be redeveloped more easily.
3. Modified Central Leader System
Sometimes referred to as a delayed open center system, the modified central leader training is a combination of the two aforementioned methods. Young trees are pruned and trained following the central leader method but after several main lateral branches develop the central leader is removed to create an open center.
Commonly used on: Commercial walnut and persimmon orchards and with elm and mulberry. This is due to the natural tendency of these trees to fork somewhere in the main trunk.
Special Tree Training/Pruning Systems
Above and beyond the three basic training systems above are more-advanced systems such as coppicing, pollarding, espaliering, pleaching, and pooktre.
Espaliering is when trees are trained to grow in two dimensions, often against a trellis or fence. It is a practice gaining popularity (again) with homeowners to save space or grow fruit trees in a small yard. The other advanced tree-training systems, collectively called arborsculpture, are functional or even artistic in nature.
Training a New Tree
Trees grow fairly slowly compared to other plants, so realistically expect this project to take a few years. Most of the training is done three to five years after planting if all goes well, with less work in the next couple of years. While the process is slow, it will be worth it in the end.
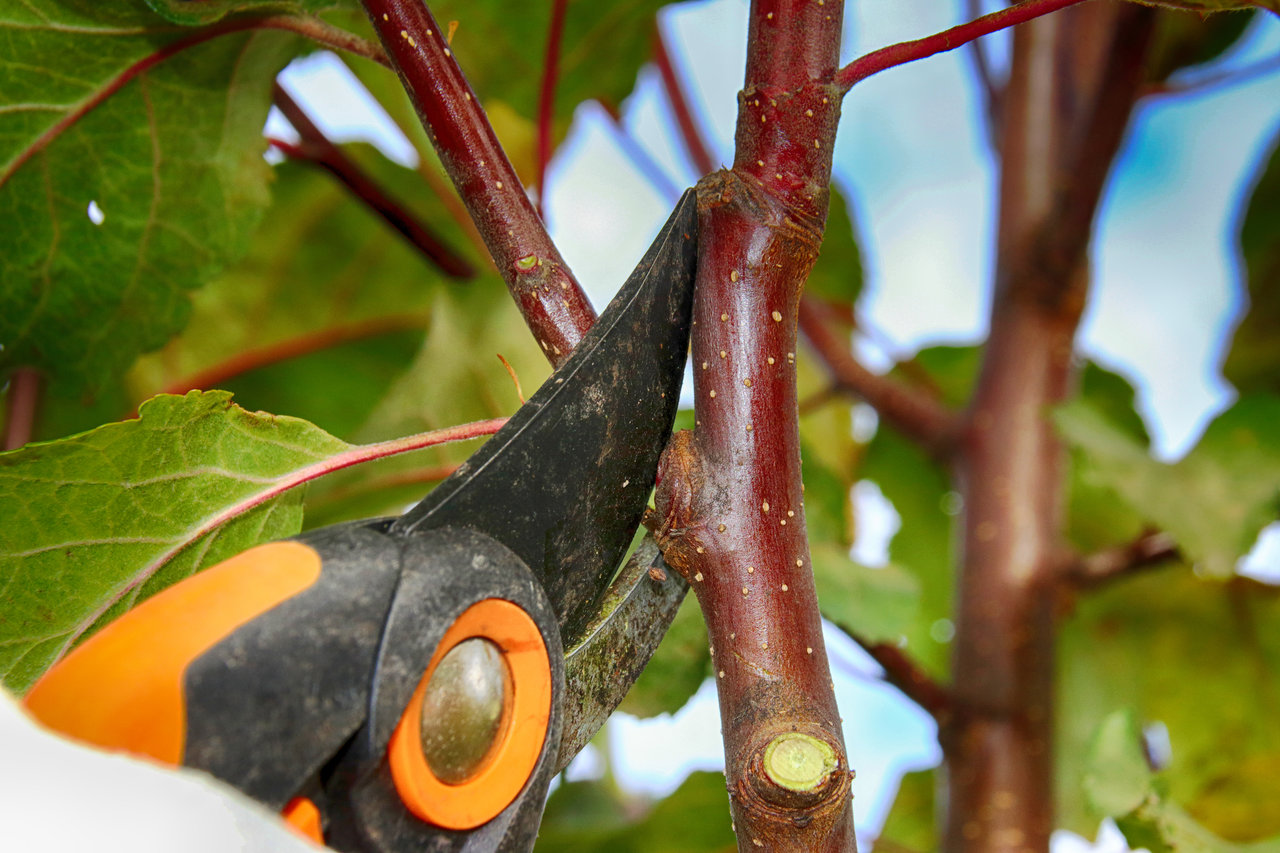
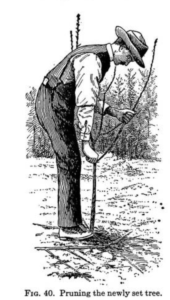
Regardless of the structure you hope to achieve, the first year when you plant the tree, the pruning methods will be the same. After planting, the rule of thumb is to prune your tree to a height of 30 to 36 inches; remove all dead or diseased wood and branches on the bottom 18-inches.
Open Center, Step by Step
Your end goal with an open center tree is to create a structure that has four main scaffold limbs even distributed around the trunk. Each of these limbs should have two to three side branches evenly spaced along them.
- The first dormant season after planting (spring is best) choose the three or four shoots that you want to form the main scaffold branches and remove the rest using thinning pruning cuts, taking the limb off just past the branch collar. Do not choose limbs that grow directly above one another and avoid upright tree branches that have upright, narrow crotch angles. If the first year of growth was poor head back those primary scaffolds to three or four buds to promote vigorous growth in the coming year. Tie or spread branches outward to create an appropriate crotch angle.
- In the second dormant season, you can choose another primary scaffold branch if you’d like. Remove any suckers or water sprouts that have formed on all limbs. Choose two or three secondary branches and head them back to 2 or 2½ feet to encourage tertiary branch development. Remove all other shoots on the primary scaffolds.
- When the third dormant season rolls around the main scaffold section should be complete. This season remove any competing branches (both primary and secondary scaffolds), all suckers and water sprouts, and prune off everything but two or three evenly spaced tertiary branches.
- In the following years continue on with routine tree pruning to remove any upright shoots that occur, use thinning cuts to reduce crowding, and maintain the tree at an appropriate height.
Central Leader, Step by Step
The goal with a central leader system is to create a tree that has three or four tiers of lateral branches, with about four branches per tier. Just like the open center system, these primary lateral branches should have two to three side secondary branches evenly spaced along them.
- The first winter after planting choose the best vigorous shoot high on the tree; this will become the main stem or central leader. Select three or four main scaffold branches you want to form the first tier. Using thinning cuts remove all shoots except the ones you’ve chosen for permanent branches and the leader; then head back the leader so it extends about 2 feet past that first tier. Tie or spread branches outward to create an appropriate crotch angle.
- The following dormant season, train the second tier of branches and again head back the central leader and remove any suckers or water sprouts. This second tier should be offset vertically above the first tier and spread to create good limb attachment angles. Choose two or three secondary branches on the previous tier of primary scaffolds and head them back to 2 or 2½ feet to encourage tertiary branch development; remove all other shoots on the primary scaffolds.
- In the third and fourth dormant season repeat the process again to create the subsequent tiers, depending on how many you’d like to achieve. Keep a pyramidal shape by keeping lower branches longer than upper branches and prune off everything but two or three evenly spaced tertiary branches on previously created tiers.
- In the following years continue to remove any suckers and water sprouts that form and begin a maintenance pruning schedule if you are growing fruit trees.
Modified Central Leader, Step by Step
With this system, follow the steps described for central leader training for the first three or four years, creating wide limb attachment angles to increase the crotch strength. Once the main scaffold branches have developed you can then remove the central leader to create the open center.
After that, continue with maintenance pruning as necessary.
5 Tips for Tree Training
- Start training as soon as you plant your tree.
- Incorporate limb positioning into the training; don’t rely solely on pruning to achieve the desired shape.
- Aim to create a crotch angle – the angle formed between the limb and trunk – between 45 and 60°. This point of attachment angle creates the strongest limb attachment. Young limbs can be spread apart from the trunk or pulled closer to it while they are still pliable.
- Prune primarily during the tree’s dormant season, preferably after the last freeze/frost date but before spring buds break open. Limit pruning during the growing season to removing dead or diseased branches.
- To achieve the desired shape in the shortest time possible, follow the training program consistently.
Main Photo Credit: Shutterstock