
Cutting a Christmas tree is a beloved holiday tradition that creates lasting memories. This guide walks you through every step of cutting your own tree, from measuring your space to safely transporting your tree home.
Pulling from my years of personal experience and advice from Christmas tree experts, our guide will help you cut down and bring home a beautiful, fresh tree to kick off your holiday season.
- Step 1: Size Up Your Space
- Step 2: Know Where You Can Cut
- Step 3: Take a Walk Through the Trees
- Step 4: Inspect Your Prospective Tree For Quality
- Step 5: Prepare Tools and Cutting Area
- Step 6: Get Into the Proper Cutting Position
- Step 7: Start the Cut Low to the Ground
- Step 8: Use Proper Sawing Technique
- Step 9: Complete the Cut Safely
- Step 10: Shake It Out
- Step 11: Get It Ready to Take It Home
- FAQ About Cutting Your Own Christmas Tree
| Project difficulty: Intermediate (requires physical exertion and mobility) Estimated time to complete: 1 to 3 hours Project cost: It costs $5 to $10 for a U.S. Forest Service permit and $5 to $20 for a Bureau of Land Management permit to cut your own; a bow saw runs $10 to $20. Tree farm prices vary depending on location and species, but on average, you’ll pay $10 to $15 per foot or $80 to $100 for an average-sized tree. |
Note: The instructions for cutting your own tree are similar whether you’re headed to a tree farm or out into the forest. The big difference is that farms offer more services.
Step 1: Size Up Your Space
Measure your ceiling height in the space where your tree will stand, along with the width of the area. Subtract the height of the tree stand, your ornament topper, and 6 to 12 inches of clearance.
Put these measurements in your phone, so you have them handy.
My Tip: Bring a tape measure with you to check tree sizes, as trees often look smaller outdoors than they will in your living room. Stick to the measurement you wrote down. A big tree is great, right until it doesn’t fit in your living room.
Step 2: Know Where You Can Cut
When you get to the tree farm, you’ll be told what trees you can cut. Many farms will tag available trees. Always be mindful and cut only tagged trees or trees from designated areas.
Many farms, like Western’s Tree Farm in Applegate, Michigan, operate on a rotational system. Scott and Jill Western, third-generation owners, plant trees in blocks. Each year, he opens 3 or 4 blocks for customers and tags the ones for sale.
On the other hand, at Coates Christmas Trees in Auburn, Washington, you can cut any tree you want, regardless of size or age. This system saves them time, because, as owner Jeff Coates says, tagging “a large amount (~3,500) of trees would be crazy.”
Most permits are purchased for a specific section of a National Forest or Bureau of Land Management-managed public lands. Make sure you check online or use an app like onX to verify where you can harvest a tree.

Pro Tip: The holidays often seem full to the brim with presents that will one day end up in a landfill, but cutting your own tree is incredibly environmentally friendly. Town & Country Gardens in Idaho Falls, Idaho, goes as far as to print sustainability facts on the back of their tree tags (see photo above), so customers can feel good about using a real tree.
Step 3: Take a Walk Through the Trees
Take your time and walk around, really looking at the shape, coloring, and fullness of a handful of trees.
My Tip: Head away from the crowds at farms. Trees near the entrance have already been picked over. You’ll find more selection farther back in the lot. When in the forest, get away from the road for the same reason. A little extra time spent walking is well worth it.
Step 4: Inspect Your Prospective Tree For Quality
With about 350 million trees growing on U.S. Christmas tree farms and billions on federal land, you want to make sure you select the perfect Christmas tree.
Angela French, nursery supervisor at Town & Country Gardens, advises that, “if there’s a tree that’s kind of more yellowish, then it just isn’t as healthy.” She also recommends you grab a branch and gently pull along the needles, towards you. If a bunch of green needles come off, the tree isn’t healthy.
Step 5: Prepare Tools and Cutting Area
Once you’ve made your decision, it’s time to get to work.
Before you start cutting, determine which direction you’d like the tree to fall. You’ll want to cut on the opposite side of the trunk. If the tree is on a hill, make sure you’re on the uphill side, and the tree will fall downhill.
Coates mentioned one of the biggest mistakes people make is not checking the saw’s sharpness before they start cutting (or before leaving home).
“People get a dull saw, and they’ll go out there, and then they push the tree over the last part of the way. Then they’re splitting it, right? And it takes a chunk out of the side of the tree, which … is going to dry it out much faster.”
Then, clear snow and debris away from the base of the tree. Have someone hold the saw for you, or set it down close to the trunk, with the teeth facing the tree.
My Tip: If the ground is snowy, muddy, or wet, spread a blanket or tarp to stay dry. No tarp? You can take your jacket off and lay it on the ground, lining face up. You’ll work up a sweat soon enough.
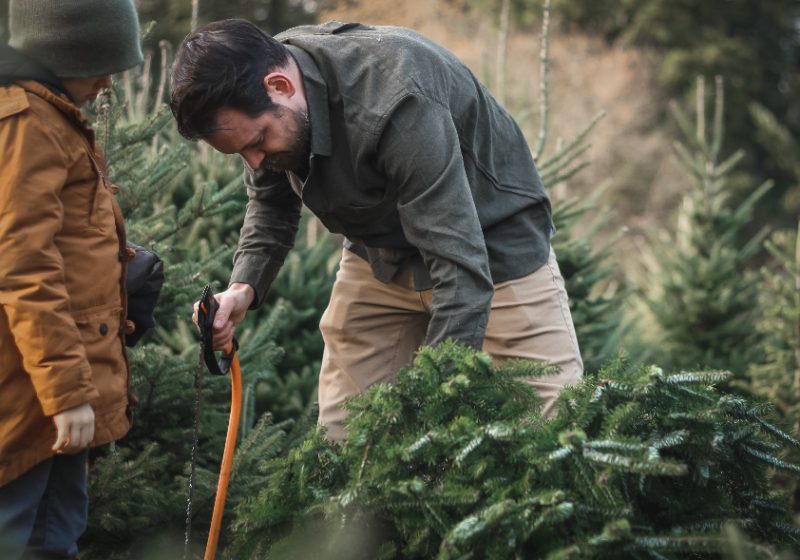
Step 6: Get Into the Proper Cutting Position
Kneel or lie on your side for the best cutting angle. Make sure you can comfortably reach the trunk, and there aren’t any obstacles that will prevent you from sawing.
Personally, I think it’s easier to saw when you’re kneeling, but it’s harder to get a good look at the trunk. To help you get a better view, you can always cut off a few of the lower branches. You’ll probably need them gone to get the tree into the stand anyway.
Use your free hand to grab the trunk for stability. Keep it well above the cut line and away from the saw blade.
Step 7: Start the Cut Low to the Ground

Start by making small, controlled strokes with the saw to create a groove in the bark about 2 or 3 inches from the ground. It will help keep the saw in the “track.”
You’ll pay for the height listed on the tree’s tag regardless of where you cut it. Don’t “take 10-foot trees and make a 5-foot tree out of it,” like Western’s customers used to do before they implemented the tag system.
Note: Per BLM and USFS guidelines, leave no stumps more than 6 inches high.
Step 8: Use Proper Sawing Technique
Keep consistent pressure on the saw and make long, smooth strokes. Maintain a steady rhythm and use the full length of the saw blade, so the saw does the work. Avoid making short, jerky motions.
Don’t worry if your cut isn’t straight. You can fix it once the tree is on the ground or before you put it in the tree stand.
If the saw starts to bind, have someone gently push the top of the tree away from you. This will open up the cut and relieve pressure on the blade.
Step 9: Complete the Cut Safely
The tree will likely fall before you cut all the way through the trunk. As you get closer to cutting through the trunk, slow down. Make sure your non-sawing hand (or someone else) has a firm grip on the trunk to help keep the tree from falling too soon and ripping the bark.
Ask a helper to guide the tree as it falls so it goes in the intended direction and doesn’t bounce or roll.
If needed, finish sawing once the tree is on the ground, then set the saw aside.
Step 10: Shake It Out
Before you start moving the tree, grab the trunk firmly and shake it up and down several times, or knock it on the ground to remove any loose needles and debris. This step is especially important if you’re cutting your own tree with a permit.
Remember that it’s normal to see dead needles fall off. Western says pine trees hold needles for about 2 years after they emerge, then drop them. Firs and spruce will hold needles closer to 5.
You’ll also see more dead needles on the lower branches. “The lower branches have been there longer,” reminds French. “You will have more empty space before you run into the good needles on the bottom of the tree.”
Step 11: Get It Ready to Take It Home
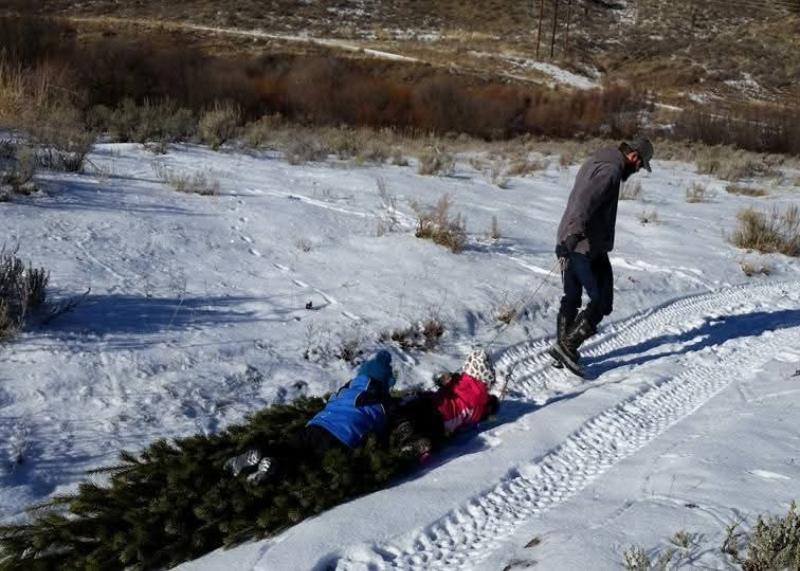
Now comes the fun part: getting it to the car!
Carry or drag the tree with the cut end forward and the top trailing behind.
My Tip: Put that tarp you laid on under the tree to help drag it if the ground is dry or snowy. Carry it if the ground is muddy. You can also bring a sled to help haul it.
Many tree farms offer mechanical shaking and wrapping, usually free of charge. Take advantage of these services.
At Coates’, they “bail all the trees and we shake all the trees unless the customer specifically says not to.” It’s so much easier to handle (all the trees the same) in the loading zone.”
Shaking will reduce needle drop, and wrapping protects the tree and your vehicle on the way home. (Obviously, none of these services are available when you’re out in the woods.)
French explains that they put each tree in a large plastic bag “to help keep the wind from drying it out as you drive home.”
Some places will also straighten the cut and may drill a hole in the trunk for your stand.
When tying the tree to the top of your vehicle, secure it with a sturdy rope or baling twine. Load it with the trunk facing forward to reduce wind damage. Again, if the farm offers to help tie the tree to the top of your car, let them. They know how to do it correctly and in a fraction of the time.
FAQ About Cutting Your Own Christmas Tree
Christmas trees are usually priced by height and variety, but costs vary depending on location. Cut-your-own farms are typically cheaper than pre-cut lots, and pre-cut trees from a big box store are usually cheaper than a tree farm.
Coates does things a little differently. He sells all his trees at one price, regardless of size or variety. He says they “decided to make it easier all the way around,” and “it makes a lot of people happy.”
The good news is that most farms don’t have formal age restrictions, so you can let your kids try their hand with the saw. But the job is strenuous and is best suited for teenagers or adults. No matter what, always follow the farm’s safety rules.
You’ll have to call the tree farm before you go, or ask when you get there, as every farm is different.
Western’s Tree Farm allows battery-powered saws but not gas-powered ones. “We figure if you bought the tool and have used it before, you’re (capable). It keeps the clients happy, and that’s our main goal.”
Your Christmas Tree Adventure Awaits
Now that you know how to cut and transport your perfect Christmas tree safely, you’re ready to create a memorable holiday tradition with family and friends.
At LawnStarter, we’re here to help with all your outdoor and seasonal needs, from selecting the right tree to caring for your lawn year-round. After the holiday passes, check out our guide on how to properly dispose of your Christmas tree through recycling and composting programs.
Sources
- “Forest Product Permit System.” U.S. Department of the Interior, Bureau Of Land Management.
- “Get Your Christmas Tree Permit.” Recreation.gov.
- Scott and Jill Western, 3rd-generation owners of Western’s Tree Farm, Applegate, MI. Personal interview.
- Jeff Coates, 1st-generation owner of Coates Christmas Trees, Auburn, WA. Personal interview.
- “Quick Tree Facts.” National Christmas Tree Association.
- Angela French. Nursery supervisor, Town & Country Gardens, Idaho Falls, ID. Personal interview.
Main Image: A family cuts a Christmas tree at a farm. Image Credit: soupstock / Adobe Stock